Small Scale Ceph Replicated Storage
Category : How-to
I’ve written a few posts about Ceph, how it works and how it’s set up and it mostly revolves around large scale storage for storing things like virtual machines. This post will focus on using Ceph provide fault tolerant storage for a small amount of data in a low resource environment. Because of this, the main focus has been moved away from performance and switched to:
- availability – the storage should always be available and recoverable in the event of disaster
- portability – the storage isn’t tied to a machine and can be moved with relative ease.
- scalability – more machines can use the storage as required.
This tutorial will focus on a small scale Ceph setup, fit for something like a Raspberry Pi or low resource VPS. We’ll use 3 machines but you could easily add more machines if your scenario requires it.
If you are looking for a larger setup, then see this blog post on installing Ceph.
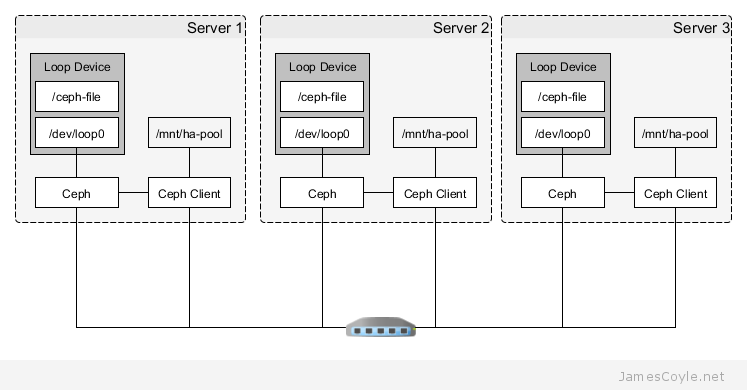
The above diagram shows the topology of the layout. Each machine will have a file /ceph-file that will be mounted as a block device on /dev/loop0 and that’s the space that will be assigned to Ceph. Ceph will replicate any data stored to the file and ensure the data is available to all Ceph clients. The Ceph storage will be accessed from a mountpoint at /mnt/ha-pool.
Ceph block device
The first step in creating a Ceph storage pool is to set aside some storage that can be used by Ceph. Ceph stores everything twice, by default, so whatever storage you provision will be halved. For this example we’re going to use a file created with dd as the Ceph storage device, however you could use a drive mounted in /dev/ if you have one. A whole drive is by far the preferred solution, however as I’ve stated, the main goal of this post isn’t just performance.
If you’re going to use a file for storage, follow my post on creating a block device from a file and mount it on loop0. Otherwise you can continue to the next step.
OpenVZ: if you’re using Ceph inside of an OpenVZ container, make sure you pass the loop device through to the container.
Installing Ceph
At this point it’s worth noting that Ceph, in addition to the application requirements, will use approximately 1MB of RAM for each GB of storage provisioned. This means that 1TB of provisioned storage (which in today’s world is rather small) would take 1GB of RAM plus the requirements of running the Ceph daemons. For our low memory footprint, only provision the storage that you’ll need.
Before starting the install, you’ll need a couple of things in place:
- SSH Keys are set up between all nodes in your cluster – see this post for information on how to set up SSH Keys. For security it’s good practice to set up a new user on all machines you’re going to install Ceph onto and use it to run Ceph. The key should also be copied to all machines using the ssh-copy-id command.
- NTP is set up on all nodes in your cluster to keep the time in sync. You can install it with: apt-get install ntp
The following commands are for installing Ceph on Debian (wheezy) and should be executed on all machines that need to run Ceph. In our example, these commands will be executed on Server 1, Server 2 and Server 3.
First let’s add the release key and repositories to the apt package manager. Run the following as root:
wget --no-check-certificate -q -O- 'https://git.ceph.com/git/?p=ceph.git;a=blob_plain;f=keys/release.asc' | apt-key add -
echo deb http://download.ceph.com/debian-firefly/ $(lsb_release -sc) main | tee /etc/apt/sources.list.d/ceph.list
Next let’s update our apt cache and install Ceph and a few other bits.
apt-get update && apt-get install ceph-deploy ceph ceph-common
Setup and configuring for minimal resource requirements
The next step should be done on just one of your Ceph machines. This will create the monitor service and make each machine aware of the other machines running Ceph.
The command references each machine you’re going to be running Ceph on by hostname or DNS entry. Before running the command, make sure that all of your machines resolve via DNS or hosts file. Because I’m only running this in a lab, I’ve used the hosts file route and added an entry to each machine in the hosts file of all Ceph machines.
vi /etc/hosts
Add your Ceph machine IP and hostnames.
10.10.10.1 ceph1
10.10.10.2 ceph2
10.10.10.3 ceph3
You can test that each machine can see the others by using the ping command. If it works then you should be in business!
ping ceph2
ping ceph3
Once you’re happy that all machines can reference the other machines then run the ceph-deploy command:
ceph-deploy new ceph1 ceph2 ceph3
If you haven’t used your ssh keys since setting them up you may be presented with the following warning. Just type yes to continue.
The authenticity of host 'ceph1 (10.10.10.1)' can't be established.
ECDSA key fingerprint is 66:44:a8:90:e2:8e:12:0e:05:4a:c4:93:a1:43:d1:fd.
Are you sure you want to continue connecting (yes/no)? yes
Warning: Permanently added 'ceph1' (ECDSA) to the list of known hosts.
We now need to configure Ceph with our low resource settings. These settings are not performance driven, but instead set to minimise system resources.
See ceph.conf for the script and add the content to the ceph.conf file
vi ~/ceph.conf
Create the initial mds daemons, monitor daemons and set the proper permissions on the keyring file.
ceph-deploy mon create-initial
ceph-deploy admin ceph1 ceph2 ceph3
ceph-deploy mds create ceph1 ceph2 ceph3

ssh ceph1 "chmod 644 /etc/ceph/ceph.client.admin.keyring"
ssh ceph2 "chmod 644 /etc/ceph/ceph.client.admin.keyring"
ssh ceph3 "chmod 644 /etc/ceph/ceph.client.admin.keyring"
Test Ceph is deployed and monitors are running
At this point it’s good to take a step back and check everything is up and running. We’ve still not assigned any storage to our Ceph cluster so we can’t run it yet, but we should have the monitor daemons running and the cluster configuration be deployed on all servers.
Run the below command and take a look at the output.
ceph -s
The output should show
cluster 51e1ddff-ff28-4f58-af7e-e94448e5324b
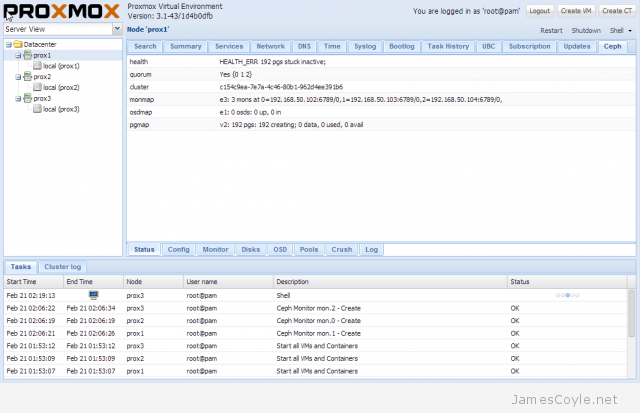
health HEALTH_ERR 192 pgs stuck inactive; 192 pgs stuck unclean; no osds
monmap e1: 3 mons at {ceph1=10.10.10.1:6789/0,ceph2=10.10.10.2:6789/0,ceph3=10.10.10.3:6789/0}, election epoch 6, quorum 0,1,2 ceph1,ceph2,ceph3
osdmap e1: 0 osds: 0 up, 0 in
pgmap v2: 192 pgs: 192 creating; 0 bytes data, 0 KB used, 0 KB / 0 KB avail
mdsmap e8: 1/1/1 up {0=web1=up:active}, 2 up:standby
As you can see, three Ceph servers are referenced on port 6789 which is the monitor daemon port number.
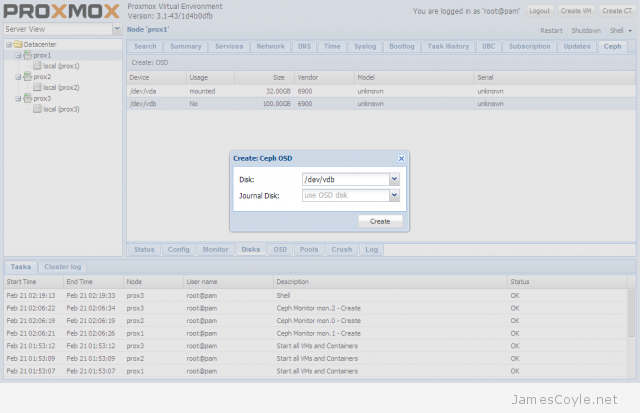
Add storage to the Ceph cluster
We’ve got our Ceph cluster, and we’ve got our storage device that we created as the first step, it’s time to put the two together. Run the below commands on the same machine that you ran the above steps on. You’ll need to replace /dev/sda with the block device on each ceph machines that you’d like to use. Note that the block device (sda) does not need to be the same on all machines.
ceph-deploy osd create --fs-type ext4 ceph1:/dev/sda
ceph-deploy osd create --fs-type ext4 ceph2:/dev/sda
ceph-deploy osd create --fs-type ext4 ceph3:/dev/sda
Or…
You can use a directory as storage for Ceph, rather than a block device.
If you’re following this tutorial and creating a loop device to use with Ceph then you’ll need to ensure there is a filesystem on the loop0 device and that it’s mounted. You can skip these next step if you are just using an existing directory.
Run the below commands (if you’re using a loop device) on each of the machines that has a loop device you’d like to use. We’re assuming that you’re loop device is loop0. For this example we’ll run it on each of the three machines; ceph1, ceph2 and ceph3.
mkfs.ext4 /dev/loop0
mkdir /mnt/ceph-backing0
echo "/dev/loop0 /mnt/ceph-backing0 ext4 defaults 1 1" >> /etc/fstab
mount /mnt/ceph-backing0
You can use a directory path on the Ceph machine as the OSD device. This may be an option if you’re in an OpenVZ or Docker container that doesn’t allow you to pass through block devices.
ceph-deploy osd prepare ceph1:/mnt/ceph-backing0
ceph-deploy osd prepare ceph2:/mnt/ceph-backing0
ceph-deploy osd prepare ceph3:/mnt/ceph-backing0
And then activate the storage:
ceph-deploy osd activate ceph1:/mnt/ceph-backing0
ceph-deploy osd activate ceph2:/mnt/ceph-backing0
ceph-deploy osd activate ceph3:/mnt/ceph-backing0
Mount a Ceph device as a folder
That’s the server side done! The last step to using our Ceph storage cluster is to mount the cluster to a mountpoint on the local filesystem. Here we’re going to use /mnt/ha-pool as the mount point but you can change that to whatever you’d like. Run these commands on any machines that you’d like to mount the Ceph volume on.
First create the mount point where the Ceph storage will be accessible from.
mkdir /mnt/ha-pool
Then we need to export the key so that the ceph-client can authenticate with the Ceph daemon. You could turn authentication off, or even create a non-admin user secret but for this tutorial we’ll just use the admin user.
ceph-authtool --name client.admin /etc/ceph/ceph.client.admin.keyring --print-key >> /etc/ceph/admin.secret
Then run the below command to add an entry to your fstab file so that the Ceph volume will be automatically mounted on machine start. This will mount the Ceph volume at /mnt/ha-pool.
echo "ceph1,ceph2,ceph3:/ /mnt/ha-pool/ ceph name=admin,secretfile=/etc/ceph/admin.secret,noatime 0 2" >> /etc/fstab
Finally run the mount command
mount /mnt/ha-pool
One last check to make sure you’re up and running:
df -h | grep ha-pool
10.10.10.1,10.10.10.2,10.10.10.3:/                    6G   3G   3G  54% /mnt/ha-pool
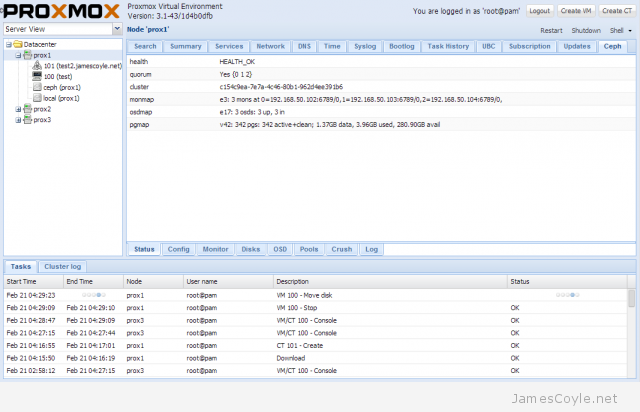
And that’s it! You have a working Ceph cluster up and running!
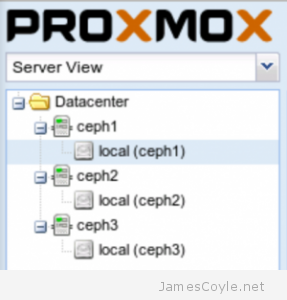 The rest of this tutorial will assume that you have three nodes which are all clustered into a single Proxmox cluster. I will refer to three host names which are all resolvable via my LAN DNS server; prox1, prox2 and prox3 which are all on the jamescoyle.net domain. The image to the left is what is displayed in the Proxmox web GUI and details all three nodes in a single Proxmox cluster. Each of these nodes has two disks configured; one which Proxmox is installed onto and provides a small ‘local’ storage device which is displayed in the image to the left and one which is going to be used for the Ceph storage. The below output shows the storage available, which is exactly the same on each host. /dev/vda is the root partition containing the Proxmox install and /dev/vdb is an untouched partition which will be used for Ceph.