Ceph Storage on Proxmox

Ceph Storage on Proxmox

Get Social!

ceph-logoCeph is an open source storage platform which is designed for modern storage needs. Ceph is scalable to the exabyte level and designed to have no single points of failure making it ideal for applications which require highly available flexible storage.

Since Proxmox 3.2, Ceph is now supported as both a client and server, the client is for back end storage for VMs and the server for configuring storage devices. This means that a Ceph storage cluster can now be administered through the Proxmox web GUI and therefore can be centrally managed from a single location. In addition, as Proxmox now manages the Ceph server the config can be stored in Proxmox’ shared file system meaning that the configuration is immediately replicated throughout the entire cluster.

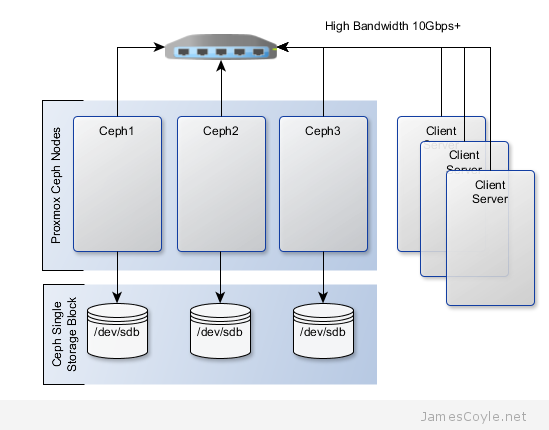
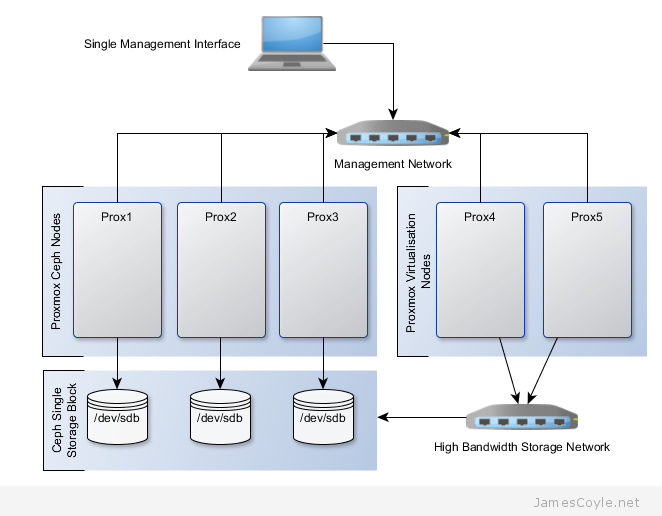
The below diagram shows the layout of an example Proxmox cluster with Ceph storage.

  • 2 nodes are used dedicated to running VMs and use the Ceph storage hosted by the other nodes.
  • Two networks are used, one for management and application traffic and one for Ceph traffic only. This helps to maintain sufficient bandwidth for storage requirements without affecting the applications which are hosted by the VMs.

ceph-infrastructure-proxmox

Before getting started with setting up the Ceph cluster, we need to do some preparation work. Make sure the following prerequisites are met before continuing the tutorial.

  • You have Proxmox cluster with the latest packages from the pvetest repository. You must have at least three nodes in your cluster. See How to set up a cluster.
  • SSH Keys are set up between all nodes in your cluster – Proxmox does this automatically as part of clustering but if you are using a different user, you may need to set them up manually.
  • NTP is set up on all nodes in your cluster to keep the time in sync. You can install it with: apt-get install ntp

promox-ceph-3-nodes
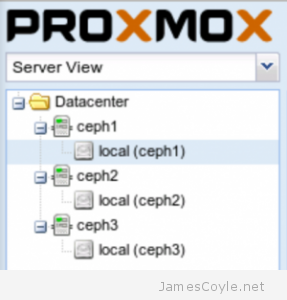
The rest of this tutorial will assume that you have three nodes which are all clustered into a single Proxmox cluster. I will refer to three host names which are all resolvable via my LAN DNS server; prox1, prox2 and prox3 which are all on the jamescoyle.net domain. The image to the left is what is displayed in the Proxmox web GUI and details all three nodes in a single Proxmox cluster. Each of these nodes has two disks configured; one which Proxmox is installed onto and provides a small ‘local’ storage device which is displayed in the image to the left and one which is going to be used for the Ceph storage. The below output shows the storage available, which is exactly the same on each host. /dev/vda is the root partition containing the Proxmox install and /dev/vdb is an untouched partition which will be used for Ceph.

root@prox1:~# fdisk -l | grep /dev/vd
Disk /dev/vdb doesn't contain a valid partition table
Disk /dev/mapper/pve-root doesn't contain a valid partition table
Disk /dev/mapper/pve-swap doesn't contain a valid partition table
Disk /dev/mapper/pve-data doesn't contain a valid partition table
Disk /dev/vda: 21.5 GB, 21474836480 bytes
/dev/vda1   *        2048     1048575      523264   83  Linux
/dev/vda2         1048576    41943039    20447232   8e  Linux LVM
Disk /dev/vdb: 107.4 GB, 107374182400 bytes

Now that I’ve set the scene, lets start to put together our Ceph cluster! Before using the new Proxmox web GUI you must run a few SSH commands to set up the initial Ceph instance.

Run the below command on all of the nodes which you will use as a Ceph server. This will download and set up the latest Ceph packages.

pveceph install

Create the Ceph config file by initialising pveceph. The Ceph config file will be created in your /etc/pve/ directory called ceph.conf. You should only run this on one node.

pveceph init --network 192.168.50.0/24

The next step is to set up the Ceph monitors for your cluster. So that you don’t have a single point of failure, you will need at least 3 monitors. You must also have an uneven number of monitors – 3, 5, 7, etc.

pveceph createmon

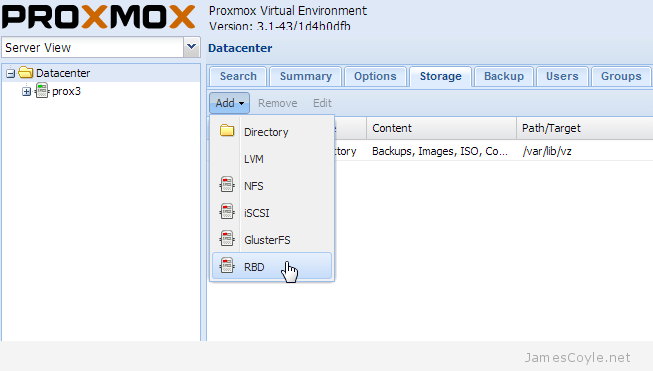
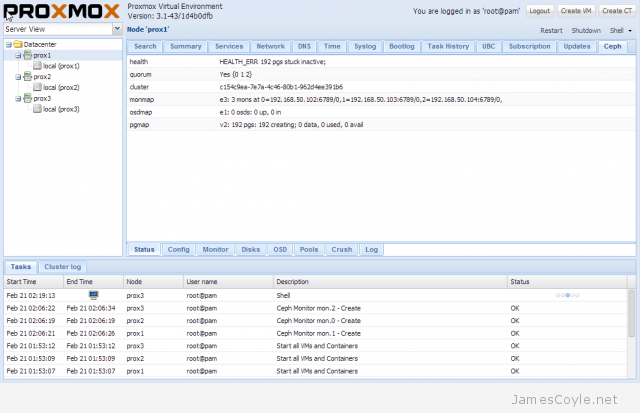
The rest of the configuration can be completed with the Proxmox web GUI. Log in to your Proxmox web GUI and click on one of your Proxmox nodes on the left hand side, then click the Ceph tab.

proxmox-ceph-status-tab

Next, you will add a disk to the Ceph cluster. Each disk creates to as an OSD in Ceph which is a storage object used later by the Ceph storage pool. Click on the Disks tab at the bottom of the screen and choose the disk you would like to add to the Ceph cluster. Click the Create: OSD button and click Create to create an OSD. Repeat these steps for each Proxmox server which will be used to host storage for the Ceph cluster.

ceph-create-osd

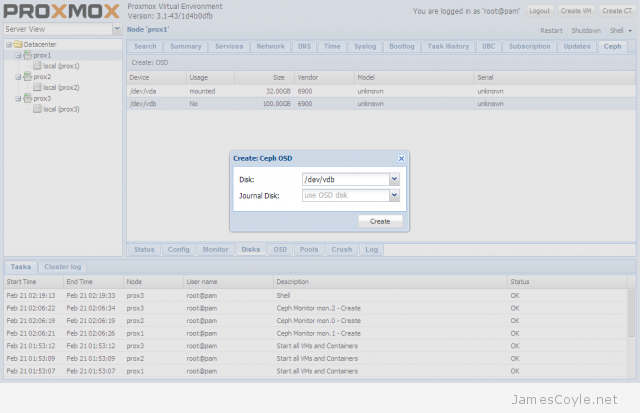
If the Create: OSD button is greyed out, it’s because the disk is not in a state where Ceph can use it. It’s likely because you have partitions on your disk. Run the fdisk command on the disk and press d to delete the partitions and w to save the changes. For example:

fdisk /dev/vdb

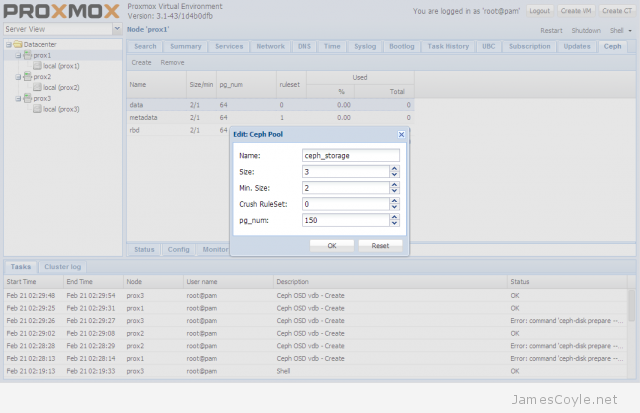
The last step in creating the Ceph storage cluster is to create a storage pool. Click the Pools tab and click Create. Enter the below values into the new Create Pool dialogue box:

  • Name: name to use for the storage pool.
  • Size: the number of replicas to use for a working cluster. A replica is the number of times the data is stored across nodes.
  • Min. Size: the minimum of replicas which can be used.
  • Crush RuleSet:
  • pg_num: this is the placement group count which you have to calculate based on the number os OSDs you have. To calculate your placement group count, multiply the amount of OSDs you have by 100 and divide it by the number of number of times each part of data is stored. The default is to store each part of data twice which means that if a disk fails, you won’t loose the data because it’s stored twice.For our example,3 OSDs * 100 = 300
    Divided by replicas, 300 / 2 = 150

ceph-create-pool

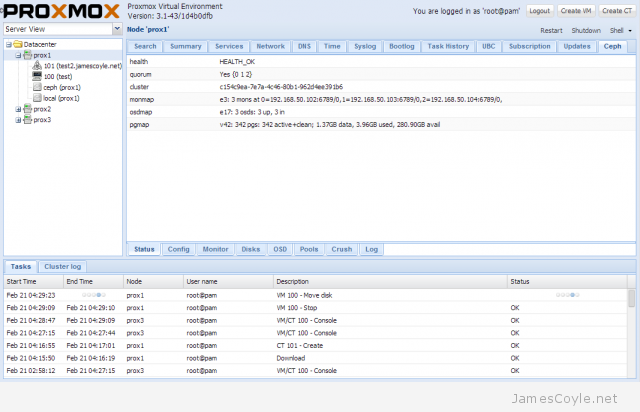
The Ceph storage pool is now set up and available to use for your KVM images. You can check the status of the Ceph storage pool by clicking on the Status tab.

ceph-status-screen

See my blog post on mounting Ceph storage on Proxmox.


Create a 3 Node Ceph Storage Cluster

Category : How-to

Get Social!

ceph-logoCeph is an open source storage platform which is designed for modern storage needs. Ceph is scalable to the exabyte level and designed to have no single points of failure making it ideal for applications which require highly available flexible storage.

The below diagram shows the layout of an example 3 node cluster with Ceph storage. Two network interfaces can be used to increase bandwidth and redundancy. This can help to maintain sufficient bandwidth for storage requirements without affecting client applications.

ceph-infrastructure

This example will create a 3 node Ceph cluster with no single point of failure to provide highly redundant storage. I will refer to three host names which are all resolvable via my LAN DNS server; ceph1ceph2 and ceph3 which are all on the jamescoyle.net domain. Each of these nodes has two disks configured; one which runs the Linux OS and one which is going to be used for the Ceph storage. The below output shows the storage available, which is exactly the same on each host. /dev/vda is the root partition containing the OS install and /dev/vdb is an untouched partition which will be used for Ceph.

root@ceph1:~# fdisk -l | grep /dev/vd
Disk /dev/vdb doesn't contain a valid partition table
Disk /dev/mapper/pve-root doesn't contain a valid partition table
Disk /dev/mapper/pve-swap doesn't contain a valid partition table
Disk /dev/mapper/pve-data doesn't contain a valid partition table
Disk /dev/vda: 21.5 GB, 21474836480 bytes
/dev/vda1   *        2048     1048575      523264   83  Linux
/dev/vda2         1048576    41943039    20447232   8e  Linux LVM
Disk /dev/vdb: 107.4 GB, 107374182400 bytes

Before getting started with setting up the Ceph cluster, you need to do some preparation work. Make sure the following prerequisites are met before continuing the tutorial.

You will need to perform the following steps on all nodes in your Ceph cluster. First you will add the Ceph repositories and download the key to make the latest Ceph packages available. Add the following line to a new /etc/apt/sources.list.d/ file.

vi /etc/apt/sources.list.d/ceph.list

Add the below entry, save and close the file.

deb http://ceph.com/debian-dumpling/ wheezy main

Download the key from Ceph’s git page and install it.

wget -q -O- 'https://ceph.com/git/?p=ceph.git;a=blob_plain;f=keys/release.asc' | apt-key add -

Update all local repository cache.

sudo apt-get update

Note: if you see the below code when running apt-get update then the above wget command has failed – it could be because the Ceph git URL has changed.

W: GPG error: http://ceph.com wheezy Release: The following signatures couldn't be verified because the public key is not available: NO_PUBKEY 7EBFDD5D17ED316D

Run the following commands on just one of your Ceph nodes. I’ll use ceph1 for this example. Update your local package cache and install the ceph-deploy command.

apt-get install ceph-deploy -y

Create the first Ceph storage cluster and specify the first server in your cluster by either hostname or IP address for [SERVER].

ceph-deploy new [SERVER]

For example

ceph-deploy new ceph1.jamescoyle.net

Now deploy Ceph onto all nodes which will be used for the Ceph storage.  Replace the below [SERVER] tags with the host name or IP address of your Ceph cluster including the host you are running the command on. See this post if you get a key error here.

ceph-deploy install [SERVER1] [SERVER2] [SERVER3] [SERVER...]

For example

ceph-deploy install ceph1.jamescoyle.net ceph2.jamescoyle.net ceph3.jamescoyle.net

Install the Ceph monitor and accept the key warning as keys are generated. So that you don’t have a single point of failure, you will need at least 3 monitors. You must also have an uneven number of monitors – 3, 5, 7, etc. Again, you will need to replace the [SERVER] tags with your server names or IP addresses.

ceph-deploy mon create [SERVER1] [SERVER2] [SERVER3] [SERVER...]

Example

ceph-deploy mon create ceph1.jamescoyle.net ceph2.jamescoyle.net ceph3.jamescoyle.net

Now gather the keys of the deployed installation, just on your primary server.

ceph-deploy gatherkeys [SERVER1]

Example

ceph-deploy gatherkeys ceph1.jamescoyle.net

It’s now time to start adding storage to the Ceph cluster. The fdisk output at the top of this page shows that the disk I’m going to use for Ceph is /dev/vdb, which is the same for all the nodes in my cluster. Using Ceph terminology, we will create an OSD based on each disk in the cluster. We could have used a file system location instead of a whole disk but, for this example, we will use a whole disk. Use the below command, changing [SERVER] to the name of the Ceph server which houses the disk and [DISK] to the disk representation in /dev/.

ceph-deploy osd --zap-disk create [SERVER]:[DISK]

For example

ceph-deploy osd --zap-disk create ceph1.jamescoyle.net:vdb

If the command fails, it’s likely because you have partitions on your disk. Run the fdisk command on the disk and press d to delete the partitions and w to save the changes. For example:

fdisk /dev/vdb

Run the osd command for all nodes in your Ceph cluster

ceph-deploy osd --zap-disk create ceph2.jamescoyle.net:vdb
ceph-deploy osd --zap-disk create ceph3.jamescoyle.net:vdb

We now have to calculate the number of placement groups (PG) for our storage pool. A storage pool is a collection of OSDs, 3 in our case, which should each contain around 100 placement groups. Each placement group will hold your client data and map it to an OSD whilst providing redundancy to protect against disk failure.

To calculate your placement group count, multiply the amount of OSDs you have by 100 and divide it by the number of number of times each part of data is stored. The default is to store each part of data twice which means that if a disk fails, you won’t loose the data because it’s stored twice.

For our example,

3 OSDs * 100 = 300
Divided by replicas, 300 / 2 = 150

Now lets create the storage pool! Use the below command and substitute [NAME] with the name to give this storage pool and [PG] with the number we just calculated.

ceph osd pool create [NAME] [PG]

For example

ceph osd pool create datastore 150
pool 'datastore' created

You have now completed the set up for the Ceph storage pool. See my blog post on mounting Ceph storage on Proxmox.


Manually Mount a Ceph Storage Pool in Proxmox

Get Social!

ceph-logoThe latest BETA of Proxmox, and soon to be released 3.2 comes with the Ceph client automatically installed which makes mount Ceph storage pools painless.

You can mount the Ceph storage pool using the Proxmox web GUI.

You may need to copy the Ceph storage pool keyring from your Ceph server to your Proxmox server. If you use authentication on your Ceph storage pool, log in to your Ceph server via SSH. Run the below scp command to copy your Ceph keyring to your Proxmox server. You will need to replace [PROXMOX_SERVER] with the host name or IP address of your Proxmox server and [STORAGE_NAME] is the name you will use for your Proxmox storage mount which will be used in the web GUI.

scp /etc/ceph/ceph.client.admin.keyring [PROXMOX_SERVER]:/etc/pve/priv/ceph/[STORAGE_NAME].keyring

For example

scp /etc/ceph/ceph.client.admin.keyring prox3.jamescoyle.net:/etc/pve/priv/ceph/ceph_storage.keyring

To use the Proxmox GUI to mount a Ceph storage pool, login to the web GUI and click on the Datacenter folder in the top left, then click the Storage tab, Add and finally RBD.

proxmox-add-ceph-rbd

Enter the details of your Ceph storage pool in the new dialogue box which appears.

  • ID: the name which this storage mount will have in Proxmox. If you use authentication on your Ceph server, you will need to use the same name as the above  [STORAGE_NAME] field.
  • Pool: the Ceph storage pool name.
  • Monitor Host: the host or IP addresses of your Ceph monitor servers. You can enter a single host or multiple hosts separated by a semicolon [;].
  • User name: the named use to use when connecting to the Ceph storage pool. If you are not using user authentication, set this to the below value.
    admin (optional, default = admin)

proxmox-ceph-add-rbd

Don’t forget to make sure that the Proxmox host can reach the remote Ceph monitor hosts – by default a Ceph monitor runs on port 6789.

proxmox-ceph-storage-mount-rbd


Proxmox bind mount for OpenVZ – mount storage in a container

Category : How-to

Get Social!

proxmox logo gradYou can allocate storage to an OpenVZ container during creation, when the container is offline and even when the container is active. The main problem with this is that it is not shared, and has to be on the same storage which the container was created on.

You can mount any folder which is available to the host operating system in any container. You can also mount the same storage in multiple containers.

Before you begin, make sure the storage is mounted and usable on the host file system. For this example, we are going to use a disk which is mounted on the host at /mnt/binaries.

On the host, locate where your OpenVZ container config files are stored. On a standard Proxmox installation, this is /etc/vz/conf/. 

cd /etc/vz/conf/

Create a file with the naming convention [VMID].mount. This will be the file which is executed each time the container is started as part of the boot process. This example will assume the container is using VMID 270.

vi 270.mount

Add the below content to this file making the two changes; [HOST FOLDER] should be replace with the location on the host to use for storage in the container and [GUEST FOLDER] which will be the folder on the guest container where the storage will be available. The location on both the physical host and virtual guest must exist when the container is started. 

#!/bin/bash
. /etc/vz/vz.conf
. ${VE_CONFFILE}
SRC1=[HOST FOLDER]
DST1=[GUEST FOLDER]

mount -n -t simfs ${SRC1} ${VE_ROOT}${DST1} -o ${SRC1}

The below example makes /mnt/binaries on the host available at /mnt/vm_binaries on the guest.

#!/bin/bash
. /etc/vz/vz.conf
. ${VE_CONFFILE}
SRC1=/mnt/binaries
DST1=/mnt/vz_binaries

mount -n -t simfs ${SRC1} ${VE_ROOT}${DST1} -o ${SRC1}

To create multiple bind mounts, edit the below example.

#!/bin/bash
. /etc/vz/vz.conf
. ${VE_CONFFILE}
SRC1=/mnt/binaries
DST1=/mnt/vz_binaries
SRC2=/mnt/homes
DST2=/homes
SRC3=/mnt/backups
DST3=/mnt/vz_backups

mount -n -t simfs ${SRC1} ${VE_ROOT}${DST1} -o ${SRC1}
mount -n -t simfs ${SRC2} ${VE_ROOT}${DST2} -o ${SRC2}
mount -n -t simfs ${SRC3} ${VE_ROOT}${DST3} -o ${SRC3}

If you have many mounts something more elegant could be created however, generally speaking, only a few mount points are required per guest meaning that this brutish script is perfectly adequate.

These settings will require a restart of your container as the scripts are only applied on container start up.


Visit our advertisers

Quick Poll

How many Proxmox servers do you work with?

Visit our advertisers