Author Archives: James Coyle

Windows Has Symbolic Links And It’s Called mklink

Get Social!

A symbolic Link is a reference to a file which is stored in another location to make a file or folder accessible from that location. For example, if you have a directory in c:\Users\James and wanted to make that accessible from c:\James you could create a symbolic link of c:\Users\James to the location c:\James which would mean anything stored in c:\Users\James such as test.txt would be accissible from c:\James\test.txt.

This has been available in Linux since the dawn of time and is one of the common file system functions. It’s used as standard by Apache2 on Ubuntu to enable or disable site config files. What you might not know, however, is that symlinks are available on Windows and have been for some time. In Windows symlinks are created using a command line application called mklink.

mklink-command-prompt

A link works exactly like the object is actually in that location; it’ll show in Windows Explorer, and CMD prompt and all Save As dialogues.

Create an mklink

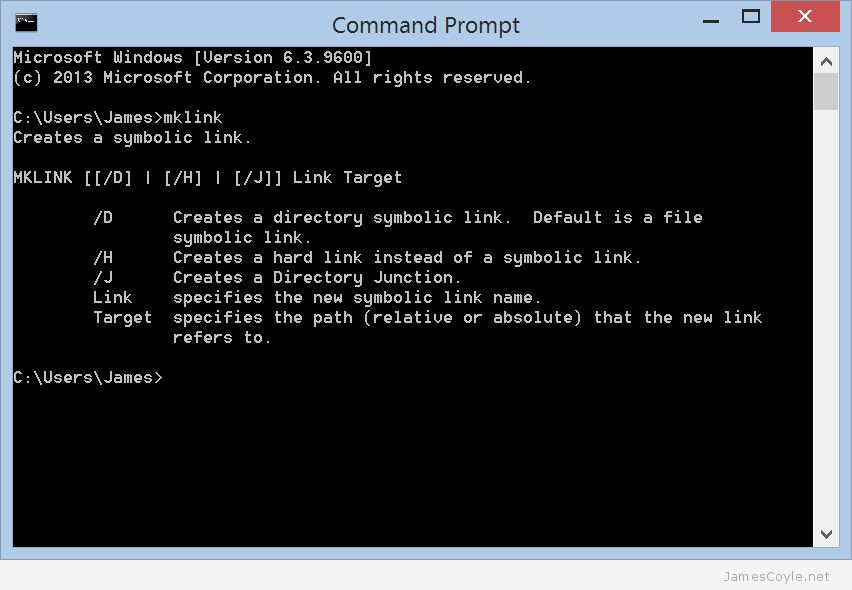
To create a directory link you’ll need to open a command prompt and use the mklink command as below with your values substituted.

mklink /j [linkname] [target]
  • [linkname] is the new object that will be created on the file system to point to your [target] location.
  • [target] is the file system location of the file or directory that you would like to link to.

You can think of this process in a similar way to creating a Windows shortcut. The [linkname] is the place you will save your shortcut and the [target] is the place your shortcut will take you when you double click it. Remember an mklink is not the same as a shortcut because an mklink will make the target location look like it’s physically available at the link location where a shortcut will simply send you to the target location when clicked.

Delete an mklink

mklink-folder-exampleChecking if a folder is a link or a regular file system object is quite easy. If you look at it in Windows Explorer will show a small arrow on the icon, much like a shortcut, or you can look at it using dir in a Command Prompt similar to below:

c:\Users\James>dir

14/07/2015  19:37  <JUNCTION> my-link [C:\Users\James\Desktop\my-link-source]

You can see that the directory link called my-link is referenced as <JUNCTION>.

Deleting the mklink is then done in the same way as deleting any other filesystem object – simply delete it using Windows Explorer.


MySQL Database Alternative

Category : How-to

Get Social!

mysql-logoThere are many alternatives to MySQL that tick some of the boxes you may require. There are plenty of free, open source databases such as PostgreSQL, MogoDB, CouchDB and Apache Derby however many of these databases have a different feature set or are a completely different type of database to the standard MySQL relational data model. Another question is what if I already have MySQL set up in my environment and would like to change? Many people are concerned that the (fairly) recent takeover of Sun Microsystems by Oracle could spell trouble for MySQL.

mariadb-logoMariaDB was created by some of the original developers of MySQL and was created by forking the MySQL code base. It[‘s maintained by the MariaDB Foundation who ensures the free availability of the database software. There are currently 2 main versions of MariaDB available as stable distributions:

  • Version 5.x – which is a drop in replacement for any version 5.x of MSSQL and promises to support all MySQL version 5.x functionality. With this version of MariaDB you can switch your applications to point at it and they will just work. All the connectors and client binaries are compatible and for most scenarios will work right out of the box.
  • Version 10.x – this is the new branch of MariaDB which drifts away from the original MySQL specification and introduces new features. Currently, most of the basics will work, but it no longer guarantees backwards compatibility with MySQL and can no longer be used as a drop in replacement. Eventually this had to happen to enable the MariaDB developers to implement the features they needed to and is the branch of MariaDB that’s being most actively developed.

As you can see, version 5.x is a version you can use straight away if you’re a MySQL 5.x user if you so choose. Version 10.x however, will take a little more time to implement as you’ll need to change the connectors in your applications and ensure that all the features you require from the database are the same. You may also wish to use some of Version 10.x’s features that would otherwise be unavailable.

Take a look at installing MariaDB on Ubuntu or installing a quick and easy database cluster.


Create a RAM Disk in Windows

Category : How-to

Get Social!

ImDisk-Virtual-Disk-DriverI’ve been using RAM disks within Linux for quite some time now and I’ve blogged about it with the ramfs and tmpfs file systems. I’m not going to go over the details of a RAM disk again as the principle is the same on whichever operating system you choose; you set aside a portion of RAM to use as a file system.

Currently I’m using Windows 7 at work instead of my usual Linux based OS’s and so my usual out of the box mounting of a RAM Disk simply won’t work. After a spot of Googling I came across ImDisk which promises to be an Open Source Windows Virtual Disk driver (as well as a few other things). I’m not plugging ImDisk specifically, but they do seem to do what I’m after – create a virtual Disk that I can use as a file system.

Installing ImDisk

Installation was quick and easy – simply download the binary from the website and give the .exe two little clicks.

ram-disk-ImDisk-Setup

I disabled a couple of things on the installer because I only want to use it as a RAM Disk driver.

ram-disk-ImDisk-desktop-iconsOnce the installation completes you’ll have two shortcuts on your desktop – that’s assuming you didn’t un-tick them during the installation!

Double click on RamDisk Configuration to create your first Windows RAM Disk and mount it at your chosen drive letter mount point. The options are pretty straight forward, such as size of RAM to use for the RAM Disk, the drive letter top use as the mount point and the format to use for the file system. There were two others that I found to be a little more interesting:

  • Allocate Memory Dynamically – will instruct the RAM Disk driver to allocate all the memory specified under Size straight away, or to only allocate the memory as it’s needed by adding files to the RAM Disk file system. By ticking this option you can keep your RAM free for your computer to use for things like file cache or other applications and it will only be used for the RAM Disk when it’s needed to store the files you save to it. Alternatively  you can un-tick it and allocate the full Size amount and reserve the memory straight from the off.
  • Use AWE physical memory – This is found on the Advanced tab and will force the OS to never page the RAM Disk content, even in the case where the OS decides it’s low on physical memory. Be careful with this setting because it will force your RAM Disk to only use physical RAM. If you set your Ram Disk Size too high you could soon run out of physical memory and cause your computer to become unstable.

ImDisk-create-ram-disk

Click OK when you’re happy with your settings to create your new RAM Disk.

RamDisk-Properties

And that’s all there is to it! You now have a fully functioning Windows RAM Disk that you can use for fast file storage. Don’t forget, anything on the Ram Disk will be lost when you restart your computer.


Downgrade an OBIEE RPD Version

Category : How-to

Get Social!

oracle-bi
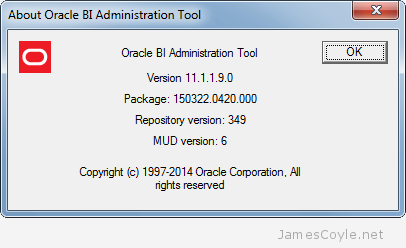
An RPD file saved by one version of the OBIEE Administration Tool cannot be opened by an older version of the OBIEE Administration Tool or be applied to an older version of an Oracle BI Server. For  this example we’re looking at an RPD created with version 349 of the Administration Tool (that’s the first release of OBIEE 11.1.1.9) and we’re trying to apply it to a server expecting version 326 (that’s the latest patched release of OBIEE 11.1.1.7.150120)

You can check the version of the tool you’re currently using by going to Help > About in the menu and look at the Repository Version line.

About-Oracle-BI-Administration-Tool

You’ll get an nQSError 36010 from the Administration tool if the tool is not of a high enough version:

nQSError: 36010] Server version 326 cannot read the newer version 349 of the repository c:\oracle\middleware\fmw\instances\instance1\bifoundation\OracleBIServerComponent\coreapplication_obis1\repository\Dev_Copy.rpd

Luckily there is a way round it! For certain versions you’ll be able to downgrade your RPD file so that you’re able to open it in the older version of the Admin tool. This isn’t true for all version, but from my test the below major versions worked for the downgrade process:

  • 11.1.1.6 > 11.1.1.5 (318 > 308)
  • 11.1.1.9 > 11.1.1.7 (349 > 326)

To downgrade the RPD file you’ll need to use an Admin Tool version that can open the file. Carrying on our example, we’ll need to use the 11.1.1.9 Admin Tool. You will need the nqgenoldverrpd utility which is part of the Administration Tool installation and can be found in the below path:

C:\Program Files\Oracle Business Intelligence Enterprise Edition Plus Client Tools\oraclebi\orahome\bifoundation\server\bin

The utility has a few switches which you’ll need to enter to tell it what it needs to know to downgrade the RPD file.

  • -P – is the RPD password of the source RPD you wish to downgrade.
  • -I –  is the source RPD you wish to downgrade.
  • -O – is the target name and path for the downgraded RPD
  • -V – is the RPD version to downgrade to.

There is also a -F which will force the downgrade process to clear any expressions that cannot be downgraded.

The following example will downgrade an RPD on your desktop with password Admin123 and save it to a new RPD file on your desktop. The downgraded version will be 326 which is OBIEE 11.1.1.7.

First of all, open a CMD prompt in Windows and navigate to the above path, or the path where your Administration Tool is installed.

C:\Program Files\Oracle Business Intelligence Enterprise Edition Plus Client Tools\oraclebi\orahome\bifoundation\server\bin

And execute the nqgenoldverrpd command and substitute your values.

nqgenoldverrpd -P Admin123 -I C:\Users\James\newversion.rpd -O C:\Users\James\oldversion.rpd -V 326

You’ll see the below message once it’s complete:

Reading newversion.rpd...
Preprocessing...
Generating oldversion.rpd of version 326...Done!!!

nqgenoldverrpd File Paths

You can find the nqgenoldverrpd utility installed as part of the OBIEE Admin Tool or under an OBIEE installation on Windows.

  • On Client under : [CLIENT_FOLDER]\oraclebi\orahome\bifoundation\server\bin\nqgenoldverrpd.exe
  • On Server under : $MW_HOME\bifoundation\server\bin\nqgenoldverrpd

Access a qcow2 Virtual Disk Image From The Host

Get Social!

A disk image, such as the popular qcow2 disk image can be read and used as a file system without having to attach it to a running VM. That can be handy when you’ve got information on a backed up virtual image and don’t want to turn on a whole VM in order to access some data held on it.

If you’re using a host such as Proxmox then you’ll already have everything installed, but if you’re on some other Debian based system then you’ll need to install the required package:

apt-get install qemu-utils

What we’re trying to achieve is a standard mount point on the host that we can access like we would any other mounted block device. As you can imagine, it’s a little more tricky than just using a mount command along with a file name, but not by much.

Make sure that you have the required kernel module, nbd, loaded:

modprobe nbd

You should then find that you have plenty of object in /dev starting with nbd:

ls /dev/nbd*
/dev/nbd0  /dev/nbd10  /dev/nbd12  /dev/nbd14  /dev/nbd2  /dev/nbd4  /dev/nbd6  /dev/nbd8
/dev/nbd1  /dev/nbd11  /dev/nbd13  /dev/nbd15  /dev/nbd3  /dev/nbd5  /dev/nbd7  /dev/nbd9

Each one of these devices is something you can use to attach a virtual image to, however you can only attach one image per device giving you a total of 16 images you can use at any one time.

Attach a qcow2 Virtual Image File

To attach an image file to one of these devices run the below command, substituting the nbd0 device and /var/lib/vz/images/107/vm-107-disk-1.qcow2 with your own values.

qemu-nbd -c /dev/nbd0 /var/lib/vz/images/107/vm-107-disk-1.qcow2

The device /dev/nbd0 will now contain the virtual image file as a block device and any partitions or volumes on the virtual image will be available for mounting.

You can check the partitions available on the virtual disk using your favorite partitioning tool, gparted, fdisk, etc:

partx -l /dev/nbd0

Partitions are named slightly differently to what you may be used to. With a normal partitioned disk (with no LVM) you’d reference the first partition with /dev/nbd0p1. For example, using a mount command you might use the below:

mount /dev/nbd0p1 /mnt/mntpoint

If you use LVM on the virtual disk image then you won’t be able to mount the partition directly – you’ll need to use the vg suite of tools to detect the logical volume. Run the two below commands vgscan and vgchange as below to detect the logical volumes.

vgscan
  Reading all physical volumes.  This may take a while...
  Found volume group "pve" using metadata type lvm2
vgchange -ay
   3 logical volume(s) in volume group "pve" now active

You can then use pvdisplay to find your volume name and mount it.

lvdisplay

  --- Logical volume ---
  LV Path                /dev/pve/myvolume
  LV Name                myvolume
  VG Name                pve
  LV UUID                jgok7M-c9x1-dTdt-PXXh-8NXf-BzgG-aRsaY7
  LV Write Access        read/write
  LV Creation host, time proxmox, 2015-04-06 20:28:28 +0100
  LV Status              available
  # open                 1
  LV Size                20.00 GiB
  Current LE             5120
  Segments               1
  Allocation             inherit
  Read ahead sectors     auto
  - currently set to     256
  Block device           253:0
mount /dev/pve/myvolume /mnt/mntpoint

Detach a qcow2 Image Virtual Image File

Once you have finished with the virtual image file, you’ll want to detach it and release the nbd process used for IO operations for that image. Assuming that any mounts based on the image have been umount‘d use the qemu-nbd command with the -D switch:

qemu-nbd -d /dev/nbd0

You can also remove the kernel module if you’ve detached all of your virtual images from their /dev/nbdX device:

rmmod nbd


OBIEE With Essbase as a Data Source Using SSO

Get Social!

oracle-biThere are various ways to integrate OBIEE and Essbase when using SSO, each with their own security specifics and implementation difficulty. The three main ways of SSO authentication between OBIEE and Essbase are:

  1. Username and password pass-through – this passes the user name and user password through to the Essbase server with each request. This will not work with some OBIEE Authentication methods such as SAML SSO Authentication due to the fact that the OBIEE server never knows the user password.
  2. CSS Token authentication – This is not recommended any more due to the difficulty in setting it up. This process differers depending on the version of Essbase used.
  3. User Impersonation – this uses an Essbase Admin user (or user with the required permission) for the connection between OBIEE and Essbase however when data is requested, the username is passed to the Essbase server as part of the EssLoginAs function. This function is similar to using su – username in Linux as it assumes the username‘s status despite who initially connected.

Option 1 doesn’t work in all scenarios, such as when OBIEE authentication is done using SAML SSO – so that rules out option 1. Oracle no longer recommends using the CSS Token method due to the complexity involved in setting it up – so that removes option 2 from the pool.

Option 3 is the new, recommended method of connecting OBIEE to an Essbase data source using single sign on. The client authenticates with OBIEE using the Authentication Provider, in this case Active Directory, and then sends the username to the Essbase server to run all further commands (such as ‘give me some data’) as if it were the user running them.

obiee_essbase

Setting this up is very easy. You need an Essbase user that has permission to run EssLoginAs , such as any admin user. Once you have that, enter that users credentials into the Connection Pool’s User name and Password fields under Shared logon and tick the SSO check box.  And that’s it – you’re good to go!

Connection Pool - Essbase_CP

It’s worth noting that if you look at Sessions in the EAS Console you’ll only see the Admin user name and not the user being impersonated. It can be a bit misleading, but you’ll see something similar to the below in the Essbase logs:

[Thu Jun 18 20:18:12 2015]Local/ESSBASE0///Info(1051529)
Logging in user [essbaseadmin] with security privileges of user [james]

This shows the initial user that is in your Connection Pool, essbaseadmin, and the user being impersonated, james.


Visit our advertisers

Quick Poll

How often do you change the password for the computer(s) you use?

Visit our advertisers