Author Archives: James Coyle

Proxmox 4.0 Beta 2 is Now Available

Category : Tech News

Get Social!

proxmox logo gradThe Proxmox VE team have released a new BETA version of their 4.0 branch to the public.


There are some pretty big changes in Proxmox v4 which really warrant the new 4.0 version increment. See my other blog post on the initial 4.0 BETA 1 release notes for the bigger picture, or the below bullet points for the latest changes.

  • Improvements to the new container engine based on LXC, especially the integration into the storage model.
  • Migration path from OpenVZ to LXC
  • Linux Kernel 4.2
  • Ceph Server packages (0.94.x – hammer release)
  • Embedded NoVNC console
  • Improved IPv6 support
  • Countless bug fixes

You can download the ISO from their download site and install it onto a new machine. Unfortunately, because it’s still a BETA product there is no upgrade path from 3.4. I’d expect this to change in the near future.

It’s worth noting, however, that the website states that any BETA version of release 4.0 will be upgradeable to the full 4.0 when it’s available.

Quick Poll

Which type of virtualisation do you use?
  • Add your answer

Javascript to Refresh All OBIEE Dashboard Analysis

Get Social!

oracle-biOBIEE isn’t designed for (near) real time reporting, and as such doesn’t have an out of the box page refresh option.

There are times when I’ve needed a dashboard to be refreshed – when looking at query performance dashboards, for example, and would like the charts and tables to be constantly updated.

After searching on-line I found a few different ways to to refresh a dashboard but they all refreshed the whole page, rather than just the Analysis themselves. It’s not the end of the world, but it results in the whole page flickering as the Browser reloads it. It’s most annoying when you’re half way through the ‘Dashboards’ menu, about to click the navigate away and BAM! The page refreshes and you loose your position on the menu.

The following script is a combination of HTML, CSS and JavaScript code to loop through each Analysis on a single Dashboard page and issue the OBIEE Refresh command. A small box towards the bottom left hdashboard-refresh
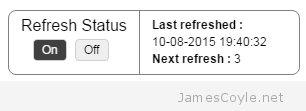
and side of the page that overlays the Dashboard with some controls and stats for the page refresh. It will show when the page was last refreshed, a countdown in seconds to the next refresh and a button to start and stop the automatic refresh.

chrome_256x256 Works in Chrome 44 internet-explorer_256x256 and Internet Explorer 8 and 10

There are 3 variables that are user changeable:

  • vRefreshDuration controls how many seconds between refreshes. Make sure this is higher than how long each query takes, otherwise an Answer will be asked to refresh before it’s finished refreshing!
  • vMessageLastRefreshed is the message displayed before the date and time of the last refresh.
  • vMessageNextRefresh is the message displayed before the countdown in seconds to the next refresh.

Feel free to change the below code, but please keep the header information. If you make any improvements, please let me know!

To add the Refresh code to a Dashboard, create a Text Dashboard drag-text-dashboard-objectObject and drag it onto any Dashboard that you’d like to automatically refresh. Then paste the below code into the Text box and check the ‘Contains HTML Markup’ checkbox. Click save and view your Dashboard!

<!--
        Title:      OBIEE in page refresh
	Author:     James Coyle (www.jamescoyle.net)
	Date:       2015-08-10
	Description:Self contained code to loop through each analysis on a 
                    Dashboard page and issue a Refresh command. This will 
                    refresh each analysis, going back to the data source, 
                    without refreshing the whole page. 
				 
	Version:    2015-08-10                  First revision. 
				
-->
<style type="text/css">
.toggle {
    margin: 4px;
    background-color: #EFEFEF;
    border-radius: 4px;
    border:1px solid #D0D0D0;
    overflow: auto;
    float: left;
}
.toggle label {
    float: left;
    width: 32px;
}
.toggle label span {
    text-align: center;
    padding: 3px 0px;
    display: block;
    cursor: pointer;
}
.toggle label input {
    position: absolute;
    top: -20px;
}
.toggle .input-not-checked:hover{
    background-color: #AAAAAA;
}
.toggle .input-checked{
    background-color: #404040;
    color: #F7F7F7;
	cursor: default;
}
#left-refresh-wrapper{
	float: left;
	padding: 6px 12px 6px 12px;
}
#refresh-heading-wrapper{
	font-size: 16px;
}
#refresh-button-wrapper{
	width: 90px;
	margin-left: auto;
	margin-right: auto;
}
#refresh-text-wrapper{
	padding: 6px 0px 6px 12px;
	float: left;
	font-size: 12px;
	line-height: 17px;
	border-left: 1px solid grey;
}
#floating-refresh-wrapper{
	border: 1px solid grey;
	width: 290px;
	overflow: hidden;
	border-radius: 8px;
	position: fixed;
	left: 20px;
	bottom: 22px;
	margin: auto; 
	background: rgb(255, 255, 255);
    background: rgba(255, 255, 255, .7);
}


</style>
<div id="floating-refresh-wrapper">
	<div id="left-refresh-wrapper">
		<div id="refresh-heading-wrapper">
			Refresh Status
		</div>
		<div id="refresh-button-wrapper">
			<div class="toggle">
				<label id="refresh-on" onclick="event.preventDefault(); toggleButton(this);"><input type="radio" name="toggle"><span class="input-checked">On</span></label>    
			</div>
			<div class="toggle">
				<label id="refresh-off" onclick="event.preventDefault(); toggleButton(this);"><input type="radio" name="toggle"><span class="input-not-checked">Off</span></label>
			</div>
		</div>
	</div>
	<div id="refresh-text-wrapper">
		<div id="last-refresh">Please wait...</div>
		<div id="next-refresh">Please wait...</div>
	</div>
	<div style="clear: both;"></div> 
</div>
<script type="text/javascript">
	// Get report IDs into an array
	function initRefresh(){
		if (typeof vReportIds !== 'undefined'){
			for (key in vReportIds){
				if (key != 'undefined' && key != null){
					vObjectIds.push(vReportIds[key]);
				}
			}
		}
		else{
			vObjectIds = [];
		}
	}

	// Start timer if refreshTimerObject is null
	function startRefreshTimer(){
		if (refreshTimerObject === null || typeof refreshTimerObject === 'undefined'){
			refreshTimerObject = setInterval(function () {timerTick()}, 1000);
			vCountdown = vRefreshDuration;
		}
	}
	
	// Stop timer if refreshTimerObject is not null
	function stopRefreshTimer(){
		if (refreshTimerObject !== null && typeof refreshTimerObject !== 'undefined'){
			clearTimeout(refreshTimerObject);
			refreshTimerObject = null;
			updateNextRefresh('-');
		}
	}

	// Loop known report IDs and send them to the OBIEE refresh function
	function timerTick(){
		if (vCountdown === 1){
			refreshReports();
			vCountdown = vRefreshDuration;
			updateLastRefreshed();
		}
		else{
			vCountdown = vCountdown - 1;
		}
		
		updateNextRefresh(vCountdown);
		
	}
	
	// Update display countdown
	function refreshReports(){
		for (key in vObjectIds){
			HereLink(vObjectIds[key], 'Refresh');
		}
	}
	
	// Update last refresh time on Dashboard
	function updateLastRefreshed(){
		document.getElementById("last-refresh").innerHTML = vMessageLastRefreshed + formatDate(new Date());
	}
	
	function formatDate(dt) {
		var dd = dt.getDate();
		var m = dt.getMonth() + 1;
		var yyyy = dt.getFullYear();
		var hh = dt.getHours();
		var mm = dt.getMinutes();
		var ss = dt.getSeconds();
		return padZero(dd, 2) + '-' + padZero(m, 2) + '-' + yyyy + ' ' + padZero(hh, 2) + ':' + padZero(mm, 2) + ':' + padZero(ss, 2) ;
	}
	
	function padZero(v, l){
		var r = v;
		if (v.toString().length < l){
			for(a = v.toString().length; a < l; a++){
				r = '0' + v;
			}
		}
		return r;
	}
	
	// Update last refresh time on Dashboard
	function updateNextRefresh(i){
		document.getElementById("next-refresh").innerHTML = vMessageNextRefresh + i;
	}
	
	// toggle button and change timer status
	function toggleButton(o){
		if (o.childNodes[1].innerHTML !== vLastSpanClick){
			vLastSpanClick = o.childNodes[1].innerHTML;
			var spans = document.getElementById('refresh-button-wrapper').getElementsByTagName('span');
			for (el in spans){
				spans[el].className = 'input-not-checked';
			}
			
			o.childNodes[1].className = 'input-checked';
			
			if (o.childNodes[1].innerHTML === 'Off'){
				stopRefreshTimer();
			}
			else{
				startRefreshTimer();
			}
		}
	}
	
	var vRefreshDuration = 5;
	var vMessageLastRefreshed = '<strong>Last refreshed :</strong> <br />';
	var vMessageNextRefresh =  '<strong>Next refresh : </strong>';
	
	var vObjectIds = [];
	var refreshTimerObject = null;
	var vCountdown = 0;
	var vLastSpanClick = 'On';
	
	initRefresh();
	updateLastRefreshed((new Date).toLocaleString());
	updateNextRefresh(0);
	startRefreshTimer();
	
</script>


Download Oracle Java From The Terminal With wget

Get Social!

java-logoOracle have a very restrictive license that applies to most of their software downloads which prohibits you from distributing the binaries yourself. What this means, for example, is that you could not download the Java binaries and upload them to your own APT repository for others to use.

There are a few workarounds that exist to help making this install easier, but here we’re going to look at downloading the Java runtime environment (JRE) binaries and installing them all from a command line.

Use wget to download the binaries, so make sure that’s available on your system. If it isn’t, simply apt-get install wget.

One of the important things to note is that the Java version changes over time and therefore the links and commands below may need to be changed to ensure you’re always getting the latest version. Check out the Java Download Page to make sure you have the latest.

wget --header "Cookie: oraclelicense=accept-securebackup-cookie" http://download.oracle.com/otn-pub/java/jdk/8u51-b16/server-jre-8u51-linux-x64.tar.gz

I’m using an minimal version of Debian that doesn’t have the worlds Certificate Authorities installed and therefore wget gives me an error:

ERROR: cannot verify edelivery.oracle.com's certificate, issued by '/C=US/O=GeoTrust, Inc./CN=GeoTrust SSL CA':
  Unable to locally verify the issuer's authority.
To connect to edelivery.oracle.com insecurely, use `--no-check-certificate'.

The fix is to either install the correct CA certificate on the machine or add the no-check-certificate switch to wget to avoid checking the certificate:

wget --no-check-certificate --header "Cookie: oraclelicense=accept-securebackup-cookie" http://download.oracle.com/otn-pub/java/jdk/8u51-b16/server-jre-8u51-linux-x64.tar.gz

Once you have the Java archive downloaded you’ll need to create a target folder and extract the downloaded archive with tar:

mkdir /opt/jre
tar -zxf server-jre-8u51-linux-x64.tar.gz -C /opt/jre

The last couple of steps are to tell your OS to use the Java binaries you’ve just moved into place.

update-alternatives --install /usr/bin/java java /opt/jre/jdk1.8.0_51/bin/java 1000
update-alternatives --install /usr/bin/javac javac /opt/jre/jdk1.8.0_51/bin/javac 1000

Running anything in Java, or using the -version switch should now use your newly installed binaries.

java -version
java version "1.8.0_51"
Java(TM) SE Runtime Environment (build 1.8.0_51-b16)
Java HotSpot(TM) 64-Bit Server VM (build 25.51-b03, mixed mode)


Git SSL Certificate Problem Caused By Self Signed Certificates

Category : How-to

Get Social!

git-logoIt’s never been easier to set up your own Git server to host your own git repositories for your projects. Thanks to people like the folks over at GitLab you can be up and running in no time at all.

If you host something like this yourself, you’ll probably have entered the world called self signed certificates. These are SSL certificates that have not been signed by a known and trusted certificate authority. There is no security concern using a self signed certificate, the level of security will be similar to a paid for certificate, the problem is that your commuter won’t know that it can trust the certificate. You may have seen this error in a Web Browser, such as Chrome:

chrome-ssl-warning

With Git, however, you’ll get an error from the git command line tool similar to the below:

$ git clone https://wwwgit.jamescoyle.net/test/test-project.git
Cloning into 'test-project'...
fatal: unable to access 'https://[email protected]/test/test-project.git/': SSL certificate problem: unable to get local issuer certificate

The preferred method of dealing with this error is to add the Certificate Authority’s signing certificate as a trusted Certificate Authority on your computer.The way to do this differs depending on your OS and is out of scope for this post.

There are two Git specific methods of forcing Git to accept the self signed certificates, which don’t require you to import the CA certificate to your computers Trusted  CA store:

Turn off Git SSL Verification

You can stop the Git client from verifying your servers certificate and to trust all SSL certificates you use with the Git client. This has it’s own security risks as you would not be warned if there was a valid problem with the server you are trying to connect to.

That said, it’s the quickest and easiest fix for a non trusted server certificate. Simply run the below git command on your Git client.

git config --global http.sslVerify false

Tell Git Where Your Certificate Authority Certificates Are

Another option is to point your Git client towards a folder that contains the Certificate Authority certificate that was used to sign your Git server’s SSL certificate. You may not have one of these if you’re using Self Signed certificates.

Save the CA certificate to a folder on your Git client and run the following git command to tell your Git client to use it when connecting t the server:

git config --system http.sslCAPath /git/certificates


dd Cheat Sheet

Get Social!

dd is one of the most versatile IO tools available for Linux. It’s used in a variety of ways ranging from Disk Benchmarking through to creating SWAP files and copying downloaded disk images to physical disks.

dd takes the following common switches:

  • if is the input file name and location.
  • of is the name and location of the output file.
  • bs is the block size that will be used to read and/ or write the file. Increasing this can help with performance  or dictate how much data will be read or written.
  • count is the number of blocks that will be used.
  • seek is the number of blocks on the output file that will be skipped before writing any data.
  • skip is the number of blocks that will be skipped on the input file before starting to read data.
  • conv is a comma separated list of additional parameters that can be used. See the man dd for more information.

The below headings will list a few example uses of dd in a typical Linux environment.

Backup disk partition with dd

You can use dd to copy an entire disk partition to a virtual disk file. This can be useful for creating a backup or to clone the disk to another machine.

dd if=/dev/sda1 of=~/localdisk_sda1.img

You can use this method to read a CD-ROM, USB drive or Flash disk to a file in the same way – just make sure the device is inserted and point the if= part of the dd command to the relevant /dev/ device.

You could also compress the image as part of the process with gzip.

dd if=/dev/sda1 | gzip -c > ~/localdisk_sda1.img.gz

Restore disk partition with dd

Similar to the above command, you can use dd to replace a disk’s partition with a virtual disk file.

dd if=~/localdisk_sda1.img of=/dev/sda1

If you compressed the image then you can decompress it first all in one go:

gunzip -c ~/localdisk_sda1.img.gz | dd of=/dev/sda1

Create a fixed size file with dd

You can create a fixed size file with DD that will be created in the location you specify.

dd if=/dev/zero of=/root/test bs=1024 count=1

This will create a file in /root/test of 1024 bytes in size. Increase either bs or count to change the size of the file. The resulting size will be bs count. You can also use shorhand sizes such as K, M and G with bs, for example bs=1G,

dd if=/dev/zero of=upload_test bs=file_size count=1

Create a SWAP file with dd

dd can be used to create a SWAP file that can be used as a SWAP device by your computer. This is often needed with smaller instances on Cloud providers such as AWS.

The starting point is the same as the above command to create a file with the size that you’d like to use for swap. See my other blog post for more info.

Split a file with dd

dd can be used to read just part of a file, given offset and length coordinates. The below example will skip the first 100 bytes of the file and output the proceeding 10 bytes (byte 101 – 111).

dd if=filetosplit of=partfile bs=1 count=10 skip=100

You could repeat this process to split a large file into multiple smaller files, to be able to email it for example.

dd if=filetosplit of=partfile1 bs=1 count=100
dd if=filetosplit of=partfile2 bs=1 count=100 skip=100
dd if=filetosplit of=partfile3 bs=1 count=100 skip=200

Merge multiple files with dd

You can merge multiple files into a single file with dd. Following on from the above split example, the below will rejoin the 3 file parts into a single file.

dd if=partfile1 of=joinedfile bs=1 count=100
dd if=partfile2 of=joinedfile bs=1 count=100 seek=100
dd if=partfile3 of=joinedfile bs=1 count=100 seek=200

Convert text to lower case with dd

You can use the conv switch with dd to transform ascii text from upper case to lower case and visa-versa. Using lcase and ucase in the conv switch will instruct dd to convert the text as it’s written.

The below example will convert all characters in the filetoconvert.txt. file to lower case.

dd if=filetoconvert.txt of=convertedfile.txt conv=lcase


Visit our advertisers

Quick Poll

Do you use ZFS on Linux?

Visit our advertisers