Script To Install AWS CodeDeploy Agent on Linux

Script To Install AWS CodeDeploy Agent on Linux

Get Social!

Here is the script for installing the AWS CodeDeploy agent on Ubuntu. See the full description here.

For more information on AWS CodeDeploy, please see: https://aws.amazon.com/codedeploy/

apt update
apt -y install ruby

cd /tmp
wget https://aws-codedeploy-eu-central-1.s3.amazonaws.com/latest/install;
chmod +x ./install

./install auto

service codedeploy-agent start

Scripted Install of Oracle Java 8 on Ubuntu 16.04

Get Social!

Please see Install Oracle Java In Debian/ Ubuntu using apt-get for more information.

apt install -y software-properties-common
apt-add-repository -y ppa:webupd8team/java
apt update
echo oracle-java8-installer shared/accepted-oracle-license-v1-1 select true | /usr/bin/debconf-set-selections
apt install -y oracle-java8-installer


Simple iptables Rules for Ubuntu/ Debian VPS

Get Social!

The following iptables rules are are a starting point to add basic firewall security to a public facing server, such as a public VPS. The primary focus is to stop any inbound traffic other than SSH, which is required for shell access.

[the_ad id=”2698″]

The biggest issue with public VPS providers is that often some iptables features are disabled – many OpenVZ container providers don’t allow state checking in iptables, for example. If you’ve got one of these VPS’s you’ll likely see the following error:

iptables: No chain/target/match by that name.

These rules are engineered so that they will work with most VPS’s where iptables is installed.

The following rules will block all incoming connections except SSH, including PING requests. Outgoing is open for HTTP and HTTPS TCP requests and DNS UDP requests.

See the links at the bottom of the page for a more in depth look at iptables rules.

# Loopback
iptables -A INPUT -i lo -j ACCEPT
iptables -A OUTPUT -o lo -j ACCEPT

# Inbound SSH
iptables -A INPUT -p tcp --dport 22 -j ACCEPT
iptables -A OUTPUT -p tcp --sport 22 -j ACCEPT

# Outbound HTTP/S
iptables -A OUTPUT -p tcp --dport 80 -j ACCEPT
iptables -A INPUT -p tcp --sport 80 -j ACCEPT
iptables -A OUTPUT -p tcp --dport 443 -j ACCEPT
iptables -A INPUT -p tcp --sport 443 -j ACCEPT

# Outbound DNS
iptables -A OUTPUT -p udp --dport 53 -j ACCEPT
iptables -A INPUT -p udp --sport 53 -j ACCEPT

# default policy
iptables -P INPUT DROP
iptables -P OUTPUT ACCEPT
iptables -P FORWARD DROP

If you’re using Ubuntu, you can easily make the rules persist:

apt-get install iptables-persistent
service iptables save


Install DataStax Cassandra 3 on Debain/ Ubuntu

Get Social!

datastax-logoThe following process will install the DataStax distribution of Cassandra on any Debian based system, such as Debian or Ubuntu. We’ll use the official DataStax apt repositories to install Cassandra using apt-get.

Cassandra is written in Java and the latest version (at the time of writing) of Cassandra requires Java 8. You can use either OpenJDK or visit my Oracle Java post on installing the Oracle distribution of Java 8.

Once you have Java 8 installed and confirmed you can continue to install Cassandra. Use java -version on the command line to check your Java version.

java -version
java version "1.8.0_91"
Java(TM) SE Runtime Environment (build 1.8.0_91-b14)
Java HotSpot(TM) 64-Bit Server VM (build 25.91-b14, mixed mode)

Install DataStax Cassandra 3.4

Note: You can use the simple Bash script to install Java 8 and a single instance of Cassandra found here.

The first step to installing Cassandra with apt is to add the DataStax Cassandra repository and repository key to your local apt list. Run the following command to add the required repository and update your local apt cache. Change the version 3.4 on the first line to match the version you’d like to install.

echo "deb http://debian.datastax.com/datastax-ddc 3.4 main" | tee -a /etc/apt/sources.list.d/cassandra.sources.list
curl -L https://debian.datastax.com/debian/repo_key | apt-key add -
apt-get update

Once you’re updated then run the install command and begin the Cassandra install.

apt-get install datastax-ddc

Debian’s policy is for software to be available locally after the install has completed and therefore your Cassandra instance will be running as a single stand alone node.

You can run the nodetool to check the install has completed and that the Cassandra instance is available.

nodetool status

Datacenter: datacenter1
=======================
Status=Up/Down
|/ State=Normal/Leaving/Joining/Moving
--  Address     Load       Tokens       Owns (effective)  Host ID                               Rack
UN  10.10.10.10 1.29 MB    256          100.0%            c25d396e-fa09-4bf6-837d-676d57cd7987  rack1

The next step is to configure your Cassandra instance by editing the yaml config file /etc/cassandra/cassandra.yaml but that’s a blog post for another day.


Start Ubuntu Without Starting The Gnome Desktop (text mode)

Get Social!

If you’ve installed a desktop, such as Gnome, on Linux you may not need it all the time. Some of the time taken to boot your machine when you first turn it on is used by loading the GUI and everything that comes with it. In addition, once it’s loaded it will consume resources such as RAM.

Once you install a desktop such as Gnome, especially on Ubuntu/ Debian, the default is to boot your computer into the GUI.

You could set the desktop not to load by default so that you’re presented with a terminal login screen on boot.console-login

You can then load the desktop, such as Gnome, if you need to or just use the terminal if you don’t.

To disable the Desktop on boot you’ll need to edit the grub config file and edit the GRUB_CMDLINE_LINUX_DEFAULT parameter.

vi /etc/default/grub

GRUB_CMDLINE_LINUX_DEFAULT will likely be quiet splash and you’ll need to change that to quiet splash text.

GRUB_CMDLINE_LINUX_DEFAULT="quiet splash text"

Save and close the file.

The last step is to run the update-grub command to update the grub bootloader config.

update-grub

Your computer will now always boot in text mode, that is, without a desktop.

Start the Desktop

If you ever want to start the desktop, log in to the terminal session with your user name and password and run the following:

gnome-session


How To Fix A Full /boot Partition on Linux

Get Social!

full-boot-mountUtilities such as apt-get generally install kernel updates by adding the new kernel to the Linux boot list and set it as the default. This means that the next time the system boots, the new kernel will be loaded. The problem is that the old kernel is still there (just incase the new one doesn’t work, you’ve got a fall back!), and the kernel before that, and the kernel before that…

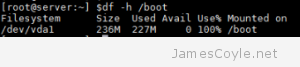
The current 3.x kernel for Ubuntu is around 20MB so it doesn’t take long for the kernel updates to fill a tiny 200-or-so-Mb boot partition where they are stored.

The good news is that it’s easy to clear out the old updates, but it’s important to not remove the latest one that you’re using.

Which Kernel am I Running?

It’s quick and easy to see which kernel version you are running. Use the uname command with the -a switch and pay attention to the version numbers reported.

uname -a
3.19.0-47-generic

This shows that you’re using version 3.19.0-47.

List Currently Installed Kernels

Next you’ll need to list the kernel packages that are currently installed so that you can remove any outdated ones to free up the space on the /boot partition.

Run the below dpkg command to list the installed kernel packages and their versions.

dpkg --list 'linux-image*'

dpkg-kernel-package-list
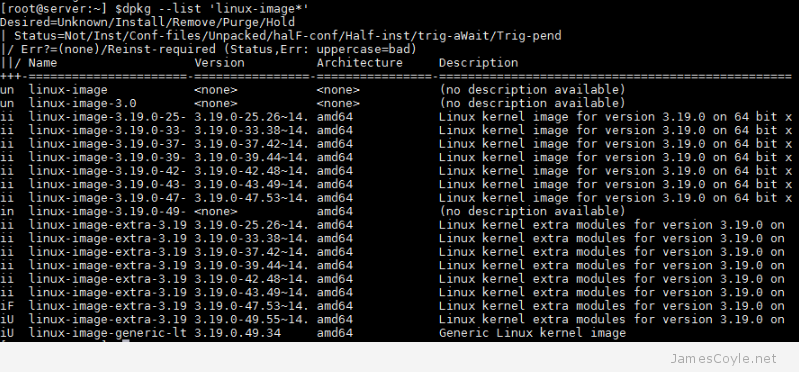
The above output shows several versions of kernel that are all taking up space on the /boot partition however we only really need the current running version given by the above uname -a command. It’s a good idea to keep the last 2 kernels just incase you notice an issue down the line, but the above list is quite excessive.

Remove Unused Kernel Packages to Free Space on /boot

Once you’ve identified your current kernel and the kernel packages you have installed it’s time to remove the ones you don’t need.

Using apt-get enter the package names of the kernel packages to remove.

apt-get remove linux-image-3.19.0-25-generic

If you get an error running this command then see the next section.

note: the above screenshot of the installed packages cropped the full version name – it’s missing the generic part. You can use tab completion with the apt-get command, or use an asterisk after the version number to remove the required package. 

Errors Removing Packages

If you get an error warning about dependencies similar to the below then you may need to manually remove a few kernel packages to free up some space.

[root@server:~] $apt-get remove linux-image-extra-3.19.0-25-generic
Reading package lists... Done
Building dependency tree
Reading state information... Done
You might want to run 'apt-get -f install' to correct these:
The following packages have unmet dependencies.
 linux-image-generic-lts-vivid : Depends: linux-image-3.19.0-49-generic but it is not going to be installed
                                 Depends: linux-image-extra-3.19.0-49-generic but it is not going to be installed
                                 Recommends: thermald but it is not going to be installed
E: Unmet dependencies. Try 'apt-get -f install' with no packages (or specify a solution).

The problem here is that the original update failed to install the latest version of the kernel (version 3.19.0-49-generic in this case) and apt-get doesn’t like doing anything else until that problem has been resolved.

First we need to free up some space. Carefully delete 2 of the older kernel packages with a command similar to the below, but with old version numbers from your system returned by the above section List Currently Installed Kernels.

rm /boot/*-3.19.0-25*
rm /boot/*-3.19.0-33*

Check and double check this command because there’s no going back once it’s ran! It’s perfectly safe to do as long as you are using old version numbers that you’re no longer using.

You can now run apt-get to complete the original upgrade now that it has the space. This will remove the error when trying to remove the unused kernel packages in the above section.

apt-get install -f

Now go back to the above section and remove the old kernel packages that you no longer need.


Visit our advertisers

Quick Poll

What type of VPN protocol do you use?

Visit our advertisers