Skip Certificate Checks with Wget

Skip Certificate Checks with Wget

Category : How-to

Get Social!

This is a reminder for myself more than anything else, on how to get wget to download SSL internet content when it’s encrypted by a self-signed or otherwise unknown certificate.

If you haven’t installed or updated your certificate Authority certificates on your computer and try and download something from an SSL URL with wget you’re going to run into trouble because your computer doesn’t know what a valid SSL certificate looks like. You’ll also get a similar problem if the site you’re accessing is encrypted by a self-signed certificate. This example shows a problem downloading from a HTTPS Github URL. Of course, there is no problem with the SSL certificate on Github.com, it’s the local machine that doesn’t have the internets Certificate Authority certificates installed.

Resolving github.com (github.com)... 192.30.253.113
Connecting to github.com (github.com)|192.30.253.113|:443... connected.
ERROR: The certificate of 'github.com' is not trusted.
ERROR: The certificate of 'github.com' hasn't got a known issuer.

The quickest way round this, albeit not the safest, is to tell wget to ignore any certificate checks and download the file. To do this, add the –no-check-certificate to your wget command. I don’t know why the wget developers couldn’t have chosen a switch that’s easier to remember!

wget https://github.com --no-check-certificate


Apt-get error: E: The method driver /usr/lib/apt/methods/https could not be found

Category : How-to

Get Social!

I’ve been getting the following error when using apt-get update with Debian Wheezy recently.

E: The method driver /usr/lib/apt/methods/https could not be found.

It seems that apt-get only supports HTTP connections by default, and throws an error with any HTTPS URLs.  You’ll likely see this error message if you add a new apt source URL that starts with https. What’s most annoying is that apt doesn’t simply ignore the HTTPS URL when updating the local cache, it actually stops all updates regardless of URL schema.

apt-get update
E: The method driver /usr/lib/apt/methods/https could not be found.

Luckily the fix is easy and requires an additional apt package to handle the SSL URLs. Run the below command to install the apt-transport-https package to enable apt to use HTTPS URL lists.

apt-get install apt-transport-https

Once this is installed, apt should function and update its local cache from your apt lists.


Git SSL Certificate Problem Caused By Self Signed Certificates

Category : How-to

Get Social!

git-logoIt’s never been easier to set up your own Git server to host your own git repositories for your projects. Thanks to people like the folks over at GitLab you can be up and running in no time at all.

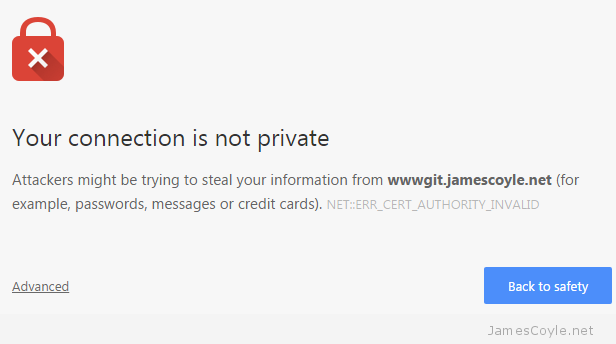
If you host something like this yourself, you’ll probably have entered the world called self signed certificates. These are SSL certificates that have not been signed by a known and trusted certificate authority. There is no security concern using a self signed certificate, the level of security will be similar to a paid for certificate, the problem is that your commuter won’t know that it can trust the certificate. You may have seen this error in a Web Browser, such as Chrome:

chrome-ssl-warning

With Git, however, you’ll get an error from the git command line tool similar to the below:

$ git clone https://wwwgit.jamescoyle.net/test/test-project.git
Cloning into 'test-project'...
fatal: unable to access 'https://[email protected]/test/test-project.git/': SSL certificate problem: unable to get local issuer certificate

The preferred method of dealing with this error is to add the Certificate Authority’s signing certificate as a trusted Certificate Authority on your computer.The way to do this differs depending on your OS and is out of scope for this post.

There are two Git specific methods of forcing Git to accept the self signed certificates, which don’t require you to import the CA certificate to your computers Trusted  CA store:

Turn off Git SSL Verification

You can stop the Git client from verifying your servers certificate and to trust all SSL certificates you use with the Git client. This has it’s own security risks as you would not be warned if there was a valid problem with the server you are trying to connect to.

That said, it’s the quickest and easiest fix for a non trusted server certificate. Simply run the below git command on your Git client.

git config --global http.sslVerify false

Tell Git Where Your Certificate Authority Certificates Are

Another option is to point your Git client towards a folder that contains the Certificate Authority certificate that was used to sign your Git server’s SSL certificate. You may not have one of these if you’re using Self Signed certificates.

Save the CA certificate to a folder on your Git client and run the following git command to tell your Git client to use it when connecting t the server:

git config --system http.sslCAPath /git/certificates


Proxy the Proxmox Web GUI with Nginx Over HTTPS with Load Balancing

Get Social!

The Proxmox web GUI is served by Proxmox’s new event driven API server called PVE Proxy. The default settings for the Proxmox web GUI is to listen on port 8006 for incoming HTTPS connections.

The following tutorial will show you how to use Nginx to reverse proxy the PVE Proxy application to do the following:

  • Redirect HTTP requests to use the HTTPS protocol.
  • Add your own certificate to use for HTTPS.
  • Listen on the standard HTTPS port (port 443).

The following steps show how to use Nginx to reverse Proxy Proxmox’s web GUI. If you would prefer to use Apache, please see my other blog post.

The first step is to make sure you have Nginx installed on the machine, or virtual instance, that you are going to use. You can install Nginx directly on the Proxmox host however, I prefer to keep the host software as standard as possible and run all additional applications in OpenVZ containers.

Create a shell session on the machine you would like to use and use apt-get to install Nginx.

apt-get install nginx

Make sure you have an SSL certificate and key pair on your server. See my OpenSSL certificate cheat sheet for more information.

We now need to specify the configuration for Nginx. Remove the existing site configuration and create a new configuration file called proxmox-gui. You can call this file whatever you wish, but you will also need to use the same name in the below steps.

rm -f /etc/nginx/sites-enabled/default
vi /etc/nginx/sites-enabled/proxmox-gui

Add the below text to your proxmox-gui file. You will need to substitute some of the settings with your own values:

  • ssl_certificate – this should point to your SSL certificate to use for signing the SSL traffic.
  • ssl_certificate_key – is this key which matches the above certificate.
  • server – this is the IP and port of your Proxmox server. If you have installed Nginx on the same host as the Proxmox web GUI then you could use https://localhost:8006 here.
upstream proxmox {
    server 10.10.10.10:8006;
}

server {
    listen 80 default_server;
    rewrite ^(.*) https://$host$1 permanent;
}

server {
    listen 443;
    server_name _;
    ssl on;
    ssl_certificate /etc/nginx/ssl/cert.pem;
    ssl_certificate_key /etc/nginx/ssl/key.pem;
    proxy_redirect off;
    location / {
        proxy_pass https://proxmox;
    }
}

If you have multiple Proxmox servers in a cluster, it would make sense to use load balancing in Nginx. We don’t really want to use this feature to spread the load, because usually the traffic will be very light – we want to use it so that if one node in the cluster is down, Nginx will automatically try a different node in the cluster.

To add load balancing, add your additional servers in the upstream proxmox code section. For example:

upstream proxmox {
    server 10.10.10.10:8006;
    server 10.10.10.11:8006;
    server 10.10.10.12:8006;

}

We need to link the newly created config file so that Nginx can load it.

ln -sf /etc/nginx/sites-available/proxmox-gui /etc/nginx/sites-enabled/

The last step is to restart Nginx web server to pick up the new settings.

service nginx restart

Your Proxmox web GUI should now be available on the IP address of your Nginx server on the HTTPS protocol.


OpenSSL Certificate Cheat Sheet

Get Social!

openssl-logoThese commands cover the basics of OpenSSL and are valid for either Windows or Linux with the exception that paths may need to be corrected for the respective platform.

Install OpenSSL

For windows http://www.openssl.org/related/binaries.html

For Ubuntu

sudo apt-get install openssl

Create Private Key

The last argument in the below line is the key length. This can be changed to 2048 or 4096 if required for better encryption.

openssl genrsa -des3 -out server.key 1024

Generate a CSR (Certificate Signing Request)

You will be asked for the details of the certificate such as domain name and address when running this command.

openssl req -new -key server.key -out server.csr

Remove Passphrase from Key

Some applications do not allow for the private key to have a passphrase. The below commands will remove the passphrase – be careful as it will mean the key is no longer protected and can be viewed by anyone with read access to the file.

openssl rsa -in server-with-passphrase.key -out server.key

Generating a Self-Signed Certificate

Once you have generated a key and CSR you will need to sign the request and generate the public certificate. If you do not have a certificate authority you can sign the certificate yourself. The below will generate a certificate which is valid for one year.

openssl x509 -req -days 365 -in server.csr -signkey server.key -out server.crt

Convert x509 to pem

openssl x509 -inform der -in server.crt -out server.pem

pkcs12 to pem – key only

Use the below command to extract only the key from a pkcs12 certificate.

openssl pkcs12 -nocerts -in c:\server.pfx -out c:\server-key.key

pkcs12 to pem – certificate only

Use the below command to extract only the public certificate from a pkcs12 certificate.

openssl pkcs12 -nokeys -in server.pfx -out server-cert.cer

Check a private key

You can check a private key with the below command.

openssl rsa -in privateKey.key -check

Check a certificate

Use the below command to check a certificate.

openssl x509 -in certificate.crt -text -noout


Bash Script to Create an SSL Certificate Key and Request (CSR)

Category : How-to

Get Social!

padlockCreating multiple SSL certificates for web servers and application can be a repetitive task. Generally speaking, when creating these things manually you would follow the below steps:

  • Create a certificate key.
  • Create the certificate signing request (CSR) which contains details such as the domain name and address details.
  • Sign the certificate
  • Install the certificate and key in the application.

If nothing else, typing out the address and organisation for every certificate can be laborious.

The below script allows you to hard code many of the details to avoid the repetition and only specify the domain name as an argument. The script is dependent on openssl which can be installed using your distributions package manger or from their website. Use apt-get on Debian/ Ubuntu:

apt-get install openssl

Once you have openssl installed, copy the below script to a file called gen-cer.

vi gen-cer
#!/bin/bash

#Required
domain=$1
commonname=$domain

#Change to your company details
country=GB
state=Nottingham
locality=Nottinghamshire
organization=Jamescoyle.net
organizationalunit=IT
[email protected]

#Optional
password=dummypassword

if [ -z "$domain" ]
then
    echo "Argument not present."
    echo "Useage $0 [common name]"

    exit 99
fi

echo "Generating key request for $domain"

#Generate a key
openssl genrsa -des3 -passout pass:$password -out $domain.key 2048 -noout

#Remove passphrase from the key. Comment the line out to keep the passphrase
echo "Removing passphrase from key"
openssl rsa -in $domain.key -passin pass:$password -out $domain.key

#Create the request
echo "Creating CSR"
openssl req -new -key $domain.key -out $domain.csr -passin pass:$password \
    -subj "/C=$country/ST=$state/L=$locality/O=$organization/OU=$organizationalunit/CN=$commonname/emailAddress=$email"

echo "---------------------------"
echo "-----Below is your CSR-----"
echo "---------------------------"
echo
cat $domain.csr

echo
echo "---------------------------"
echo "-----Below is your Key-----"
echo "---------------------------"
echo
cat $domain.key

Make sure your script has execute permissions.

chmod +x gen-cer

You can then call the script with ./gen-cer and specify your domain name as an argument. For example:

./gen-cer mynewwebserver.jamescoyle.net

The script will then output the key as well as the CSR which you will need to submit to your certificate authority (CA).


Visit our advertisers

Quick Poll

How often do you change the password for the computer(s) you use?

Visit our advertisers