Upload OVA to Proxmox/ KVM
Category : How-to
Proxmox does not have native support for an OVA template which is surprising considering it’s the open format for creating packaged virtual machines, or virtual appliances as they are often referred.
We can still get an OVA template running in Proxmox but it will take a little bit of work to transform it into a functional VM.
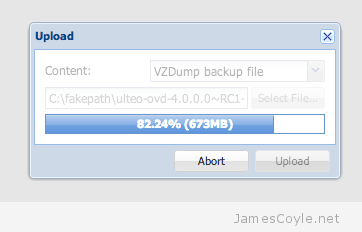
First off, lets get the OVA file uploaded to the Proxmox server; you can do this using SCP or the Proxmox web GUI. If you use the Proxmox web GUI you will need to rename the OVA to end in a iso extension and upload it as a ISO image content. Depending on the size of the OVA file and the bandwidth you have available, it may take a while to upload the file. The file will then be available in the dump folder in the selected storage.
SSH onto your Proxmox server and locate the OVA file. An OVA file is simply a tar file containing an image file and some configuration for things like CPU, RAM, etc. Run the tar command to extract the components of the OVA file onto your file system.
tar - my.ovf
The output will be two or more files – one will be an OVF file which contains the settings and configuration of the virtual machine and one or more files will be VMDKs which are the disk images of the virtual machine.
Although you can run a VMDK file in Proxmox, it’s recommended to use qcow2 which is the default file format for Proxmox virtual machines. Run the VMDK file through the converter – note this can take a while with large files.
qemu-img convert -f vmdk myvm-disk1.vmdk -O qcow2 myvm-disk1.qcow2
We now need to get the image into a VM with some hardware so that we can begin to use it. This is where things get tricky – the OVF file is not compatible with Proxmox and needs to be manually understood. The principle here is we are going to use the Proxmox web GUI to create a VM and replace the empty disk image which is created with our recently converted qcow2 image.
You can use vi to open the OVF file and understand some of the basic settings which are required for the VM. Open the OVF file and look for the following XML tags:
- OperatingSystemSection
- VirtualHardwareSection
- Network
- StorageControllers
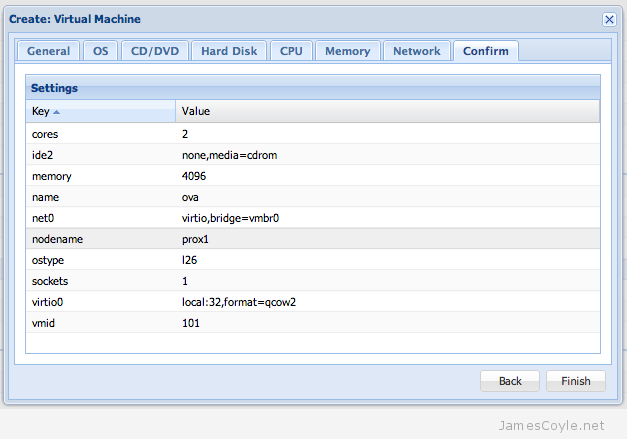
You should be able to get a rough idea of the requirements for the KVM. In the Proxmox web GUI, click on Create VM and create a VM which meets the requirements of the image you converted. Make sure that you select qcow2 for the disk format. After clicking Finish an empty VM will be created – in this example I used local storage and VMID 101 so the disk images are stored in /var/lib/vz/images/101.
Copy the previously converted qcow2 image over the existing image – be sure to overwrite the existing image otherwise your image will not be used and KVM will try to start with a blank, empty image.
mv /tmp/myvm-disk1.qcow2 /var/lib/vz/image/101/vm-101-disk-1.qcow2
Thats it – you can now start up the image from the Proxmox web GUI.
32 Comments
Anonymous
31-Aug-2014 at 1:43 pmCommand ‘tar – my.ovf’ should rather read ‘tar xvf my.ova’
Jeff Moss
14-Nov-2016 at 11:04 am…or even tar xvf my.iso
…since James has already suggested to rename the OVA to ISO before uploading it.
David RIEHL
20-Nov-2014 at 12:59 pm/usr/lib/vz/image/101/vm-101-disk-1.qcow2
should rather read /var/lib/vz/image/101/vm-101-disk-1.qcow2
james.coyle
20-Nov-2014 at 3:05 pmGood spot – thank you.
Martin
6-Mar-2015 at 6:35 pmThanks for this. It really should be a feature of proxmox!
Jeff
1-Oct-2015 at 5:22 pmAnother excellent walk-through, James, thank you very much!
Between this and your migrate script for changing storage type, I feel like we should be paying YOU instead of Maurer IT. ;^)
james.coyle
1-Oct-2015 at 6:55 pmIt’s weird, I’ve felt like that for ages!
All the best, Jeff – I’m glad it helps :)
matt
10-Dec-2015 at 9:52 pmWhat about in the case of the .ova appliance already having i.e. VMWare tools installed? any hope then?
Robert Smith
11-Feb-2016 at 5:30 pmUmmmmm….why doesn’t Proxmox just build the support for OVA (or do all the shenannigans behind the scenes). Kind of silly if you ask me.
james.coyle
11-Feb-2016 at 8:20 pmEspecially given that it’s supposed to be the *Open* Virtualization Format!
MikeP
17-Mar-2016 at 11:28 pmWhat about when using ZFS? It appears that Proxmox makes use of a ZVOL not a qcow2.
Thanks in advance.
Paul Littlefield
14-Apr-2016 at 9:53 amI have used your instructions on a Proxmox 3.3 VE and it worked with the ESET ERA Virtual Appliance, no problem.
However, now I am trying to do the same thing with a Proxmox 4.1 VE and I am getting the folllowing error when Starting the VM…
kvm: -drive file=/var/lib/vz/images/100/vm-100-disk-1.qcow2,if=none,id=drive-ide0,cache=none,format=qcow2,aio=native,detect-zeroes=on: file system may not support O_DIRECT
james.coyle
15-Apr-2016 at 7:26 pmWhat is the cache setting for the disk?
Jeff Moss
16-Jul-2016 at 10:45 pmThanks JC…just used that to help me setup a proxmox VM for a downloaded Oracle BigDataLite VM…up and running!
james.coyle
16-Jul-2016 at 10:52 pmNice one! Just make sure you give it enough resource.
Ron Oostveen
3-Sep-2016 at 10:52 pmHi James,
Nice write-up! Used it succesfully with Proxmox 3.4 last year. Thanx!
But today I installed a fresh Proxmox 4.2 server and they changed the way diskimages are stored on the hypervisor. They are no longer located in the /var/lib/vz/images folder, but somewhere on LVM-thin filesystem that is not readable and more important not writable as far as I can see. Any idea whether this procedure with a little adjustment can also work on Proxmox 4.2?
james.coyle
4-Sep-2016 at 8:04 pmI haven’t had the chance to try this on 4.2 since the storage plugins changed.
N
12-Oct-2016 at 1:12 pmYou still can uset the old storage way
lvremove /dev/pve/data
lvcreate -l 100%FREE -n data pve
mkfs.ext4 /dev/pve/data
nano /etc/fstab
# add
/dev/pve/data /var/lib/vz ext4 defaults 0 1
mount /dev/pve/data
Oscar
16-Oct-2016 at 6:31 amThanks! i can deploy my local experiments to my company server :D
curt
18-Oct-2016 at 9:48 pmI know this is an old article but wanted to say. For the new 4.3 proxmox you can do almost the same thing, but you dd the image into your drive.
Use qemu-img to convert to raw format rather than qcow2. If you do an fdisk -l, it might show up, or through invalid partition error for that partition. You can also cat /etc/pve/qemu-server/#.conf will give you the partition name.
Then it’s just a matter of dd if=myImage.raw of=/dev/mapper/pve-vm–100-disk-1 bs=1M.
james.coyle
18-Oct-2016 at 10:31 pmThanks for posting :)
mashood
10-Feb-2017 at 8:02 amHi,
I was trying it with proxmox 4.4 and didnt get any error messages.
when i ran the machine it is asking for username and password. I am wondering what it should be. As i didnt set any username or passpord??
thanks in advance
jebo1
2-Mar-2017 at 9:57 amThanks for the command qemu-img.
It is possible to view progression of conversion like : …. 10 % ….. ….. 11% ….. etc ?
TY
Bob
21-Apr-2017 at 3:41 pmkey `-p` shows progress
qemu-img -p convert -f vmdk myvm-disk1.vmdk -O qcow2 myvm-disk1.qcow2
Greg
31-Aug-2017 at 7:46 pmThe “-p” switch needs to be after the convert command:
qemu-img convert -p -f vmdk myvm-disk1.vmdk -O qcow2 myvm-disk1.qcow2
David
30-Apr-2017 at 9:39 amThat was quite a flawless transition on a Proxmox 3.4, had to dig a little finding the images, but the rest is straightforward.
Thanks a lot
Greg
31-Aug-2017 at 8:16 pmAnother option that I’ve used along with guidance from this great how-to; is to download VirtualBox, import the .ova file into their platform. Where you can easily ready all of the system specifications (CPU’s, Ram, Hdd space, etc). Then create the VM in Proxmox based upon those values. I used VirtualBox to export the .ova file to a .vmdk. Once it is a .vmdk file then I moved it to Proxmox, and converted using the “qmeu-img convert” command above. Since my PVE hosts are upgraded 4.4 hypervisors, I could rename the file in the directory and it worked like a charm.
The VM’s live under the “/var/lib/vz/images” directory in their ID# sub-folder.
The VM’s config files live under the “etc/pve/nodes/my-server-name/qemu-server” directory.
PVE 4.1 and beyond changed their file system to “blocking” as they call it and it is harder to track down the files; but improved performance. I keep an older 4.x machine around that was upgraded to so that I could easily find the files in the directory structure, and use their backup and restore feature to move the VM’s back and forth between hosts, if I need to convert their formats.
Terence Faul
19-Sep-2017 at 6:34 amJames
Thanks for a great post. I have managed to get the vm imported, but I have no network on the guest, an ubuntu server.
ifconfig gives only the loopback address
Ren
11-Jun-2022 at 10:30 pmHappened to me as well – you need to go to network configuration file and add your network card to the config – I am running ubuntu 20 so netplan is used – had to change the nic card that was in that config to the one being used on the proxmox host example: instead of having enps1s1 <—- this was my old nic card from virtualbox, I switched this to enps618 in the netplan config. You can get the name of the nic card with command ip addr and look for the appropriate card. Hope this helps!
rauf
3-Oct-2018 at 9:12 amfinally worked after several times trying.. thanks a lot man.
Robert
30-Jan-2019 at 7:46 amHi, excuse me, do you know if there is something else to migrate a disk from OVH Cloud? I have the downloaded the qcow image using Glance and i have copied to a VM in Proxmox, but it doesn’t start, in the console I can read at the last line “random: nonblocking pool is initialized”
Trent
8-Nov-2019 at 4:57 pmIt needs to be updated for Proxmox version 5.