Manually Mount a Ceph Storage Pool in Proxmox

Manually Mount a Ceph Storage Pool in Proxmox

Get Social!

ceph-logoThe latest BETA of Proxmox, and soon to be released 3.2 comes with the Ceph client automatically installed which makes mount Ceph storage pools painless.

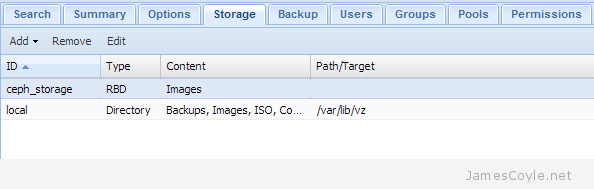
You can mount the Ceph storage pool using the Proxmox web GUI.

You may need to copy the Ceph storage pool keyring from your Ceph server to your Proxmox server. If you use authentication on your Ceph storage pool, log in to your Ceph server via SSH. Run the below scp command to copy your Ceph keyring to your Proxmox server. You will need to replace [PROXMOX_SERVER] with the host name or IP address of your Proxmox server and [STORAGE_NAME] is the name you will use for your Proxmox storage mount which will be used in the web GUI.

scp /etc/ceph/ceph.client.admin.keyring [PROXMOX_SERVER]:/etc/pve/priv/ceph/[STORAGE_NAME].keyring

For example

scp /etc/ceph/ceph.client.admin.keyring prox3.jamescoyle.net:/etc/pve/priv/ceph/ceph_storage.keyring

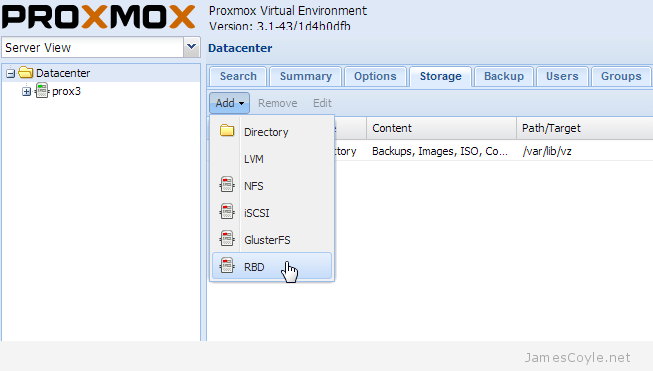
To use the Proxmox GUI to mount a Ceph storage pool, login to the web GUI and click on the Datacenter folder in the top left, then click the Storage tab, Add and finally RBD.

proxmox-add-ceph-rbd

Enter the details of your Ceph storage pool in the new dialogue box which appears.

  • ID: the name which this storage mount will have in Proxmox. If you use authentication on your Ceph server, you will need to use the same name as the above  [STORAGE_NAME] field.
  • Pool: the Ceph storage pool name.
  • Monitor Host: the host or IP addresses of your Ceph monitor servers. You can enter a single host or multiple hosts separated by a semicolon [;].
  • User name: the named use to use when connecting to the Ceph storage pool. If you are not using user authentication, set this to the below value.
    admin (optional, default = admin)

proxmox-ceph-add-rbd

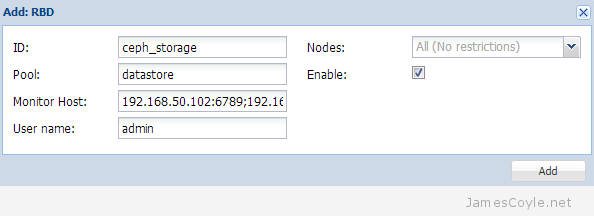
Don’t forget to make sure that the Proxmox host can reach the remote Ceph monitor hosts – by default a Ceph monitor runs on port 6789.

proxmox-ceph-storage-mount-rbd


Mount a Windows/ Samba Share in Linux

Category : How-to

Get Social!

Linux penguinGiven the amount of trouble you can have getting Linux and Windows to play nicely together, you may be surprised to find out that it’s easy to mount either a Windows file share on Linux. You can also use the same method to mount a Samba share.

This article assumes you already have a Windows or Samba share set up which is protected by a username and password. The user could be part of a domain or local to the machine which presents the storage.

The first step is to create a credentials file which will contain the username and password for accessing the file share. This needs to be in a protected area so that the details cannot be viewed. For this example, I will put the file in the root home directory.

vi /root./smbcreds

Add the following details, substituting the below details

  • [DOMAIN] – this is the domain for the file share user. This may not be required in all environments.
  • [USER] – this is the user name for the file share.
  • [PASSWORD] – this is the password of the above user.
username=[DOMAIN]\[USER]
password=[PASSWORD]

For example:

username=JAMESCOYLE\james.coyle
password=mypassword

Before continuting with the configuration, we need to make sure that the required packages are installed. On Ubuntu, you can use the apt-get command. Use your distributions package manager for other Linux distributions.

apt-get install cifs-utils

The next step is to create a folder where you will mount the Windows or samba share to in Linux. I will use the mount point /mnt/winshare.

mkdir /mnt/winshare

Now open fstab and add a new row at the bottom of the file to mount the remote share to the local folder. Add the below line to your fstab and substitute the values for your environment.

  • [SHARE_LOCATION] – is the remote host name/ DNS and shared folder name.
  • [MOUNT_LOCATION] – is the local path which will be used as the mount point for the Windows or Samba share.
  • cifs – is the type of mount to use. For older Linux systems you may need to use smbfs.
  • [CREDENTIALS_FILE] – is the location of the local credentials file.
//[SHARE_LOCATION]  [MOUNT_LOCATION]  cifs  credentials=[CREDENTIALS_FILE],iocharset=utf8,uid=1001,_netdev,file_mode=0770,dir_mode=0770 0 0

For example:

//windowsbox/sharename  /mnt/winshare  cifs  credentials=/root/.smbcreds,iocharset=utf8,uid=1001,_netdev,file_mode=0770,dir_mode=0770 0 0

Finally we need to create the mount which will use the details in fstab. Change [MOUNT_POINT] to match the mount point you created.

mount [MOUNT_POINT]

For example:

mount /mnt/winshare

Proxmox bind mount for OpenVZ – mount storage in a container

Category : How-to

Get Social!

proxmox logo gradYou can allocate storage to an OpenVZ container during creation, when the container is offline and even when the container is active. The main problem with this is that it is not shared, and has to be on the same storage which the container was created on.

You can mount any folder which is available to the host operating system in any container. You can also mount the same storage in multiple containers.

Before you begin, make sure the storage is mounted and usable on the host file system. For this example, we are going to use a disk which is mounted on the host at /mnt/binaries.

On the host, locate where your OpenVZ container config files are stored. On a standard Proxmox installation, this is /etc/vz/conf/. 

cd /etc/vz/conf/

Create a file with the naming convention [VMID].mount. This will be the file which is executed each time the container is started as part of the boot process. This example will assume the container is using VMID 270.

vi 270.mount

Add the below content to this file making the two changes; [HOST FOLDER] should be replace with the location on the host to use for storage in the container and [GUEST FOLDER] which will be the folder on the guest container where the storage will be available. The location on both the physical host and virtual guest must exist when the container is started. 

#!/bin/bash
. /etc/vz/vz.conf
. ${VE_CONFFILE}
SRC1=[HOST FOLDER]
DST1=[GUEST FOLDER]

mount -n -t simfs ${SRC1} ${VE_ROOT}${DST1} -o ${SRC1}

The below example makes /mnt/binaries on the host available at /mnt/vm_binaries on the guest.

#!/bin/bash
. /etc/vz/vz.conf
. ${VE_CONFFILE}
SRC1=/mnt/binaries
DST1=/mnt/vz_binaries

mount -n -t simfs ${SRC1} ${VE_ROOT}${DST1} -o ${SRC1}

To create multiple bind mounts, edit the below example.

#!/bin/bash
. /etc/vz/vz.conf
. ${VE_CONFFILE}
SRC1=/mnt/binaries
DST1=/mnt/vz_binaries
SRC2=/mnt/homes
DST2=/homes
SRC3=/mnt/backups
DST3=/mnt/vz_backups

mount -n -t simfs ${SRC1} ${VE_ROOT}${DST1} -o ${SRC1}
mount -n -t simfs ${SRC2} ${VE_ROOT}${DST2} -o ${SRC2}
mount -n -t simfs ${SRC3} ${VE_ROOT}${DST3} -o ${SRC3}

If you have many mounts something more elegant could be created however, generally speaking, only a few mount points are required per guest meaning that this brutish script is perfectly adequate.

These settings will require a restart of your container as the scripts are only applied on container start up.


Visit our advertisers

Quick Poll

Do you use GlusterFS in your workplace?

Visit our advertisers