Where to Run Ceph Processes For High Availability

Where to Run Ceph Processes For High Availability

Tags :

Category : Knowledge

Get Social!

ceph-logoIn this blog post we’re going to take a detailed look at the Ceph server processes within a Ceph cluster of multiple server nodes.

Ceph is a highly available network storage layer that uses multiple disks, over multiple nodes, to provide a single storage platform for use over a network. Ceph is designed to be fault tolerant to ensure access to data is always available.

A Ceph cluster consists of 4 components:

  1. Monitor – is the daemon that holds the cluster map listing all the available nodes and Ceph daemons that are available for use by the cluster.
  2. OSD – is the daemon that handles the reading and writing of data to a physical disk. One OSD process will run per storage medium (usually a single disk device such as /dev/sdb) attached to the cluster. For example, a single server with 3 hard disks attached for use by the Ceph cluster will run 3 OSD processes.
  3. Metadata – is only required is Ceph will be used as a CephFS, that is a network filesystem. The Metadata, or MDS, daemon contains metadata on files and directories such as size and directory hierarchy so that Ceph can be used as a POSIX compliant filesystem. There can only be one active MDS daemon at any one time, but at least one secondary passive MDS daemon is advised to provide fault tolerance.
  4. Client – is used to read and write to the Ceph cluster. It allows the Linux kernel to mount a Ceph cluster as a filesystem, use Ceph as an object store or use Ceph as a block device.

Ceph Process Architecture

The Ceph storage daemons can run on dedicated hardware to provide a highly available file storage layer to remote clients over a network. This configuration is similar to a typical file server where the hardware is dedicated to only serving data. Extremely large or high performance storage requirements would usually be configured in this way to ensure there is sufficient resource (such as CPU, RAM and disk) to meet the requirements of the cluster. Ceph can also be used, in smaller and less demanding environments, to run alongside existing applications to maximise the use of existing hardware and reduce costs. This is one of the recommended setups for Proxmox VE, for example. The below example shows a 4 server cluster of Ceph daemons, suitable for either of the above two scenarios.

Ceph Cluster Process Overview

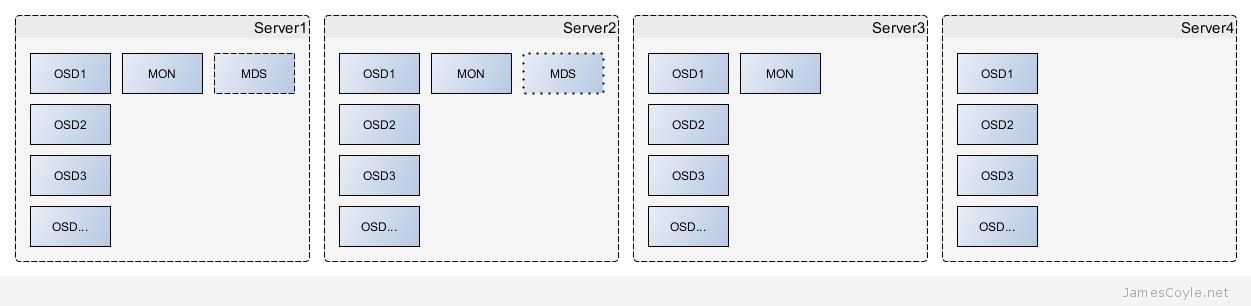
Server1 has 4 OSD processes running, which would indicate there are 4 physical disks used by Ceph on the server. The monitor daemon ensures that available nodes and daemons are tracked so that requests for I/ O can be served by active nodes. Finally, the optional MDS daemon is available and running for metadata requests from a Ceph filesystem. There can only be one active MDS daemon for a cluster, therefore server one hosts the primary MDS daemon.

Server2 is the same as Server1 however it’s MDS process is in standby mode. As only one MDS daemon can be answering requests at any given time, the MDS daemon runs in Active/ Passive mode. If the Active daemon fails, it takes around 30 seconds for the Passive daemon to become Active. This can present a small period of downtime for metadata requests. Future versions of Ceph will change this behaviour to create a more redundant process.

Server3 does not have any MDS component because there are already two nodes hosting an active and standby MDS process.

Server4 only hosts OSD processes. All other processes are already highly available and with a node of this size there is plenty of redundancy.

Scaling Ceph


Ceph is very modular by design, with each process having a specific task and talking to other processes over the network. Adding new servers is something that can be done easily, and without downtime to the existing storage pool. Further storage servers would look like either Server3 or Server4.

Generally additional servers are added so that more disks can be added to the cluster, and therefore it’s easy to understand why additional OSD processes would be added. In addition to adding additional servers (horizontal scaling), if existing servers have sufficient resource, further OSD processes could be added to the existing servers (vertical scaling). Adding additional OSD processes could be to either increase the overall storage pool size, increase the replication factor or to increase available bandwidth.

Mon processes, however, are not required on all servers and are only needed in multiples to prevent a failure causing downtime. Ceph requires a majority of monitors running to establish a quorum therefore monitors should always exist in odd numbers. To explain a little further; more monitor processes must be available then failed, for a cluster. So in a cluster with 10 monitor processes only 4 could fail before causing a problem, whereas with 11 monitor processes 5 could fail. Generally 3 mon processes will be sufficient for common Ceph cluster requirements.

Conclusion

Ceph should be provisioned to provide at least the minimum availability you need from your storage pool and the maximum risk you can afford to data loss. Each component must be balanced; it’s no good having a fully fault tolerant suite of monitor processes if you’ve not enabled data replication.

My final point is to plan for cluster maintenance as well as failures. Throughout a cluster’s lifetime, it’s reasonable to expect that individual servers will be taken out of service for short periods of time. For example, applying Ceph updates requires that the components are restarted, or applying kernel updates often results in a complete restart of the host taking several minutes to complete. During this time your cluster will be in a degraded state as services required by the cluster are offline. Ceph is designed to work in this scenario (depending on configuration) however if, for example, you only have 3 mon processes and you take the server down running one of them to apply a kernel update then the cluster cannot function if another mon process fails due to other reasons.


A New Version Of Ceph Has Been Released, Ceph Jewel

Category : Tech News

Get Social!

ceph-logoThe latest version of Ceph has been released codenamed Jewel with version number 10.2.0. Ceph Jewel has been released as a long term support (LTS) version and will be retired in November 2017.

The Ceph Jewel release marks the first stable release of CephFS. Whilst some have been using CephFS for some time, this is the first release it’s officially marked as stable and production ready.

Various other improvements have been made with the Jewel release:

  • CephFS:
    • This is the first release in which CephFS is declared stable! Several features are disabled by default, including snapshots and multiple active MDS servers.
    • The repair and disaster recovery tools are now feature-complete.
    • A new cephfs-volume-manager module is included that provides a high-level interface for creating “shares” for OpenStack Manila and similar projects.
    • There is now experimental support for multiple CephFS file systems within a single cluster.
  • RGW:
    • The multisite feature has been almost completely rearchitected and rewritten to support any number of clusters/sites, bidirectional fail-over, and active/active configurations.
    • You can now access radosgw buckets via NFS (experimental).
    • The AWS4 authentication protocol is now supported.
    • There is now support for S3 request payer buckets.
    • The new multitenancy infrastructure improves compatibility with Swift, which provides a separate container namespace for each user/tenant.
    • The OpenStack Keystone v3 API is now supported. There are a range of other small Swift API features and compatibility improvements as well, including bulk delete and SLO (static large objects).
  • RBD:
    • There is new support for mirroring (asynchronous replication) of RBD images across clusters. This is implemented as a per-RBD image journal that can be streamed across a WAN to another site, and a new rbd-mirror daemon that performs the cross-cluster replication.
    • The exclusive-lock, object-map, fast-diff, and journaling features can be enabled or disabled dynamically. The deep-flatten features can be disabled dynamically but not re-enabled.
    • The RBD CLI has been rewritten to provide command-specific help and full bash completion support.
    • RBD snapshots can now be renamed.
  • RADOS:
    • BlueStore, a new OSD backend, is included as an experimental feature. The plan is for it to become the default backend in the K or L release.
    • The OSD now persists scrub results and provides a librados API to query results in detail.
    • We have revised our documentation to recommend against using ext4 as the underlying filesystem for Ceph OSD daemons due to problems supporting our long object name handling.

Taken from release notes


Persistent Ceph Mount Point

Tags :

Category : How-to

Get Social!

ceph-logoOnce you’ve got a Ceph cluster up and running you’re going to want to mount it somewhere. This guide assumes that the mount point will be on a machine that isn’t running Ceph, however if you’re mounting the storage on one of the Ceph server nodes then you can skip the package installation steps.

Install the Ceph Client

Before we start mounting anything, we’re going to need the required software installed. Assuming you’re on Debian run the below commands to add the key and the software repository for the Ceph binaries.

wget --no-check-certificate -q -O- 'https://git.ceph.com/git/?p=ceph.git;a=blob_plain;f=keys/release.asc' | apt-key add -
echo deb http://download.ceph.com/debian-firefly/ $(lsb_release -sc) main | tee /etc/apt/sources.list.d/ceph.list

Then run the apt-get commands to update your software index and install the Ceph binaries for the client.

apt-get update && apt-get install -y ceph-fs-common

Mount a Ceph device as a folder

Here we’re going to use /mnt/ha-pool as the mount point but you can change that to whatever you’d like. Run this command on any machine that you’d like to mount the Ceph volume on.

mkdir /mnt/ha-pool

Then we need to export the key so that the ceph-client can authenticate with the Ceph daemon. You could turn authentication off, or even create a non-admin user secret but for this tutorial we’ll just use the admin user. Run this command on your admin machine for your Ceph cluster (NOT on the client you’re setting up the mount point).

ceph-authtool --name client.admin /etc/ceph/ceph.client.admin.keyring --print-key

You’ll be presented with a string of letters and numbers. Copy this and add it to a file stored on your Ceph client machine. This is the ‘password’ or secret that the Ceph client will use to authenticate with the Ceph server. Paste the string into a file – you can store this anywhere but we’ll use /etc/ceph/admin.secret.

mkdir /etc/ceph/ 
vi /etc/ceph/admin.secret

Automatic mount

If you’d like the Ceph mount point to persist across client machine reboots then you’ll need to add an entry to /etc/fstab. Run the below command to add an entry to your fstab file so that the Ceph volume will be automatically mounted on machine start. This will mount the Ceph volume at /mnt/ha-pool and is referencing the Ceph monitor server nodes ceph1, ceph2 and ceph3 – make sure you change these values for your environment. You don’t have to specify more than one Ceph monitor server node, but it makes sense, just incase one of your nodes fails.

echo "cehp1,ceph2,ceph3:/ /mnt/ha-pool/ ceph name=admin,secretfile=/etc/ceph/admin.secret,noatime 0 2" >> /etc/fstab

Then to mount the volume, run the below mount command

mount /mnt/ha-pool

Manually mount filesystem

If you don’t need the mount to persist you can simply use the mount command. The parameters are very similar to the above section, with the Ceph monitor servers, secret file and mount point all specified. This will mount the Ceph volume at /mnt/ha-pool and is referencing the Ceph monitor server nodes ceph1, ceph2 and ceph3 – make sure you change these values for your environment.

mount -t ceph ceph1,ceph2,ceph3:/ /mnt/ha-pool -o name=admin,secretfile=/etc/ceph/admin.secret

Ceph mount ports and additional options

By default, and if left unspecified like the above examples, the Ceph client will use 6789 for your monitor server daemon. If you’ve specified a different port for your monitor daemon then you can specify them in the mount command. The same syntax can be used in your fstab.

mount -t ceph ceph1:1234,ceph2:4567,ceph3:8910/ /mnt/ha-pool -o name=admin,secretfile=/etc/ceph/admin.secret

You can also specify your secret key directly, rather than a file that contains it. I won’t go into the security implications of this here, but I’m sure you can imagine one or two. Again, the same syntax can be used in your fstab.

mount -t ceph ceph1,ceph2,ceph3:/ /mnt/ha-pool -o name=admin,secret=AQATSKdNGBnwLhAAnNDKnH65FmVKpXZJVasUeQ==

Small Scale Ceph Replicated Storage

Category : How-to

Get Social!

I’ve written a few posts about Ceph, how it works and how it’s set up and it mostly revolves around large scale storage for storing things like virtual machines. This post will focus on using Ceph  provide fault tolerant storage for a small amount of data in a low resource environment. Because of this, the main focus has been moved away from performance and switched to:

  • availability – the storage should always be available and recoverable in the event of disaster
  • portability – the storage isn’t tied to a machine and can be moved with relative ease.
  • scalability – more machines can use the storage as required.

This tutorial will focus on a small scale Ceph setup, fit for something like a Raspberry Pi or low resource VPS. We’ll use 3 machines but you could easily add more machines if your scenario requires it.

If you are looking for a larger setup, then see this blog post on installing Ceph.

ceph-local

The above diagram shows the topology of the layout. Each machine will have a file /ceph-file that will be mounted as a block device on /dev/loop0 and that’s the space that will be assigned to Ceph. Ceph will replicate any data stored to the file and ensure the data is available to all Ceph clients. The Ceph storage will be accessed from a mountpoint at /mnt/ha-pool.

Ceph block device

The first step in creating a Ceph storage pool is to set aside some storage that can be used by Ceph. Ceph stores everything twice, by default, so whatever storage you provision will be halved. For this example we’re going to use a file created with dd as the Ceph storage device, however you could use a drive mounted in /dev/ if you have one. A whole drive is by far the preferred solution, however as I’ve stated, the main goal of this post isn’t just performance.

If you’re going to use a file for storage, follow my post on creating a block device from a file and mount it on loop0. Otherwise you can continue to the next step.

OpenVZ: if you’re using Ceph inside of an OpenVZ container, make sure you pass the loop device through to the container.

Installing Ceph

At this point it’s worth noting that Ceph, in addition to the application requirements, will use approximately 1MB of RAM for each GB of storage provisioned. This means that 1TB of provisioned storage (which in today’s world is rather small) would take 1GB of RAM plus the requirements of running the Ceph daemons. For our low memory footprint, only provision the storage that you’ll need.

Before starting the install, you’ll need a couple of things in place:

  • SSH Keys are set up between all nodes in your cluster – see this post for information on how to set up SSH Keys. For security it’s good practice to set up a new user on all machines you’re going to install Ceph onto and use it to run Ceph. The key should also be copied to all machines using the ssh-copy-id command.
  • NTP is set up on all nodes in your cluster to keep the time in sync. You can install it with: apt-get install ntp

The following commands are for installing Ceph on Debian (wheezy) and should be executed on all machines that need to run Ceph. In our example, these commands will be executed on Server 1Server 2 and Server 3.

First let’s add the release key and repositories to the apt package manager. Run the following as root:

wget --no-check-certificate -q -O- 'https://git.ceph.com/git/?p=ceph.git;a=blob_plain;f=keys/release.asc' | apt-key add -
echo deb http://download.ceph.com/debian-firefly/ $(lsb_release -sc) main | tee /etc/apt/sources.list.d/ceph.list

Next let’s update our apt cache and install Ceph and a few other bits.

apt-get update && apt-get install ceph-deploy ceph ceph-common

Setup and configuring for minimal resource requirements

The next step should be done on just one of your Ceph machines. This will create the monitor service and make each machine aware of the other machines running Ceph.

The command references each machine you’re going to be running Ceph on by hostname or DNS entry. Before running the command, make sure that all of your machines resolve via DNS or hosts file. Because I’m only running this in a lab, I’ve used the hosts file route and added an entry to each machine in the hosts file of all Ceph machines.

vi /etc/hosts

Add your Ceph machine IP and hostnames.

10.10.10.1 ceph1
10.10.10.2 ceph2
10.10.10.3 ceph3

You can test that each machine can see the others by using the ping command. If it works then you should be in business!

ping ceph2
ping ceph3

Once you’re happy that all machines can reference the other machines then run the ceph-deploy command:

ceph-deploy new ceph1 ceph2 ceph3

If you haven’t used your ssh keys since setting them up you may be presented with the following warning. Just type yes to continue.

The authenticity of host 'ceph1 (10.10.10.1)' can't be established.
ECDSA key fingerprint is 66:44:a8:90:e2:8e:12:0e:05:4a:c4:93:a1:43:d1:fd.
Are you sure you want to continue connecting (yes/no)? yes
Warning: Permanently added 'ceph1' (ECDSA) to the list of known hosts.

We now need to configure Ceph with our low resource settings. These settings are not performance driven, but instead set to minimise system resources.

See ceph.conf for the script and add the content to the ceph.conf file

vi ~/ceph.conf

Create the initial mds daemons, monitor daemons and set the proper permissions on the keyring file.

ceph-deploy mon create-initial
ceph-deploy admin ceph1 ceph2 ceph3
ceph-deploy mds create ceph1 ceph2 ceph3

ssh ceph1 "chmod 644 /etc/ceph/ceph.client.admin.keyring"
ssh ceph2 "chmod 644 /etc/ceph/ceph.client.admin.keyring"
ssh ceph3 "chmod 644 /etc/ceph/ceph.client.admin.keyring"

Test Ceph is deployed and monitors are running

At this point it’s good to take a step back and check everything is up and running. We’ve still not assigned any storage to our Ceph cluster so we can’t run it yet, but we should have the monitor daemons running and the cluster configuration be deployed on all servers.

Run the below command and take a look at the output.

ceph -s

The output should show

cluster 51e1ddff-ff28-4f58-af7e-e94448e5324b
   health HEALTH_ERR 192 pgs stuck inactive; 192 pgs stuck unclean; no osds
   monmap e1: 3 mons at {ceph1=10.10.10.1:6789/0,ceph2=10.10.10.2:6789/0,ceph3=10.10.10.3:6789/0}, election epoch 6, quorum 0,1,2 ceph1,ceph2,ceph3
   osdmap e1: 0 osds: 0 up, 0 in
    pgmap v2: 192 pgs: 192 creating; 0 bytes data, 0 KB used, 0 KB / 0 KB avail
   mdsmap e8: 1/1/1 up {0=web1=up:active}, 2 up:standby

As you can see, three Ceph servers are referenced on port 6789 which is the monitor daemon port number.

Add storage to the Ceph cluster

We’ve got our Ceph cluster, and we’ve got our storage device that we created as the first step, it’s time to put the two together. Run the below commands on the same machine that you ran the above steps on. You’ll need to replace /dev/sda with the block device on each ceph machines that you’d  like to use. Note that the block device (sda) does not need to be the same on all machines.

ceph-deploy osd create --fs-type ext4 ceph1:/dev/sda
ceph-deploy osd create --fs-type ext4 ceph2:/dev/sda
ceph-deploy osd create --fs-type ext4 ceph3:/dev/sda

Or…

You can use a directory as storage for Ceph, rather than a block device.

If you’re following this tutorial and creating a loop device to use with Ceph then you’ll need to ensure there is a filesystem on the loop0 device and that it’s mounted. You can skip these next step if you are just using an existing directory.

Run the below commands (if you’re using a loop device) on each of the machines that has a loop device you’d like to use. We’re assuming that you’re loop device is loop0. For this example we’ll run it on each of the three machines; ceph1, ceph2 and ceph3.

mkfs.ext4 /dev/loop0
mkdir /mnt/ceph-backing0
echo "/dev/loop0 /mnt/ceph-backing0 ext4 defaults 1 1" >> /etc/fstab
mount /mnt/ceph-backing0

You can use a directory path on the Ceph machine as the OSD device. This may be an option if you’re in an OpenVZ or Docker container that doesn’t allow you to pass through block devices.

ceph-deploy osd prepare ceph1:/mnt/ceph-backing0
ceph-deploy osd prepare ceph2:/mnt/ceph-backing0
ceph-deploy osd prepare ceph3:/mnt/ceph-backing0

And then activate the storage:

ceph-deploy osd activate ceph1:/mnt/ceph-backing0
ceph-deploy osd activate ceph2:/mnt/ceph-backing0
ceph-deploy osd activate ceph3:/mnt/ceph-backing0

Mount a Ceph device as a folder

That’s the server side done! The last step to using our Ceph storage cluster is to mount the cluster to a mountpoint on the local filesystem. Here we’re going to use /mnt/ha-pool as the mount point but you can change that to whatever you’d like. Run these commands on any machines that you’d like to mount the Ceph volume on.

First create the mount point where the Ceph storage will be accessible from.

mkdir /mnt/ha-pool

Then we need to export the key so that the ceph-client can authenticate with the Ceph daemon. You could turn authentication off, or even create a non-admin user secret but for this tutorial we’ll just use the admin user.

ceph-authtool --name client.admin /etc/ceph/ceph.client.admin.keyring --print-key >> /etc/ceph/admin.secret

Then run the below command to add an entry to your fstab file so that the Ceph volume will be automatically mounted on machine start. This will mount the Ceph volume at /mnt/ha-pool.

echo "ceph1,ceph2,ceph3:/ /mnt/ha-pool/ ceph name=admin,secretfile=/etc/ceph/admin.secret,noatime 0 2" >> /etc/fstab

Finally run the mount command

mount /mnt/ha-pool

One last check to make sure you’re up and running:

df -h | grep ha-pool
10.10.10.1,10.10.10.2,10.10.10.3:/                    6G   3G   3G  54% /mnt/ha-pool

And that’s it! You have a working Ceph cluster up and running!


Ceph Minimal Resource ceph.conf

Tags :

Category : Supporting Scripts

Get Social!

The below file content should be added to your ceph.conf file to reduce the resource footprint for low powered machines.

The file may need to be tweaked and tested, as with any configuration, but pay particular attention to osd journal size. As with many data storage systems, Ceph creates a journal file of content that’s waiting to be committed to ‘proper’ storage. The osd journal size sets the the maximum amount of data that can be stored in the journal.

It should be calculated as follows:

2 * (T * filestore max sync interval)

T in this scenario is the lowest maximum throughput that’s expected through the network or on the disk. For example, a standard mechanical hard disk writes at roughly 100MB/ s. A 1GBPS network has a maximum throughput of 125 MB/s and therefore 100MB is the value of T. The parameter filestore max sync interval is 5 by default.

Therefore, 2 * (100 * 5 ) = 1000.

  # Disable in-memory logs
  debug_lockdep = 0/0
  debug_context = 0/0
  debug_crush = 0/0
  debug_buffer = 0/0
  debug_timer = 0/0
  debug_filer = 0/0
  debug_objecter = 0/0
  debug_rados = 0/0
  debug_rbd = 0/0
  debug_journaler = 0/0
  debug_objectcatcher = 0/0
  debug_client = 0/0
  debug_osd = 0/0
  debug_optracker = 0/0
  debug_objclass = 0/0
  debug_filestore = 0/0
  debug_journal = 0/0
  debug_ms = 0/0
  debug_monc = 0/0
  debug_tp = 0/0
  debug_auth = 0/0
  debug_finisher = 0/0
  debug_heartbeatmap = 0/0
  debug_perfcounter = 0/0
  debug_asok = 0/0
  debug_throttle = 0/0
  debug_mon = 0/0
  debug_paxos = 0/0
  debug_rgw = 0/0
  osd heartbeat grace = 8

[mon]
  mon compact on start = true
  mon osd down out subtree_limit = host

[osd]
  # Filesystem Optimizations
  osd mkfs type = btrfs
  osd journal size = 512

  # Performance tuning
  max open files = 327680
  osd op threads = 2
  filestore op threads = 2
  
  #Capacity Tuning
  osd backfill full ratio = 0.95
  mon osd nearfull ratio = 0.90
  mon osd full ratio = 0.95

  # Recovery tuning
  osd recovery max active = 1
  osd recovery max single start = 1
  osd max backfills = 1
  osd recovery op priority = 1

  # Optimize Filestore Merge and Split
  filestore merge threshold = 40
  filestore split multiple = 8

With thanks to Bryan Apperson for the config.


Proxmox 3.2 is now available with SPICE, Ceph and updated QEMU

Category : Tech News

Get Social!

proxmox logo gradProxmox has today released a new version of Proxmox VE, Proxmox 3.2 which is available as either a downloadable ISO or from the Proxmox repository.

Hilights of this release include’;

  • Ceph has now been integrated to the Proxmox web GUI as well as a new CLI command created for creating Ceph clusters. See my post on Ceph storage in Proxmox for more information.
  • SPICE is now fully integrated as the console viewer however the original Java console is still the default. SPICE supports multiple monitors and all recent guest operating systems.
  • QEMU has been updated with better backups and a few new supported guest hardware devices, mostly for compatibility with VMWare.

You can download the ISO from Proxmox directly at the following link:
http://www.proxmox.com/downloads/item/proxmox-ve-3-2-iso-installer

If you already have Proxmox installed, you can use the below commands to automatically update your Proxmox servers to the latest 3.2 version from the terminal. Before updating, make sure all your VM’s have been stopped. Run the below commands on each server in your cluster.

Upgrade
apt-get update
apt-get dist-upgrade

Restart all Proxmox servers to complete the installation.


Visit our advertisers

Quick Poll

Which type of virtualisation do you use?
  • Add your answer

Visit our advertisers