OBIEE With Essbase as a Data Source Using SSO

OBIEE With Essbase as a Data Source Using SSO

Get Social!

oracle-biThere are various ways to integrate OBIEE and Essbase when using SSO, each with their own security specifics and implementation difficulty. The three main ways of SSO authentication between OBIEE and Essbase are:

  1. Username and password pass-through – this passes the user name and user password through to the Essbase server with each request. This will not work with some OBIEE Authentication methods such as SAML SSO Authentication due to the fact that the OBIEE server never knows the user password.
  2. CSS Token authentication – This is not recommended any more due to the difficulty in setting it up. This process differers depending on the version of Essbase used.
  3. User Impersonation – this uses an Essbase Admin user (or user with the required permission) for the connection between OBIEE and Essbase however when data is requested, the username is passed to the Essbase server as part of the EssLoginAs function. This function is similar to using su – username in Linux as it assumes the username‘s status despite who initially connected.

Option 1 doesn’t work in all scenarios, such as when OBIEE authentication is done using SAML SSO – so that rules out option 1. Oracle no longer recommends using the CSS Token method due to the complexity involved in setting it up – so that removes option 2 from the pool.

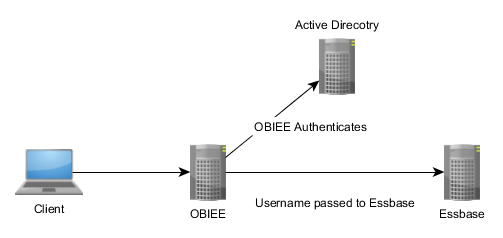
Option 3 is the new, recommended method of connecting OBIEE to an Essbase data source using single sign on. The client authenticates with OBIEE using the Authentication Provider, in this case Active Directory, and then sends the username to the Essbase server to run all further commands (such as ‘give me some data’) as if it were the user running them.

obiee_essbase

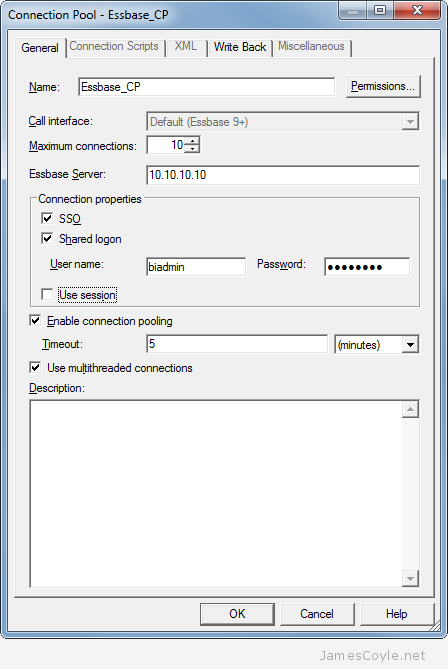
Setting this up is very easy. You need an Essbase user that has permission to run EssLoginAs , such as any admin user. Once you have that, enter that users credentials into the Connection Pool’s User name and Password fields under Shared logon and tick the SSO check box.  And that’s it – you’re good to go!

Connection Pool - Essbase_CP

It’s worth noting that if you look at Sessions in the EAS Console you’ll only see the Admin user name and not the user being impersonated. It can be a bit misleading, but you’ll see something similar to the below in the Essbase logs:

[Thu Jun 18 20:18:12 2015]Local/ESSBASE0///Info(1051529)
Logging in user [essbaseadmin] with security privileges of user [james]

This shows the initial user that is in your Connection Pool, essbaseadmin, and the user being impersonated, james.


Share a Single MDS Schema Between Multiple OBIEE Installations

Category : How-to

Get Social!

oracle-biIf you’ve installed OBIEE as many times as I have you’ll be more than familiar with the RCU and the two schemas it creates, MDS and BIPLATFORM. What you may not know, howerver, is that the MDS schema can be shared with multiple installations of OBIEE. A BIPLATFORM schema is still required for each OBIEE environment.

obiee_shared_mds

The above diagram shows a single MDS schema which is shared with each OBIEE environment; Dev, Test and Prod. Each of the OBIEE environments still has it’s own BI_PLATFORM schema. When running the RCU, you will need to run it 3 times in total; once with the MDS and BIPLATFORM components selected, and twice with just the BIPLATFORM component selected.

obiee-rcu-components


When it comes to installing OBIEE, you simpley use the same MDS details for all servers, but change the BIPLATFORM credentials to match the environment.

Obviously this method introduces it’s own problems with several environments using the same database when it comes to patching and upgrading. I’m not saying you should do it this way, just that you can!


Add a new skin to an OBIEE scaled out cluster

Category : How-to

Get Social!

oracle-biIf you are using a cluster configuration, there are multiple methods you can use to deploy a skin. Below details a method which results in a single shared resource location that each member of the OBIEE cluster will use.

This walk through assumes you already have an OBIEE cluster installed. You will also need a shared storage mount on each of the servers. The storage must be shared, so that if you add a file on one server, it’s available for all the others. You can mount this storage in any location accessible by the oracle user. For this guide, we’ll assume you’ve mounted it in /path/to/share however a more realistic example would be something like /mnt/obiee_skins.

Create a folder in the shared area called analyticsRes.

mkdir /path/to/share/analyticsRes

Copy both the sk_ and s_ directories to the analyticsRes directory.

cp -r/middleware/Oracle_BI1/bifoundation/web/app/res/sk_blafp /path/to/share/analyticsRes/
cp -r/middleware/Oracle_BI1/bifoundation/web/app/res/s_blafp /path/to/share/analyticsRes/

Edit the instance config file on all nodes of the cluster

vi /middleware/instances/instance2/config/OracleBIPresentationServicesComponent/coreapplication_obips1/instanceconfig.xml

Add or edit the following tags between <ServerInstance><WebConfig>.

<URL>
<!--     <CustomerResourceVirtualPath>/analyticsRes</CustomerResourceVirtualPath> -->
    <CustomerResourcePhysicalPath>/path/to/share/analyticsRes</CustomerResourcePhysicalPath>
</URL>

Note: The line which is commented out can be used, however this will be relative to each instances install location. This is fine for a single node install, but will cause problems with clustering as each cluster has it’s own instance.

Add or edit the following tags replacing SkinName with the name of your skin. The skin name will be the name of the folder after sk_.

<UI>
    <DefaultSkin>SkinName</DefaultSkin>
    <DefaultStyle>SkinName</DefaultStyle>
</UI>

Repeat the above instanceconfig steps for each node of the cluster.

We now need to add an Application in Weblogic so that the images, JS and CSS in the skins and style folders can be served to clients browsers. Log in to the Weblogic console.

This can be found on port 7001, by default, on the primary node of your OBIEE cluster: http://biurl.com:7001/console/

Select Deployments and click Lock and Edit on the left. Click the Install button to add a new deployment.

Summary of Deployments WLS Console
Enter the full path to your analyticsRes folder, including the analyticsShare part in the Path textbox and click next. For example, enter:

/path/to/share/analyticsRes

Select Install this deployment as an application and click Next. Select the tickbox bi_cluster to enable this application for all nodes in the cluster and click Next.

The next screen should be left as default for all options except the bottom one which should be I will make the deployment accessible from the following location with the path to your AnalyticsRes folder already filled in. Click Finish to complete the deployment.

Install Application Assistant WLS Console

The next step is to start the newly deployed application.  Log in to the Weblogic console. This can be found on port 7001, by default, on the primary node of your OBIEE cluster: http://biurl.com:7001/console/

Click Deployments and find your new analyticsRes application which should be in a Prepared state. Click the tickbox next to the deployment and click Start and then Servicing all requests.

Summary of Deployments - WLS Console

You will have to restart all cluster nodes for the changes to take effect – specifically the Presentation Services.
You can add other static resources to this folder which will be accessible from http://biurl.com/analyticsRes/example-resource.png.


Refresh Oracle Business Intelligence GUIDs

Get Social!

webcatWhen copying or making significant changes to the OBIEE 11G web catalog, users can experience difficulty with login. This includes OBIEE patching and upgrades, or moving to a new server such as releasing. To correct this issue, you must force OBIEE to refresh the web catalog. This is done by manually editing two configuration files, restarting the OBIEE system, removing the changes and restarting the OBIEE system once more.

Open the following file for editing:

ORACLE_INSTANCE/config/OracleBIServerComponent/coreapplication_obisn/NQSConfig.ini

Locate the attribute FMW_UPDATE_ROLE_AND_USER_REF_GUIDS and change the value to YES.

FMW _UPDATE_ROLE_AND_USER_REF_GUIDS = YES

Save and close the file.

Open the following file for editing:

ORACLE_INSTANCE/config/OracleBIServerComponent/OracleBIPresentationServicesComponent/instanceconfig.xml

Locate the following text:

<Catalog>
<UpgradeAndExit>false<UpgradeAndExit>
</Catalog>

Add “<UpdateAccountGUIDs>UpdateAndExit</UpdateAccountGUIDs>” to match below:

<Catalog>
<UpgradeAndExit>false<UpgradeAndExit>
<UpdateAccountGUIDs>UpdateAndExit</UpdateAccountGUIDs>
</Catalog>

Save and close the file.

Restart the OBIEE system components using opmnctl in a terminal window.

#cd ORACLE_HOME/admin/instance/bin
#./opmnctl stopall
#./opmnctl startall

Change the settings back to the original values. Open the following file for editing:

ORACLE_INSTANCE/config/OracleBIServerComponent/coreapplication_obisn/NQSConfig.ini

Locate the attribute FMW_UPDATE_ROLE_AND_USER_REF_GUIDS and change the value to NO.

FMW _UPDATE_ROLE_AND_USER_REF_GUIDS = NO

Save and close the file.

Open the following file for editing:

ORACLE_INSTANCE/config/OracleBIServerComponent/OracleBIPresentationServicesComponent/instanceconfig.xml

Locate the following text:

<Catalog>
<UpgradeAndExit>false< UpgradeAndExit>
<UpdateAccountGUIDs>UpdateAndExit</UpdateAccountGUIDs>
</Catalog>

Remove “<UpdateAccountGUIDs>UpdateAndExit</UpdateAccountGUIDs>” to match below:

<Catalog>
<UpgradeAndExit>false<UpgradeAndExit>
</Catalog>

Save and close the file.

Restart the OBIEE system components using opmnctl in a terminal window.

#cd ORACLE_HOME/admin/instance/bin
#./opmnctl stopall
#./opmnctl startall

Your OBIEE server will now start up normally and your users should be able to log in.


Visit our advertisers

Quick Poll

Do you use GlusterFS in your workplace?

Visit our advertisers