Here are a few handy commands for using iptables. They are tailored for an OpenVZ container with a venet network interface but can easily be adapted to use your interface by replacing venet0 with your network interface.
For setting up iptables in an openVZ this blog post.
Remove existing rules
You can easily delete all existing rules in iptables. Be careful using this command, there is no going back unless you have backed up your rules.
iptables -F
Backup and restore
Backup to file
Rules can easily be saved to an external file for backups or outputting for version control. This will save the rules to /etc/iptables.rules.
iptables-save -c > /etc/iptables.rules
Restore from file
Saved settings can be restored with the following command:
iptables-restore > /etc/iptables.rules
Change the default policy
The default policy can be changed to specify what should happen to traffic which doesn’t have a rule to explicitly define what to do. You can specify to ACCEPT, REJECT or DROP for INPUT, FORWARD and OUTPUT.
Change OUTPUT to ACCEPT
iptables -P OUTPUT ACCEPT
Change INPUT to DROP
iptables -P INPUT DROP
Apply the catchall rule
You can add a rule to the bottom of the rule book to choose what to do with traffic which doesn’t match any other rule. A common use would be to add a DROP as the last rule to drop any traffic which isn’t explicitly allowed by an earlier rule. You can specify to ACCEPT, REJECT or DROP for INPUT, FORWARD and OUTPUT as well as an interface.
ACCEPT INPUT on interface lo
iptables -A INPUT -i lo -j ACCEPT
BLOCK INPUT on interface venet0
iptables -A INPUT -i venet0 -j DROP
List active rules
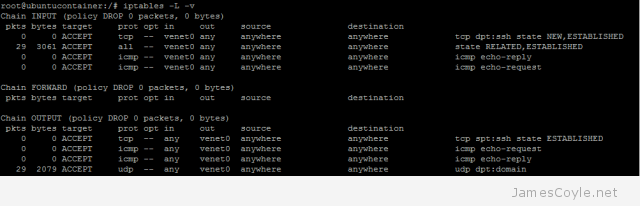
You can list the active rules with -L, and -v for information on packets affected.
iptables -L -v
Enable established connections rule
Already established connections will not be affected by adding this inbound rule. Traffic affected by other outbound rules will also be honoured. If you add this rule, you won’t likely need to specify inbound rules for many outbound rules.
iptables -A INPUT -i venet0 -m state --state RELATED,ESTABLISHED -j ACCEPT
Adding new rules
New rules can be added to control how traffic passes through an interface. If you have not used the Established connections rule then you will also need to add an outgoing rule. If you do use the Established connections rule then you will only need the top command in each of the below headings.
Add rule for port 80 – such as Apache
iptables -A INPUT -i venet0 -p tcp --dport 80 -m state --state NEW,ESTABLISHED -j ACCEPT
iptables -A OUTPUT -o venet0 -p tcp --sport 80 -m state --state ESTABLISHED -j ACCEPT
Add rule for port 22 – SSH outbound connections
iptables -A OUTPUT -o venet0 -p tcp --dport 22 -m state --state NEW,ESTABLISHED -j ACCEPT
iptables -A INPUT -i venet0 -p tcp --sport 22 -m state --state ESTABLISHED -j ACCEPT
Add rule for 53 – DNS outbound
iptables -A OUTPUT -o venet0 -p udp -o eth0 --dport 53 -j ACCEPT
iptables -A INPUT -i venet0-p udp -i eth0 --sport 53 -j ACCEPT
Add rule for port 22 – SSH inbound connections
iptables -A INPUT -i venet0 -p tcp --dport 22 -m state --state NEW,ESTABLISHED -j ACCEPT
iptables -A OUTPUT -o venet0 -p tcp --sport 22 -m state --state ESTABLISHED -j ACCEPT
Add rule for outgoing http/ https
iptables -A OUTPUT -o venet0 -p tcp -m multiport --dport 80,443 -m state --state NEW,ESTABLISHED -j ACCEPT
iptables -A INPUT -i venet0 -p tcp -m multiport --sports 80,443 -m state --state ESTABLISHED -j ACCEPT
Add rule for ping from remote to local
iptables -A INPUT -i venet0 -p icmp --icmp-type echo-request -j ACCEPT
iptables -A OUTPUT -o ventet -p icmp --icmp-type echo-reply -j ACCEPT
Add rule for ping from local to remote
iptables -A OUTPUT -o venet0 -p icmp --icmp-type echo-request -j ACCEPT
iptables -A INPUT -i venet0 -p icmp --icmp-type echo-reply -j ACCEPT
Delete rule
The easiest way to remove a rule is to delete it by it’s rule position in the list. To find out the rules position run iptables -L with the line-number argument. The below command is to delete an INPUT command however you can easily change INPUT to OUTPUT as required.
iptables -L INPUT --line-numbers
Then run the delete command for the relevent direction. This will delete the 7th inbound rule.
iptables -D INPUT 7
Example deleting rule 1 for INPUT:
# iptables -L INPUT --line-numbers
Chain INPUT (policy DROP)
num  target     prot opt source               destination
1    ACCEPT     tcp  --  anywhere             anywhere             tcp dpt:ssh state NEW,ESTABLISHED
2    ACCEPT     all  --  anywhere             anywhere             state RELATED,ESTABLISHED
3    ACCEPT     icmp --  anywhere             anywhere             icmp echo-reply
4    ACCEPT     icmp --  anywhere             anywhere             icmp echo-request

# iptables -D INPUT 1

# iptables -L INPUT --line-numbers
Chain INPUT (policy DROP)
num  target     prot opt source               destination
1    ACCEPT     all  --  anywhere             anywhere             state RELATED,ESTABLISHED
2    ACCEPT     icmp --  anywhere             anywhere             icmp echo-reply
3    ACCEPT     icmp --  anywhere             anywhere             icmp echo-request
Let me know in the comments if you think anything is missing.
 If you can, your storage servers should be in a secure zone in your network removing the need to firewall each machine. Inspecting packets incurs an overhead, not something you need on a high performance file server so you should not run a file server in an insecure zone. If you are using GlusterFS behind a firewall you will need to allow several ports for GlusterFS to communicate with clients and other servers. The following ports are all TCP: