I have recently been playing around with Git on Ubuntu and noticed that the version in the standard repository is a few versions behind the latest release.
Using the PPA repositories, you can install the latest version of the Git client software without having to build it from scratch.
Make sure you have the python-software-properties package installed.
Proxmox 3.1 brings a new storage plugin; GlusterFS. Thanks to this storage technology we can use distributed and redundant network storage to drive OpenVZ containers, qemu disk images, backups, templates and iso’s – basically all the Proxmox storage types.
Proxmox 3.1 uses version 3.4 of the GlusterFS client tools and therefore a compatible GlusterFS server version is required. For the current version, please see this post for the latest PPA Ubuntu repository, and this post for setting up a 2 node GlusterFS server.
Adding a single GlusterFS share to Proxmox 3.1 is one of the easiest things you will do, providing the server is already set up. The trouble comes in when you are using GlusterFS in a redundant/ failover scenario as Proxmox only allows you to enter one GlusterFS server IP meaning that you are loosing all the benefits of having a redundant file system.
At this point it’s worth understanding something about the GlusterFS server setup. Let’s say you have two physical servers which replicate a single GlusterFS share. This gives you a level of redundancy as one server can fail without causing any issues. It also gives you load balancing but that is a separate point altogether. The client can then connect to one of these servers as it mounts the filesystem however because of the way GlusterFS works it needs access to both the GlusterFS servers. This is because the first connection the client makes is to one of the servers to get a list of servers available for the storage share it is going to mount. In our example here, there are two storage servers available and it is this list which is sent to the client. Then, as the mount point is used by the client, it can communicate with any server in the known list. So then, although using a single IP for a client is a single point of failure, it’s only a single point of failure on the initial communication when obtaining the list of servers available.
Add using Proxmox web GUI
To set up a single server mount point, click on the Storage tab which can be found on DataCenter. Click Add and then GlusterFS volume. You will then see the Add: GlusterFS Volume dialogue box.
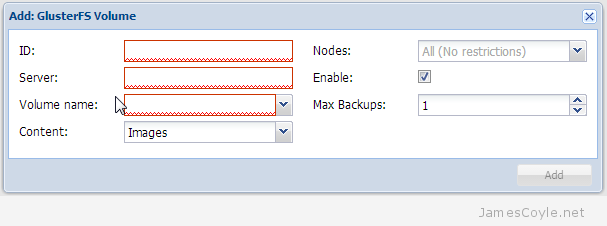
Enter your GlusterFS server information into the dialogue box along with the other required fields described below.
ID – the name to use for the storage mount point. This will be visible in your storage list.
Server – the GlusterFS server IP or hostname.
Volume name – the share name on the GlusterFS server.
Using the GlusterFS client you are able to specify multiple GlusterFS servers for a single volume. With the Proxmox web GUI, you can only add one IP address. To use multiple server IP addresses, create a mount point manually.
Most Linux based systems use a software repository which is either local (a CD-ROM) or remote (a web address) to install new software and manage software updates to already installed software. For Ubuntu/ Debian based Linux distributions apt-get is used to interact with these software repositories, for Red Hat/ CentOS its yum.
With a default Linux installation a suite of repositories are installed to manage the core operating system and install additional applications. As these repositories are critical to the Linux distribution it is difficult for software developers to get their software included in them because they have to be verified for stability and security. This means that the repositories are often behind the official release schedule of 3rd party software or don’t include the software at all. In older versions of Linux support may have been dropped altogether in favour of maintaining the newer versions of the distribution.
It’s here where Launchpad comes in. Developers can add their software to the Launchpad or PPA repository which can be added to a Linux distribution to enable installation of additional software which is not available in the core repositories.
GlusterFS, for example, is at version 3.2.5 in the core Ubuntu 12.04 distribution however the official release of GlusterFS is 3.4. You could build the GlusterFS binaries directly from source and I’ll cover that in a future blog post, but we are not going to do that here.
Kindly, semiosis has created a GlusterFS repository on Launchpad which we can add to our Ubuntu installation to deliver the latest (or thereabouts) version of the software.
Although this example details the Ubuntu GlusterFS 3.4 specifically, any Launchpad repository is added in the same way. For other software visit https://launchpad.net/ubuntu/+ppas and use the search function.
Make sure you have the following python utility installed which is used to add the repository to your Ubuntu sources list:
apt-get install python-software-properties
Use the command add-apt-repository with the username who created the repository on Launchpad and the repository name. You can find the user and repository that you require by searching on https://launchpad.net/
You can allocate storage to an OpenVZ container during creation, when the container is offline and even when the container is active. The main problem with this is that it is not shared, and has to be on the same storage which the container was created on.
You can mount any folder which is available to the host operating system in any container. You can also mount the same storage in multiple containers.
Before you begin, make sure the storage is mounted and usable on the host file system. For this example, we are going to use a disk which is mounted on the host at /mnt/binaries.
On the host, locate where your OpenVZ container config files are stored. On a standard Proxmox installation, this is /etc/vz/conf/.
cd /etc/vz/conf/
Create a file with the naming convention [VMID].mount. This will be the file which is executed each time the container is started as part of the boot process. This example will assume the container is using VMID 270.
vi 270.mount
Add the below content to this file making the two changes; [HOST FOLDER] should be replace with the location on the host to use for storage in the container and [GUEST FOLDER] which will be the folder on the guest container where the storage will be available. The location on both the physical host and virtual guest must exist when the container is started.
If you have many mounts something more elegant could be created however, generally speaking, only a few mount points are required per guest meaning that this brutish script is perfectly adequate.
These settings will require a restart of your container as the scripts are only applied on container start up.
Since ZFS was ported to the Linux kernel I have used it constantly on my storage server. With the ability to use SSD drives for caching and larger mechanical disks for the storage arrays you get great performance, even in I/O intensive environments. ZFS offers superb data integrity as well as compression, raid-like redundancy and de-duplication. As a file system it is brilliant, created in the modern era to meet our current demands of huge redundant data volumes. As you can see, I am an advocate of ZFS and would recommend it’s use for any environment where data integrity is a priority.
Please note, although ZFS on Solaris supports encryption, the current version of ZFS on Linux does not. If you are using ZFS on Linux, you will need to use a 3rd party encryption method such as LUKS or EcryptFS.
The problem with ZFS is that it is not distributed. Distributed file systems can span multiple disks and multiple physical servers to produce one (or many) storage volume. This gives your file storage added redundancy and load balancing and is where GlusterFS comes in.
GlusterFS is a distributed file system which can be installed on multiple servers and clients to provide redundant storage. GlusterFS comes in two parts:
Server – the server is used to perform all the replication between disks and machine nodes to provide a consistent set of data across all replicas. The server also handles client connections with it’s built in NFS service.
Client – this is the software required by all machines which will access the GlusterFS storage volume. Clients can mount storage from one or more servers and employ caching to help with performance.
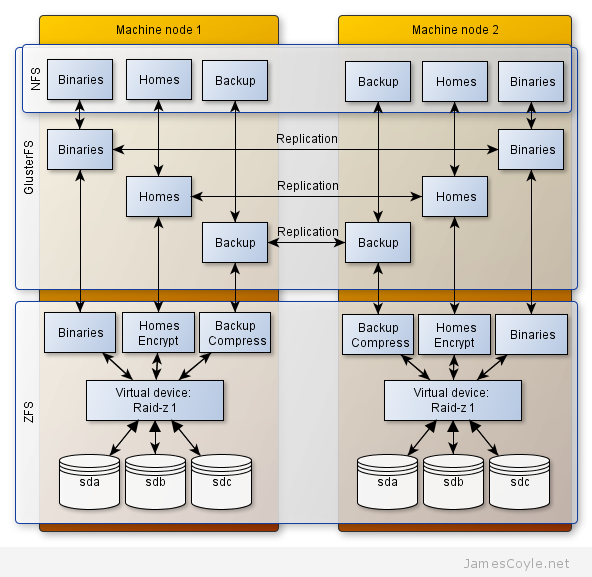
The below diagram shows the high level layout of the storage set up. Each node contains three disks which form a RAIDZ-1 virtual ZFS volume which is similar to RAID 5. This provides redundant storage and allows recovery from a single disk failure with minor impact to service and zero downtime. The volume is then split into three sub volumes which can have various properties applied; for example, compression and encryption. GlusterFS is then set up on top of these 3 volumes to provide replication to the second hardware node. GlusterFS handles this synchronisation seamlessly in the background making sure both of the physical machines contain the same data at the same time.
For this storage architecture to work, two individual hardware nodes should have the same amount of local storage available presented as a ZFS pool. On top of this storage layer, GlusterFS will synchronise, or replicate, the two logical ZFS volumes to present one highly available storage volume.
See this post for setting up ZFS on Ubuntu. For the very latest ZFS binaries, you will need to use Solaris as the ZFS on Linux project is slightly behind the main release. Set up ZFS on both physical nodes with the same amount of storage, presented as a single ZFS storage pool. Configure the required ZFS datasets on each node, such as binaries, homes and backup in this example. At this point, you should have two physical servers presenting exactly the same ZFS datasets.
We now need to synchronise the storage across both physical machines. In Gluster terminology, this is called replication. To see how to set up GlusterFS replication on two nodes, see this article.
These two technologies combined provide a very stable, highly available and integral storage solution. ZFS handles disk level corruption and hardware failure whilst GlusterFS makes sure storage is available in the event a node goes down and load balancing for performance.
ZFS datasets support a host of features to help you manage your storage mounts as effectively as possible. Dataset encryption was added to ZFS in version 30 and can be enabled on a ZFS dataset during dataset creation. As ZFS on Linux in behind the official Solaris release, encryption is not available. ZFS on Linux is currently only at version 28.
You cannot encrypt an existing dataset. You would have to create a new, encrypted dataset, and migrate your data.
To create a dataset volume with encryption, use the following command. Replace [MOUNT POINT] with the location of where to mount the encrypted volume, [ZPOOL] with the name of the existing pool to use and [DATASET NAME] with the name to call the new encrypted dataset.
Now, you will be asked for a passphrase to use. Enter a passphrase, and then confirm it by typing it a second time. Your encrypted dataset will now be created.
Enter passphrase for 'datastore/homes': xxxxxxxxxxxxxxxxx
Enter again: xxxxxxxxxxxxxxxxx
Finally, check the dataset was created and encrypted:
zfs get encryption datastore/homes
NAME              PROPERTY    VALUE        SOURCE
datastore/homes   encryption  on           local
 I have recently been playing around with Git on Ubuntu and noticed that the version in the standard repository is a few versions behind the latest release.
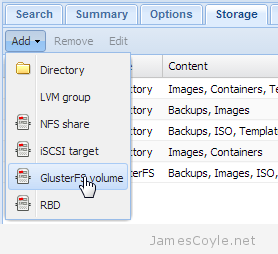
 Since ZFS was ported to the Linux kernel I have used it constantly on my storage server. With the ability to use SSD drives for caching and larger mechanical disks for the storage arrays you get great performance, even in I/O intensive environments. ZFS offers superb data integrity as well as compression, raid-like redundancy and de-duplication. As a file system it is brilliant, created in the modern era to meet our current demands of huge redundant data volumes. As you can see, I am an advocate of ZFS and would recommend it’s use for any environment where data integrity is a priority.