Move Proxmox Container to Different Storage

Move Proxmox Container to Different Storage

Get Social!

2015-03-05 00_18_04-Proxmox Virtual Environment storageA task often required when new storage is added or removed, and containers grow over time is to move a container onto another storage device.

The  Proxmox  Web GUI does not give us the ability to migrate a container from one storage device to another directly. To move a container onto different storage we have to take a backup of the container and restore it to the same ID with a different storage device specified. This can be time laborious when working with several containers.

The below script allows you to move an OpenVZ container from one storage device to another. The process requires that the container be stopped, which the script will handle.

Save the below script into a file called migrate.

vi migrate
#!/bin/bash
#
# Filename : migrate
# Description : Migrate Proxmox OpenVZ container from one storage to another
# Author : James Coyle
#
# Version:
# -Date       -Author      -Description
# 20-11-2013  James Coyle  Initial
#
#

# Variables
TMP=/tmp      #Location to use to create the backup for transferring to new storage. This needs to be big enough to store the backup archive for the container.

# Do not edit
usage() { 
	echo "Usage: $0" 
	echo "          [-c Required: Container ID to migrate <int>] "
	echo "          [-s Required: Target storage ID <string>]"
	echo "          [-d Optional: Delete the backup file after CT restoration <boolean>]"
	echo ""
	echo "Example: $0 -c 100 -s nasarray"
	echo ""
	exit 1; 
}

while getopts "c:s:d" o; do
  case "${o}" in
    c)
      CT=${OPTARG}
      ;;
    s)
      TARGET_STORAGE=${OPTARG}
      ;;
    d)
      DELETE=true
      ;;
    *)
      usage
      ;;
    esac
done
shift $((OPTIND-1))

# Check mandatory fields
if [ -z "${CT}" ] || [ -z "${TARGET_STORAGE}" ]; then
  usage
fi

RUNNING=false

set -e
set -o pipefail

echo "Moving $CT to $TARGET_STORAGE..."
if vzlist | fgrep -w -q " $CT "
then
    RUNNING=true
fi

if $RUNNING
then
    vzctl stop $CT
fi

vzdump --dumpdir $TMP $CT

ARCHIVE=$(ls -t $TMP/vzdump-openvz-$CT-*.tar | head -n 1)

vzrestore $ARCHIVE $CT -force -storage $TARGET_STORAGE

if $RUNNING
then
    vzctl start $CT
fi

if $DELETE
then
    LOG=$(ls -t $TMP/vzdump-openvz-$CT-*.log | head -n 1)
    echo "Deleting $LOG and $ARCHIVE"
    rm -rf $ARCHIVE $TMP/$LOG
fi

Set execution permissions on the script:

chmod + x migrate

The script has several parameters which are detailed below:

  • -d is specified if you would like the script to delete the temporary backup after the process has completed. Leave this out if you would like the backup tar file to be kept, just in case anything goes wrong.
  • -s is required to specify the name of the target storage. You can find this from the Proxmox Web GUI.
  • -c is required for the container ID to migrate.

In addition, the script contains the variable TMP. This will be the location of the backup tar created as part of the migration process and must contain enough space to store the content of the container being migrated. You can change this to suit your environment.

Example command:

./migrate -d -s newstorage -c 101


OpenVZ USB Passthrough in Proxmox

Get Social!

usb-logoUSB Passthrough is the concept of passing a USB device that is plugged into the host server to a guest. This post will detail how to make the USB device available in an OpenVZ container.

The first step is usually the easiest; take your USB device and plug it into your Proxmox host. Wait a few moments for it to be recognised and then run the below command to identify which bus the device is plugged into.

lsusb

The below shows an example output of the command.

Bus 002 Device 003: ID 0403:6001 Future Technology Devices International, Ltd FT232 USB-Serial (UART) IC
Bus 002 Device 002: ID 8087:0024 Intel Corp. Integrated Rate Matching Hub
Bus 002 Device 001: ID 1d6b:0002 Linux Foundation 2.0 root hub
Bus 006 Device 001: ID 1d6b:0003 Linux Foundation 3.0 root hub
Bus 005 Device 001: ID 1d6b:0002 Linux Foundation 2.0 root hub
Bus 004 Device 001: ID 1d6b:0003 Linux Foundation 3.0 root hub
Bus 003 Device 001: ID 1d6b:0002 Linux Foundation 2.0 root hub
Bus 001 Device 002: ID 8087:0024 Intel Corp. Integrated Rate Matching Hub
Bus 001 Device 001: ID 1d6b:0002 Linux Foundation 2.0 root hub

The device I’m after for this example is on Bus 002 Device 003 which I identified from the name. Yours will more than likely be different

Often the names of the devices mean little and you’ll then need to compare the  output of lsusb before and after plugging the device in. For example, run the below command with the device unplugged.

lsusb > /tmp/before

Then plug the device in and run the following command:

lsusb > /tmp/after

Finally compare the two command outputs and identify the difference:

diff /tmp/before /tmp/after

Once you had identified the row in the output of lsusb it’s  time to make a note of the usb bus it’s attached to. As above, mine is 002:003, which are the details I’ll need in a moment.

The way Linux accesses most IO devices is through the /dev/ mounts, and USB devices are no different. You can navigate to the USB bus in /dev/bus/ by following the bus address.

/dev/bus/usb/002/003

As you can see, the above path starts with /dev/bus/usb/ and follows with the bus address in the lsusb command. We’ll need this to pass to our OpenVZ container in just a moment so make a note of it.

One final check we can do to make sure we have the correct bus address is to use the above path with lsusb -D to get a more detailed output of the device. This will usually contain a manufacture ID and other information that may help us identify the device we need. I’ll spare you the output, but an example is below:

lsusb -D /dev/bus/usb/002/003

The next step is to tell the OpenVZ container all about the USB devices bus location. Using vzctl set we can specify the OpenVZ container ID, USB device and access level.

Before continuing, make sure that the container is turned off.

The command to run on the turned off container is below. Make sure to substitute the bracketed values as follows:

  • [VMID] is the ID of the openVZ container that the USB device will be passed to.
  • [BUS_PATH] is the path to the USB device that we discovered earlier. Be sure to drop the /dev/ prefix.
vzctl set [VMID] --devnode [BUS_PATH]:rw --save

For example:

vzctl set 107 --devnode bus/usb/002/003:rw --save

And there it is, turn on the container and point your application to /dev/bus/usb/002/003 and you should be up and running.


New features in Proxmox Test Repository

Category : Tech News

Get Social!

proxmox logo gradProxmox uses two main repositories (if you exclude the Enterprise repository) to release updates to Proxmox servers around the world. The usual repository pve-no-subscription is used to release updates for the Proxmox VE platform that are usually stable and tested. The other repository is the pvetest repository that contains new code that has not yet been thoroughly tested by the community. Updates in the pvetest repository should never be used in production, but are a great way to give something back to the Proxmox community by testing the code in a development environment and to see what new features are up and coming.

Martin Maurer sent an email to the Proxmox mailing list stating that a rift of changes and new features have been released to the pvetest repository and are available for download.

If you would like to use the pvetest repository on your Proxmox installation you will need to add the test repository source to your configuration. Remember, this is not recommended for production servers.

The notable features include:

  • A new Proxmox VE Firewall for the host and guests.
  • A new non-Java Html5 Console
  • Two-factor authentication

Keep an eye out for the official release, but we can speculate that a new version of Proxmox is just on the horizon containing these new updates.


Proxy the Proxmox Web GUI with Nginx Over HTTPS with Load Balancing

Get Social!

The Proxmox web GUI is served by Proxmox’s new event driven API server called PVE Proxy. The default settings for the Proxmox web GUI is to listen on port 8006 for incoming HTTPS connections.

The following tutorial will show you how to use Nginx to reverse proxy the PVE Proxy application to do the following:

  • Redirect HTTP requests to use the HTTPS protocol.
  • Add your own certificate to use for HTTPS.
  • Listen on the standard HTTPS port (port 443).

The following steps show how to use Nginx to reverse Proxy Proxmox’s web GUI. If you would prefer to use Apache, please see my other blog post.

The first step is to make sure you have Nginx installed on the machine, or virtual instance, that you are going to use. You can install Nginx directly on the Proxmox host however, I prefer to keep the host software as standard as possible and run all additional applications in OpenVZ containers.

Create a shell session on the machine you would like to use and use apt-get to install Nginx.

apt-get install nginx

Make sure you have an SSL certificate and key pair on your server. See my OpenSSL certificate cheat sheet for more information.

We now need to specify the configuration for Nginx. Remove the existing site configuration and create a new configuration file called proxmox-gui. You can call this file whatever you wish, but you will also need to use the same name in the below steps.

rm -f /etc/nginx/sites-enabled/default
vi /etc/nginx/sites-enabled/proxmox-gui

Add the below text to your proxmox-gui file. You will need to substitute some of the settings with your own values:

  • ssl_certificate – this should point to your SSL certificate to use for signing the SSL traffic.
  • ssl_certificate_key – is this key which matches the above certificate.
  • server – this is the IP and port of your Proxmox server. If you have installed Nginx on the same host as the Proxmox web GUI then you could use https://localhost:8006 here.
upstream proxmox {
    server 10.10.10.10:8006;
}

server {
    listen 80 default_server;
    rewrite ^(.*) https://$host$1 permanent;
}

server {
    listen 443;
    server_name _;
    ssl on;
    ssl_certificate /etc/nginx/ssl/cert.pem;
    ssl_certificate_key /etc/nginx/ssl/key.pem;
    proxy_redirect off;
    location / {
        proxy_pass https://proxmox;
    }
}

If you have multiple Proxmox servers in a cluster, it would make sense to use load balancing in Nginx. We don’t really want to use this feature to spread the load, because usually the traffic will be very light – we want to use it so that if one node in the cluster is down, Nginx will automatically try a different node in the cluster.

To add load balancing, add your additional servers in the upstream proxmox code section. For example:

upstream proxmox {
    server 10.10.10.10:8006;
    server 10.10.10.11:8006;
    server 10.10.10.12:8006;

}

We need to link the newly created config file so that Nginx can load it.

ln -sf /etc/nginx/sites-available/proxmox-gui /etc/nginx/sites-enabled/

The last step is to restart Nginx web server to pick up the new settings.

service nginx restart

Your Proxmox web GUI should now be available on the IP address of your Nginx server on the HTTPS protocol.


Installing Open vSwitch in Proxmox

Get Social!

open-vswitch
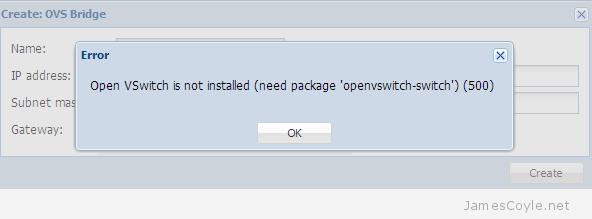
Open vSwitch is a virtual switch which enables you to create multiple virtual networks on a single physical host. In Proxmox, it’s a more flexible networking approach over the standard Linux Bridge method.

The default install of Proxmox does not contain the required packages for Open vSwitch so you will have to install them manually.

You will receive the following error if you try to configure Open vSwitch using the Proxmox web GUI before you install the required packages.

Open VSwitch is not installed (need package 'openvswitch-switch') (500)

proxmox-open-vswitch-is-not-installed

Login to your Proxmox host and run the below apt-get command to install Open vSwitch.

apt-get install openvswitch-switch

You can now use the Proxmox web GUI to create a new OVS network interface.


Create a Ubuntu 14.04 OpenVZ Template for Proxmox

Get Social!

proxmox logo gradThe latest Ubuntu long term support is now available, called Ubuntu 14.04.

There isn’t currently a template available over on OpenVZ however I’m sure that will be shortly rectified. In the meantime, however, you can use the below steps to create a 14.04 Ubuntu template for OpenVZ/ Proxmox. This template has only been lightly tested so please report any errors as you find them.

This template is BETA, please report any problems in the comments.

Vistit Downloads Page


You can download a pre-created VM from here directly, or you can create your own using the below notes.


Before continuing, this guide assumes that you already have an installation of Ubuntu up and running which you can SSH to. This could be either a KVM or physical machine.

We will use debootstrap to create the template so make sure it’s installed and install it if you haven’t already.

apt-get install -y debootstrap

Use debootstrap to download and configure all the required packages to a temporary directory. For this example, we’ll use /tmp/deb.

debootstrap --arch amd64 trusty /tmp/deb ftp://ftp.ubuntu.com/ubuntu

Copy the below script into the tmp directory of the template root which has just been created. For this example you’ll need to copy the text into this path:

vi /tmp/deb/tmp/client.sh
#!/bin/bash

echo "root:password" | chpasswd

apt-get update

apt-get purge -y console-setup ntpdate whiptail eject ureadahead sudo vim-tiny rsync
apt-get install -y vim openssh-server

find / -name *ondemand -exec rm -rf {} \;
rm -f /etc/init/console* /etc/init/tty*

sed -i -e 's/^\$ModLoad imklog/#\$ModLoad imklog/g' /etc/rsyslog.conf
sed -i -e 's@\(space:\)\(/var/log/\)@\1-\2@' /etc/rsyslog.d/*.conf
sed -i -e 's/^\#cron./cron./g' /etc/rsyslog.d/50-default.conf

sed -i -e 's/^\console output/#console output/g' /etc/init/rc.conf
sed -i -e 's/^\env INIT_VERBOSE/#env INIT_VERBOSE/g' /etc/init/rc.conf

locale-gen en_US.UTF-8
locale-gen en_GB.UTF-8
dpkg-reconfigure locales

cp /usr/share/zoneinfo/Europe/London /etc/localtime

cat <<EOF > /etc/init/tty1.conf
# tty1 - getty
#
# This service maintains a getty on tty1 from the point the system is
# started until it is shut down again.

start on stopped rc RUNLEVEL=[2345]

stop on runlevel [!2345]

respawn
exec /sbin/getty -8 38400 tty1
EOF

rm -f /etc/ssh/ssh_host_*

cat << EOF > /etc/init.d/generate_ssh_keys
#!/bin/bash
ssh-keygen -f /etc/ssh/ssh_host_rsa_key -t rsa -N ''
ssh-keygen -f /etc/ssh/ssh_host_dsa_key -t dsa -N ''
rm -f \$0
EOF

chmod a+x /etc/init.d/generate_ssh_keys
update-rc.d generate_ssh_keys defaults

apt-get clean
find /var/ -name *.log -exec rm -rf {} \;
rm -rf /boot /dev /media /opt /run /srv /tmp /root/.bash_history /root/.viminfo /etc/ssh/ssh_host_*
mkdir /dev /run /tmp
touch /dev/null

exit

Make the script runnable which chmod.

chmod +x /tmp/deb/tmp/client.sh

Run the above script using the chroot command to set up the template.

chroot /tmp/deb /tmp/client.sh

The script will now run and set up the template using /tmp/deb/ as the templates root.

Once completed, create an archive of the template root device and install it on your OpenVZ/ Proxmox server.

cd /tmp/deb
tar -czpf /tmp/ubuntu-14.04-x86_64-initial1.tar.gz .

Copy the /tmp/ubuntu-14.04-x86_64-initial1.tar.gz file to your cache directory of your Proxmox install and create your first Ubuntu 14.04 container!

proxmox-ubuntu-1404-template


Visit our advertisers

Quick Poll

How many Proxmox servers do you work with?

Visit our advertisers