qcow2 is a virtual disk image format developed by the guys who created QEMU and is one of the most versatile virtual disk formats available. It’s the default and preferred virtual disk format for the Proxmox VE hypervisor and should be used for most virtual machines.
qcow2 offers the following features :
- Sparse space allocation which means that the entire virtual disk size doesn’t need to be allocated on the hard drive when it’s created. Only the physical space needed by actual data stored to the virtual disk is required.
- Snapshots can be stored and rolled back to thanks to the copy-on-write process which is used to write to qcow2 files.
- Linked or chained files can be used. For example, a read only base file could be used to hold ‘system’ files (a gold plate image, if you will), and any changes could be written to an additional file leaving the original intact and unchanged. Multiple machines could use this base file at once, therefore reducing space requirements.
- AES encryption can be used to encrypt all data at rest.
- Compression, based on zlib, to reduce physical space requirements and reduce read bytes.
Because of all these features, qcow2 files have a processing overhead, when compared to raw files, in that any data read or written to a qcow2 virtual disk would have to go through a process that could slow the read or write operations. This means there is an overhead associated with IO operations on qcow2 files, again, compared to raw type storage that we have to consider when deciding which features to use.
Increase qcow2 Performance
Sparse Space Allocation
Anything stored on a virtual disk has to be, at some point, stored on a physical medium such as a hard disk. In addition to the data, a virtual disk has a small amount of metadata associated with it that is usually stored in the same file. For example, a virtual disk has no physical constraint on how large it can be, like a hard disk, and therefore this is one of the bits of data we need to store in the qcow2 file.
In addition to that, and just like a physical hard drive, data in a qcow2 file is stored in blocks or clusters and a lookup is required to determine what data is in which cluster. Think of this as a shelf full of numbered boxes, and having a book (or index) which tells you what each box number contains. All of this cluster information is also stored within the qcow2 file consuming disk space that is relative to the data capacity of the qcow2 file. For example, a qcow2 file that can store 1GB of data would have a much smaller metadata footprint than a qcow2 file that can store 100GB of data.

Anyway, back to sparse files. The idea of a sparse file is to remove the need to allocate the full size of the file to a physical disk. I can, for example, create a qcow2 image with a data capacity of 10GB that will take up just several KBs of physical space until data is saved to the qcow2 image. As data is saved to the qcow2 image, the physical space used by the image will increase (the data has to be stored somewhere, right?). In addition, as will the metadata because each new cluster that’s required by the qcow2 file will have it’s own entry in the metadata section of the file.
qemu-img comes with various options for setting the allocation when creating new disk images.
- preallocation=metadata – allocates the space required by the metadata but doesn’t allocate any space for the data. This is the quickest to provision but the slowest for guest writes.
- preallocation=falloc – allocates space for the metadata and data but marks the blocks as unallocated. This will provision slower than metadata but quicker than full. Guest write performance will be much quicker than metadata and similar to full.
- preallocation=full – allocates space for the metadata and data and will therefore consume all the physical space that you allocate (not sparse). All empty allocated space will be set as a zero. This is the slowest to provision and will give similar guest write performance to falloc.
Example command:
qemu-img create -f qcow2 -o preallocation=falloc image.qcow2 1G
The performance impact here is when the virtual image needs to grow in order to store new information written to it. For each new write a new cluster will need to be provisioned and a metadata index entry referencing the new cluster. Depending on the above option selected, the OS may have to allocate a new sector for both the index and the data cluster incurring a performance penalty. Once the disk has been expanded (e.g. or preallocation=full) then there is no penalty on assigning a new cluster as all the clusters are already assigned and available.
See qcow2 preallocation for some examples and benchmarks of the above attributes.
Encryption
qcow2 images are not encrypted by default, so not using encryption couldn’t be more simple. Of course, your data will not be encrypted (unless you use some other process on top of the virtual storage layer) but you’ll save all those CPU cycles when reading and writing the data.
Compression
qcow2 is, at best, a bit weird when it comes to compression (encryption works the same way, too!) in that compression is a one time event, or process that you run to compress an existing image. Any data written after this will be stored uncompressed.
The next thing is to understand compression itself – compression (under the right circumstances) will reduce the size of the data stored on disk at the expense of CPU to compress (one off) and decompress (every time the data is accessed) the data. In certain circumstances, compression can result in a quicker read for the process consuming the data, such as where CPU is abundant and IO bandwidth is very small.
As always, testing your scenarios is the best way to understand the impact.
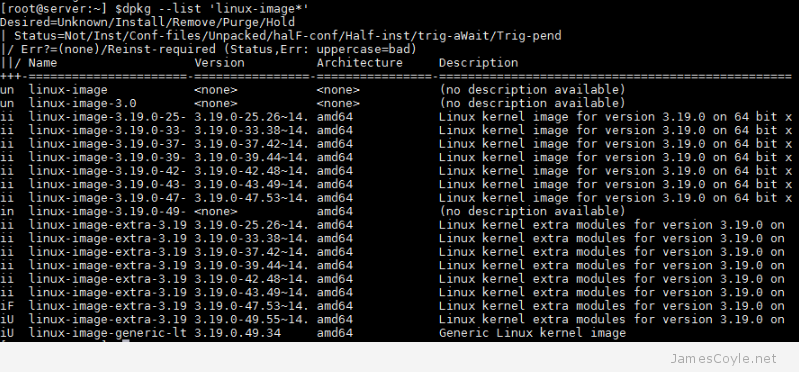
 Utilities such as apt-get generally install kernel updates by adding the new kernel to the Linux boot list and set it as the default. This means that the next time the system boots, the new kernel will be loaded. The problem is that the old kernel is still there (just incase the new one doesn’t work, you’ve got a fall back!), and the kernel before that, and the kernel before that…