Author Archives: James Coyle

Reverse Proxy Proxmox VNC With Nginx

Get Social!

proxmox logo gradThe noVNC console in the Proxmox Web GUI transfers it’s data through a technology called Websockets. Websockets often work in tandem with normal HTTP traffic and therefore often use the same end point (IP and port). Proxmox uses port 8006 by default for all web traffic; this includes the Web GUI you see and a websockets stream for the VNC console.

If you don’t already have Nginx set up, see my other post on How to reverse proxy the Proxmox Web GUI.

You’ll also need one of the more recent versions of Nginx for this to work.

If you use Nginx to reverse proxy your Proxmox Web GUI already, making it websocket compatible is very easy. In fact, it’s as easy as adding three additional lines to your Nginx config file for the location tag that serves your Proxmox Web GUI.

Open up your sites-available config file for your Proxmox site with a text editor:

vi /etc/nginx/sites-available/proxmox.jamescoyle.net

Find the location tag for your site and add the following:

proxy_http_version 1.1;                                                           proxy_set_header Upgrade $http_upgrade;                                           proxy_set_header Connection "upgrade";

The resulting site should look similar to the below:

upstream proxmox {
    server 10.10.10.10;
}
 
server {
    listen 80 default_server;
    rewrite ^(.*) https://$host$1 permanent;
}
 
server {
    listen 443;
    server_name _;
    ssl on;
    ssl_certificate /etc/nginx/ssl/cert.pem;
    ssl_certificate_key /etc/nginx/ssl/key.pem;
    proxy_redirect off;
    location / {
        proxy_http_version 1.1;
        proxy_set_header Upgrade $http_upgrade;
        proxy_set_header Connection "upgrade"; 
        proxy_pass https://proxmox:8006;
    }
}


Share a Single MDS Schema Between Multiple OBIEE Installations

Category : How-to

Get Social!

oracle-biIf you’ve installed OBIEE as many times as I have you’ll be more than familiar with the RCU and the two schemas it creates, MDS and BIPLATFORM. What you may not know, howerver, is that the MDS schema can be shared with multiple installations of OBIEE. A BIPLATFORM schema is still required for each OBIEE environment.

obiee_shared_mds

The above diagram shows a single MDS schema which is shared with each OBIEE environment; Dev, Test and Prod. Each of the OBIEE environments still has it’s own BI_PLATFORM schema. When running the RCU, you will need to run it 3 times in total; once with the MDS and BIPLATFORM components selected, and twice with just the BIPLATFORM component selected.

obiee-rcu-components


When it comes to installing OBIEE, you simpley use the same MDS details for all servers, but change the BIPLATFORM credentials to match the environment.

Obviously this method introduces it’s own problems with several environments using the same database when it comes to patching and upgrading. I’m not saying you should do it this way, just that you can!


Add a new skin to an OBIEE scaled out cluster

Category : How-to

Get Social!

oracle-biIf you are using a cluster configuration, there are multiple methods you can use to deploy a skin. Below details a method which results in a single shared resource location that each member of the OBIEE cluster will use.

This walk through assumes you already have an OBIEE cluster installed. You will also need a shared storage mount on each of the servers. The storage must be shared, so that if you add a file on one server, it’s available for all the others. You can mount this storage in any location accessible by the oracle user. For this guide, we’ll assume you’ve mounted it in /path/to/share however a more realistic example would be something like /mnt/obiee_skins.

Create a folder in the shared area called analyticsRes.

mkdir /path/to/share/analyticsRes

Copy both the sk_ and s_ directories to the analyticsRes directory.

cp -r/middleware/Oracle_BI1/bifoundation/web/app/res/sk_blafp /path/to/share/analyticsRes/
cp -r/middleware/Oracle_BI1/bifoundation/web/app/res/s_blafp /path/to/share/analyticsRes/

Edit the instance config file on all nodes of the cluster

vi /middleware/instances/instance2/config/OracleBIPresentationServicesComponent/coreapplication_obips1/instanceconfig.xml

Add or edit the following tags between <ServerInstance><WebConfig>.

<URL>
<!--     <CustomerResourceVirtualPath>/analyticsRes</CustomerResourceVirtualPath> -->
    <CustomerResourcePhysicalPath>/path/to/share/analyticsRes</CustomerResourcePhysicalPath>
</URL>

Note: The line which is commented out can be used, however this will be relative to each instances install location. This is fine for a single node install, but will cause problems with clustering as each cluster has it’s own instance.

Add or edit the following tags replacing SkinName with the name of your skin. The skin name will be the name of the folder after sk_.

<UI>
    <DefaultSkin>SkinName</DefaultSkin>
    <DefaultStyle>SkinName</DefaultStyle>
</UI>

Repeat the above instanceconfig steps for each node of the cluster.

We now need to add an Application in Weblogic so that the images, JS and CSS in the skins and style folders can be served to clients browsers. Log in to the Weblogic console.

This can be found on port 7001, by default, on the primary node of your OBIEE cluster: http://biurl.com:7001/console/

Select Deployments and click Lock and Edit on the left. Click the Install button to add a new deployment.

Summary of Deployments WLS Console
Enter the full path to your analyticsRes folder, including the analyticsShare part in the Path textbox and click next. For example, enter:

/path/to/share/analyticsRes

Select Install this deployment as an application and click Next. Select the tickbox bi_cluster to enable this application for all nodes in the cluster and click Next.

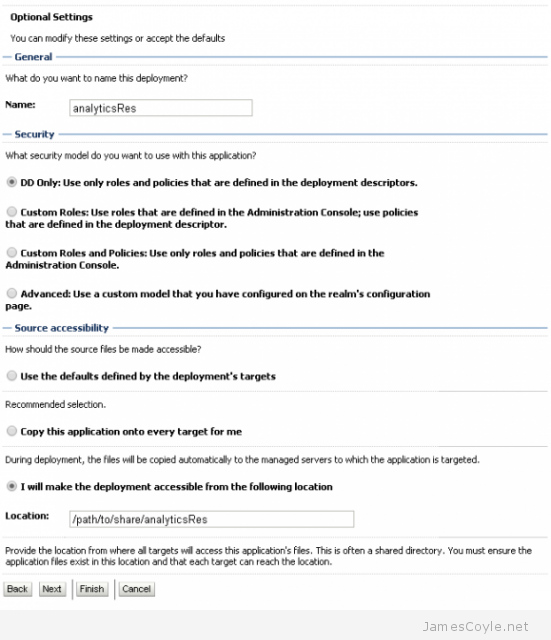
The next screen should be left as default for all options except the bottom one which should be I will make the deployment accessible from the following location with the path to your AnalyticsRes folder already filled in. Click Finish to complete the deployment.

Install Application Assistant WLS Console

The next step is to start the newly deployed application.  Log in to the Weblogic console. This can be found on port 7001, by default, on the primary node of your OBIEE cluster: http://biurl.com:7001/console/

Click Deployments and find your new analyticsRes application which should be in a Prepared state. Click the tickbox next to the deployment and click Start and then Servicing all requests.

Summary of Deployments - WLS Console

You will have to restart all cluster nodes for the changes to take effect – specifically the Presentation Services.
You can add other static resources to this folder which will be accessible from http://biurl.com/analyticsRes/example-resource.png.


Refresh Oracle Business Intelligence GUIDs

Get Social!

webcatWhen copying or making significant changes to the OBIEE 11G web catalog, users can experience difficulty with login. This includes OBIEE patching and upgrades, or moving to a new server such as releasing. To correct this issue, you must force OBIEE to refresh the web catalog. This is done by manually editing two configuration files, restarting the OBIEE system, removing the changes and restarting the OBIEE system once more.

Open the following file for editing:

ORACLE_INSTANCE/config/OracleBIServerComponent/coreapplication_obisn/NQSConfig.ini

Locate the attribute FMW_UPDATE_ROLE_AND_USER_REF_GUIDS and change the value to YES.

FMW _UPDATE_ROLE_AND_USER_REF_GUIDS = YES

Save and close the file.

Open the following file for editing:

ORACLE_INSTANCE/config/OracleBIServerComponent/OracleBIPresentationServicesComponent/instanceconfig.xml

Locate the following text:

<Catalog>
<UpgradeAndExit>false<UpgradeAndExit>
</Catalog>

Add “<UpdateAccountGUIDs>UpdateAndExit</UpdateAccountGUIDs>” to match below:

<Catalog>
<UpgradeAndExit>false<UpgradeAndExit>
<UpdateAccountGUIDs>UpdateAndExit</UpdateAccountGUIDs>
</Catalog>

Save and close the file.

Restart the OBIEE system components using opmnctl in a terminal window.

#cd ORACLE_HOME/admin/instance/bin
#./opmnctl stopall
#./opmnctl startall

Change the settings back to the original values. Open the following file for editing:

ORACLE_INSTANCE/config/OracleBIServerComponent/coreapplication_obisn/NQSConfig.ini

Locate the attribute FMW_UPDATE_ROLE_AND_USER_REF_GUIDS and change the value to NO.

FMW _UPDATE_ROLE_AND_USER_REF_GUIDS = NO

Save and close the file.

Open the following file for editing:

ORACLE_INSTANCE/config/OracleBIServerComponent/OracleBIPresentationServicesComponent/instanceconfig.xml

Locate the following text:

<Catalog>
<UpgradeAndExit>false< UpgradeAndExit>
<UpdateAccountGUIDs>UpdateAndExit</UpdateAccountGUIDs>
</Catalog>

Remove “<UpdateAccountGUIDs>UpdateAndExit</UpdateAccountGUIDs>” to match below:

<Catalog>
<UpgradeAndExit>false<UpgradeAndExit>
</Catalog>

Save and close the file.

Restart the OBIEE system components using opmnctl in a terminal window.

#cd ORACLE_HOME/admin/instance/bin
#./opmnctl stopall
#./opmnctl startall

Your OBIEE server will now start up normally and your users should be able to log in.


Upgrade Oracle opatch Version

Get Social!

opatch-upgrade-required
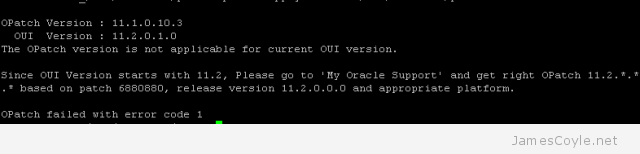
opatch is Oracle’s tool for patching software such as OBIEE and ODI and is used in conjunction with patch downloads from Oracle Support.

Versions of the opatch tool change over time, often in line with releases of other Oracle software. If you try to use an out of date opatch binary for a newer patch file, you’ll get the below error.

#opatch napply -silent /u01/binaries/patch -id 20188679

OPatch Version : 11.1.0.10.3
  OUI  Version : 11.2.0.1.0
The OPatch version is not applicable for current OUI version.

Since OUI Version starts with 11.2, Please go to 'My Oracle Support' and get right OPatch 11.2.*.*.* based on patch 6880880, release version 11.2.0.0.0 and appropriate platform.

OPatch failed with error code 1

You need to upgrade your version of opatch to the OUI Version indicated, which in this example is 11.2.0.1.0.

To upgrade your version of opatch search on Oracle Support for patch number 6880880 and click one of the results – there are several results titled something similar to ‘OPatch patch of version 11.1.0.12.7 for Oracle software releases 11.1.0.x (JUN 2015) (Patch)‘. You can click on any of the results with a similar name to the above as they all take you to the same page.

opatch-download-verisonOn the top left of the page, select the Release of opatch you need along with the the Platform you will be using opatch on and then click Download.

Copy the downloaded patch file to your target machine and unzip the file.

unzip 'p6880880*.zip'

Installing the updated opatch binary is simple – move the old OPatch directory and replace it with the new one we just downloaded.

For this example, we’re replacing the OPatch folder for an OBIEE installation located at /u01/app/oracle/product/fmw/Oracle_BI1/. Depending on your install path and application, your path may be different however the OPatch directory is usually found in the ORACLE_HOME directory.

mv /u01/app/oracle/product/fmw/Oracle_BI1/OPatch /u01/app/oracle/product/fmw/Oracle_BI1/OPatch_V11_1x

Copy the unzipped OPatch folder to the ORACLE_HOME directory:

 cp -r OPatch /u01/app/oracle/product/fmw/Oracle_BI1/

Check the version of the opatch binary:

cd /u01/app/oracle/product/fmw/Oracle_BI1/OPatch
./opatch version
OPatch Version: 11.2.0.3.10

OPatch succeeded.


Manually Install ERPNext on a Manual Install of Frappe

Tags :

Category : How-to

Get Social!

erpnext-screen
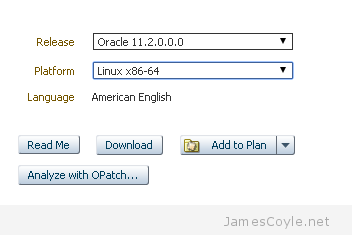
ERPNext is an Enterprise Resource Planning suite similar to Odoo. It manages every aspect of your business from time and expense tracking and payroll to invoicing and manufacturing.

Installing ERPNext is simple enough if you go with their automated approach, but can be a little more tricky when you’re wanting to control where services are. The automated install assumes everything is on the same box however it’s very likely you’ll have your database installed elsewhere.

ERPNext uses a Python framework called Frappe which must be installed before you can use ERPNext. This guide assumes you’ve completed the previous post in this series of manually installing Frappe.

To install ERPNext into your existing Frappe install, change to the frappe user and install the erpnext app.

su - frappe
bench get-app erpnext https://github.com/frappe/erpnext

Login to your SQL server (this can be MySQL or MariaDB) and create a new database for the ERPNext installation.

create database erpnext;

Add a user with all privalages on the database.

GRANT ALL PRIVILEGES ON erpnext.* TO 'root'@'erphost' IDENTIFIED BY 'password' WITH GRANT OPTION;

Replace erphost with your IP address of the server hosting Frappe and ERPNext and password with the password you would like to use for this remote root user.

Run the commands on the Frappe host to create a new site for the ERPNext installation.

bench new-site site1.local --db-name erpnext --mariadb-root-username root --mariadb-root-password password --install-app erpnext --verbose --force

Again, replace password with the password of the root user we just created.

The database tables and core data should now be installed and you’ll be prompted for an administrator username. This will be the initial username that you use to access the front page site.

Create a config for Bench, Nginx and Supervisor and copy them into place:

bench setup procfile
bench setup nginx
bench setup supervisor
cp /home/frappe/frappe-bench/config/nginx.conf /etc/nginx/sites-available/default
cp /home/frappe/frappe-bench/config/supervisor.conf /etc/supervisor/conf.d/supervisor.conf

And that’s it – restart everything and your ERPNext site should be accessible from http://ip-address/

service nginx restart
service supervisor restart


Visit our advertisers

Quick Poll

How many Proxmox servers do you work with?

Visit our advertisers