Category Archives: How-to

Bash getops Example

Tags :

Category : How-to

Get Social!

getopts is a way of adding intuitive options to custom bash scripts in Linux. getopts is a command that’s built into all recent versions of Bash, and is a more recent version of getopt (notice there is no ‘s’).

You’re not able to do anything too fancy with getopts, such as GNU long options like –filter, but you are able to easily pass in semi-meaningful arguments with relative ease.

Let’s take a look at the below example to understand what we’re getting into. 

Calling getopts Scripts

So that we know what we’re getting into, lets start with calling a script that accepts 3 arguments.

  • A port
  • A Hostname
  • A force parameter

The script we’re creating is just an example usage for getopts so each of the above parameters won’t really do anything, so I’ll leave your imagination to come up with a reason for wanting to collect such information. That said, we’re going to call our example script send_curl_command.sh and it will expect the above mentioned parameters to be passed in to work. 

send_curl_command.sh -p 443 -h api.jamescoyle.net -f

getopts Example

#!/bin/bash

# Echo usage if something isn't right.
usage() { 
    echo "Usage: $0 [-p <80|443>] [-h <string>] [-f]" 1>&2; exit 1; 
}

while getopts ":p:h:f" o; do
    case "${o}" in
        p)
            PORT=${OPTARG}
            [[ $PORT != "80" && $PORT != "443" ]] && usage
            ;;
        h)
            HOST=${OPTARG}
            ;;
        f)  
            FORCE=1
            ;;
        :)  
            echo "ERROR: Option -$OPTARG requires an argument"
            usage
            ;;
        \?)
            echo "ERROR: Invalid option -$OPTARG"
            usage
            ;;
    esac
done
shift $((OPTIND-1))

# Check required switches exist
if [ -z "${PORT}" ] || [ -z "${HOST}" ]; then
    usage
fi

echo "p = ${PORT}"
echo "h = ${HOST}"

The above snippet shows a relatively simple example of how to use getopts and can be broken into 3 main parts.

usage is a bash function that echos the script name, and some literal text on which parameters are accepted and then exits the script. The idea here is to call this function if anything is wrong with the arguments passed, so that a helpful hint can be given to the user and the script can exit.

The if block at the bottom of the script runs a few checks on the switches to ensure that they exist. The -z attribute is a simple bash test to ensure that the variable is set – it doesn’t do anything more clever than that. In addition, in the middle block you’ll find another check  [[ $PORT != “80” && $PORT != “443” ]] which checks that the p variable is set and is equal to either 80 or 443. You can check in either location, or both, just remember to call usage if something isn’t right so that the script can exit.

That means only the central block of code remains – and this is the meat of the getopts command. Much of this block can be considered boilerplate code, however there are 2 parts you’ll need to edit: the first line of the code between the quotation marks, which are the parameters that instruct getopts how to work, and the case statement. 

getopts Arguments and case Statement

The quoted arguments following the getopts command can look fairly cryptic at first, but once it’s broken down into its individual parts it’s really easy to build up the functionality you need. Keeping with the above example, let’s take a look at the getopts arguments “:p:h:f” o.

  • “:” (colon) is there to denote if getopts should throw an error if parameters are missing, which are specified as required (more on that in the last bullet point below). If you omit the : then getopts would throw generic errors – something that we’ll handle manually for this example to provide a more meaningful output in the context of our script.
  • “p:” is the first parameter that we tell getopts to expect. p specifies the character that will be passed on the command line when calling the script – for example myscript.sh -p. The colon specifies that an attribute must follow the switch, for example myscript.sh -p 443. During processing, the value 443 will be parsed with the -p switch.
  • “h:” is exactly the same as the above -p switch, only the character here is p.
  • “f” is, as above, specifying that the -p switch is expected however here there is no colon :. That’s because the -f switch will not have an attribute payload following it, for example 
    myscript.sh -p 443 -h myhost.com -f
  • “o” outside of the parenthesis is a lonely o. This value will be filled with either:
    • The switch being received, if it’s a valid switch such as ph or f.
    • a ? if the switch being passed is not an accepted switch (not specified in the getopts configuration). This is only available if the getopts argument begins with : as per the first bullet point above.
    • : if the switch is acceptable but doesn’t contain an argument when it should (configured with a : such as “p:”). This is only available if the getopts argument begins with : as per the first bullet point above.

That’s all the configuration needed for the getopts command to function however, to make useful we need to understand the arguments that are passed in, check them to ensure they’re sensible and make them available for the script to use.

case Statement

The case statement is called multiple times for each argument of getopts. In the above example, the first case check is for p which would be called when the -p argument is passed with variables. The code will then check that p is either 80 or 443 and set the variable PORT to equal the value passed in. case items h and f should be easy enough to understand and are very similar to the above p

Where things get more interesting are with the bottom two case items:

  • : (colon) here is used to denote that a switch has been passed into the script that’s expected, however an argument was expected but was not found. In this code block we simply call the usage function to remind the user what the script expects and to exit.
  • \? is simply a question mark but escaped for bash.  This represents that the switch currently being processed is not expected. Again, we just call our usage function.
  • * (asterisk) is not actually used in our sample script but it’s essentially a default which would catch anything that hasn’t been caught by a previous case element. You could use it to combine the above * and ?.

Reverse Proxy Proxmox VNC With Nginx

Get Social!

proxmox logo gradThe noVNC console in the Proxmox Web GUI transfers it’s data through a technology called Websockets. Websockets often work in tandem with normal HTTP traffic and therefore often use the same end point (IP and port). Proxmox uses port 8006 by default for all web traffic; this includes the Web GUI you see and a websockets stream for the VNC console.

If you don’t already have Nginx set up, see my other post on How to reverse proxy the Proxmox Web GUI.

You’ll also need one of the more recent versions of Nginx for this to work.

If you use Nginx to reverse proxy your Proxmox Web GUI already, making it websocket compatible is very easy. In fact, it’s as easy as adding three additional lines to your Nginx config file for the location tag that serves your Proxmox Web GUI.

Open up your sites-available config file for your Proxmox site with a text editor:

vi /etc/nginx/sites-available/proxmox.jamescoyle.net

Find the location tag for your site and add the following:

proxy_http_version 1.1;                                                           proxy_set_header Upgrade $http_upgrade;                                           proxy_set_header Connection "upgrade";

The resulting site should look similar to the below:

upstream proxmox {
    server 10.10.10.10;
}
 
server {
    listen 80 default_server;
    rewrite ^(.*) https://$host$1 permanent;
}
 
server {
    listen 443;
    server_name _;
    ssl on;
    ssl_certificate /etc/nginx/ssl/cert.pem;
    ssl_certificate_key /etc/nginx/ssl/key.pem;
    proxy_redirect off;
    location / {
        proxy_http_version 1.1;
        proxy_set_header Upgrade $http_upgrade;
        proxy_set_header Connection "upgrade"; 
        proxy_pass https://proxmox:8006;
    }
}


Share a Single MDS Schema Between Multiple OBIEE Installations

Category : How-to

Get Social!

oracle-bi
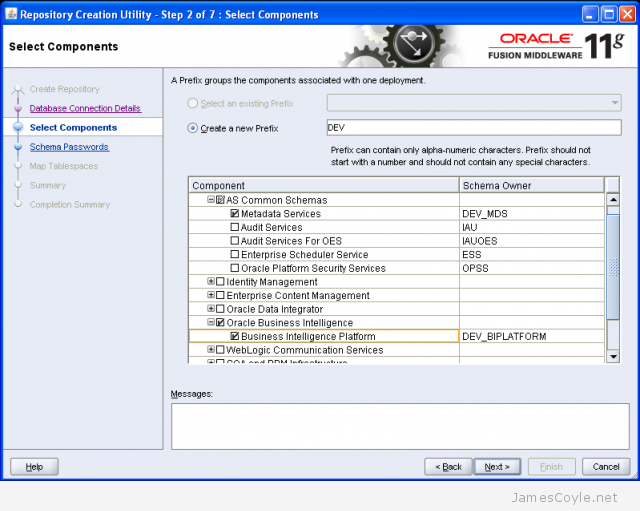
If you’ve installed OBIEE as many times as I have you’ll be more than familiar with the RCU and the two schemas it creates, MDS and BIPLATFORM. What you may not know, howerver, is that the MDS schema can be shared with multiple installations of OBIEE. A BIPLATFORM schema is still required for each OBIEE environment.

obiee_shared_mds

The above diagram shows a single MDS schema which is shared with each OBIEE environment; Dev, Test and Prod. Each of the OBIEE environments still has it’s own BI_PLATFORM schema. When running the RCU, you will need to run it 3 times in total; once with the MDS and BIPLATFORM components selected, and twice with just the BIPLATFORM component selected.

obiee-rcu-components


When it comes to installing OBIEE, you simpley use the same MDS details for all servers, but change the BIPLATFORM credentials to match the environment.

Obviously this method introduces it’s own problems with several environments using the same database when it comes to patching and upgrading. I’m not saying you should do it this way, just that you can!


Add a new skin to an OBIEE scaled out cluster

Category : How-to

Get Social!

oracle-biIf you are using a cluster configuration, there are multiple methods you can use to deploy a skin. Below details a method which results in a single shared resource location that each member of the OBIEE cluster will use.

This walk through assumes you already have an OBIEE cluster installed. You will also need a shared storage mount on each of the servers. The storage must be shared, so that if you add a file on one server, it’s available for all the others. You can mount this storage in any location accessible by the oracle user. For this guide, we’ll assume you’ve mounted it in /path/to/share however a more realistic example would be something like /mnt/obiee_skins.

Create a folder in the shared area called analyticsRes.

mkdir /path/to/share/analyticsRes

Copy both the sk_ and s_ directories to the analyticsRes directory.

cp -r/middleware/Oracle_BI1/bifoundation/web/app/res/sk_blafp /path/to/share/analyticsRes/
cp -r/middleware/Oracle_BI1/bifoundation/web/app/res/s_blafp /path/to/share/analyticsRes/

Edit the instance config file on all nodes of the cluster

vi /middleware/instances/instance2/config/OracleBIPresentationServicesComponent/coreapplication_obips1/instanceconfig.xml

Add or edit the following tags between <ServerInstance><WebConfig>.

<URL>
<!--     <CustomerResourceVirtualPath>/analyticsRes</CustomerResourceVirtualPath> -->
    <CustomerResourcePhysicalPath>/path/to/share/analyticsRes</CustomerResourcePhysicalPath>
</URL>

Note: The line which is commented out can be used, however this will be relative to each instances install location. This is fine for a single node install, but will cause problems with clustering as each cluster has it’s own instance.

Add or edit the following tags replacing SkinName with the name of your skin. The skin name will be the name of the folder after sk_.

<UI>
    <DefaultSkin>SkinName</DefaultSkin>
    <DefaultStyle>SkinName</DefaultStyle>
</UI>

Repeat the above instanceconfig steps for each node of the cluster.

We now need to add an Application in Weblogic so that the images, JS and CSS in the skins and style folders can be served to clients browsers. Log in to the Weblogic console.

This can be found on port 7001, by default, on the primary node of your OBIEE cluster: http://biurl.com:7001/console/

Select Deployments and click Lock and Edit on the left. Click the Install button to add a new deployment.

Summary of Deployments WLS Console
Enter the full path to your analyticsRes folder, including the analyticsShare part in the Path textbox and click next. For example, enter:

/path/to/share/analyticsRes

Select Install this deployment as an application and click Next. Select the tickbox bi_cluster to enable this application for all nodes in the cluster and click Next.

The next screen should be left as default for all options except the bottom one which should be I will make the deployment accessible from the following location with the path to your AnalyticsRes folder already filled in. Click Finish to complete the deployment.

Install Application Assistant WLS Console

The next step is to start the newly deployed application.  Log in to the Weblogic console. This can be found on port 7001, by default, on the primary node of your OBIEE cluster: http://biurl.com:7001/console/

Click Deployments and find your new analyticsRes application which should be in a Prepared state. Click the tickbox next to the deployment and click Start and then Servicing all requests.

Summary of Deployments - WLS Console

You will have to restart all cluster nodes for the changes to take effect – specifically the Presentation Services.
You can add other static resources to this folder which will be accessible from http://biurl.com/analyticsRes/example-resource.png.


Refresh Oracle Business Intelligence GUIDs

Get Social!

webcat
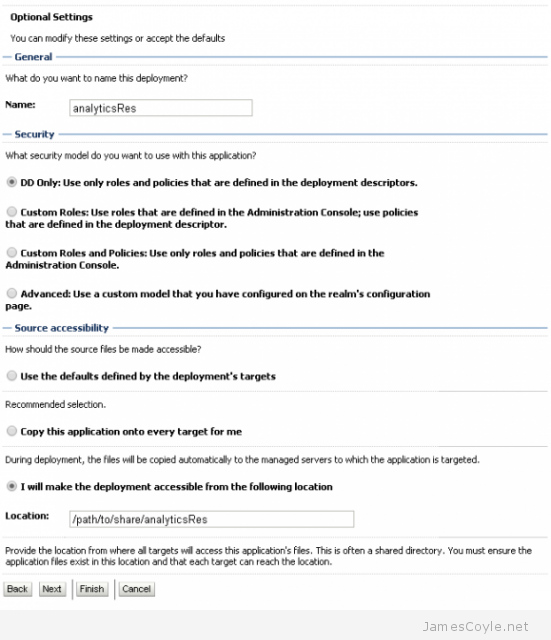
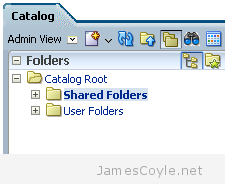
When copying or making significant changes to the OBIEE 11G web catalog, users can experience difficulty with login. This includes OBIEE patching and upgrades, or moving to a new server such as releasing. To correct this issue, you must force OBIEE to refresh the web catalog. This is done by manually editing two configuration files, restarting the OBIEE system, removing the changes and restarting the OBIEE system once more.

Open the following file for editing:

ORACLE_INSTANCE/config/OracleBIServerComponent/coreapplication_obisn/NQSConfig.ini

Locate the attribute FMW_UPDATE_ROLE_AND_USER_REF_GUIDS and change the value to YES.

FMW _UPDATE_ROLE_AND_USER_REF_GUIDS = YES

Save and close the file.

Open the following file for editing:

ORACLE_INSTANCE/config/OracleBIServerComponent/OracleBIPresentationServicesComponent/instanceconfig.xml

Locate the following text:

<Catalog>
<UpgradeAndExit>false<UpgradeAndExit>
</Catalog>

Add “<UpdateAccountGUIDs>UpdateAndExit</UpdateAccountGUIDs>” to match below:

<Catalog>
<UpgradeAndExit>false<UpgradeAndExit>
<UpdateAccountGUIDs>UpdateAndExit</UpdateAccountGUIDs>
</Catalog>

Save and close the file.

Restart the OBIEE system components using opmnctl in a terminal window.

#cd ORACLE_HOME/admin/instance/bin
#./opmnctl stopall
#./opmnctl startall

Change the settings back to the original values. Open the following file for editing:

ORACLE_INSTANCE/config/OracleBIServerComponent/coreapplication_obisn/NQSConfig.ini

Locate the attribute FMW_UPDATE_ROLE_AND_USER_REF_GUIDS and change the value to NO.

FMW _UPDATE_ROLE_AND_USER_REF_GUIDS = NO

Save and close the file.

Open the following file for editing:

ORACLE_INSTANCE/config/OracleBIServerComponent/OracleBIPresentationServicesComponent/instanceconfig.xml

Locate the following text:

<Catalog>
<UpgradeAndExit>false< UpgradeAndExit>
<UpdateAccountGUIDs>UpdateAndExit</UpdateAccountGUIDs>
</Catalog>

Remove “<UpdateAccountGUIDs>UpdateAndExit</UpdateAccountGUIDs>” to match below:

<Catalog>
<UpgradeAndExit>false<UpgradeAndExit>
</Catalog>

Save and close the file.

Restart the OBIEE system components using opmnctl in a terminal window.

#cd ORACLE_HOME/admin/instance/bin
#./opmnctl stopall
#./opmnctl startall

Your OBIEE server will now start up normally and your users should be able to log in.


Upgrade Oracle opatch Version

Get Social!

opatch-upgrade-required
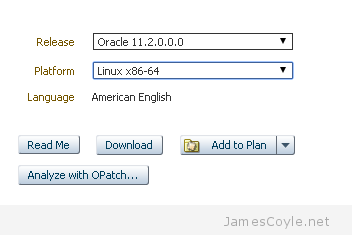
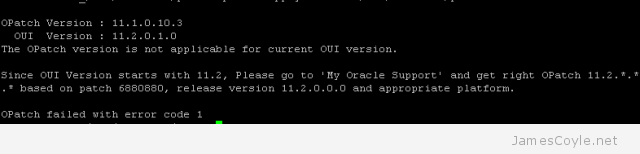
opatch is Oracle’s tool for patching software such as OBIEE and ODI and is used in conjunction with patch downloads from Oracle Support.

Versions of the opatch tool change over time, often in line with releases of other Oracle software. If you try to use an out of date opatch binary for a newer patch file, you’ll get the below error.

#opatch napply -silent /u01/binaries/patch -id 20188679

OPatch Version : 11.1.0.10.3
  OUI  Version : 11.2.0.1.0
The OPatch version is not applicable for current OUI version.

Since OUI Version starts with 11.2, Please go to 'My Oracle Support' and get right OPatch 11.2.*.*.* based on patch 6880880, release version 11.2.0.0.0 and appropriate platform.

OPatch failed with error code 1

You need to upgrade your version of opatch to the OUI Version indicated, which in this example is 11.2.0.1.0.

To upgrade your version of opatch search on Oracle Support for patch number 6880880 and click one of the results – there are several results titled something similar to ‘OPatch patch of version 11.1.0.12.7 for Oracle software releases 11.1.0.x (JUN 2015) (Patch)‘. You can click on any of the results with a similar name to the above as they all take you to the same page.

opatch-download-verisonOn the top left of the page, select the Release of opatch you need along with the the Platform you will be using opatch on and then click Download.

Copy the downloaded patch file to your target machine and unzip the file.

unzip 'p6880880*.zip'

Installing the updated opatch binary is simple – move the old OPatch directory and replace it with the new one we just downloaded.

For this example, we’re replacing the OPatch folder for an OBIEE installation located at /u01/app/oracle/product/fmw/Oracle_BI1/. Depending on your install path and application, your path may be different however the OPatch directory is usually found in the ORACLE_HOME directory.

mv /u01/app/oracle/product/fmw/Oracle_BI1/OPatch /u01/app/oracle/product/fmw/Oracle_BI1/OPatch_V11_1x

Copy the unzipped OPatch folder to the ORACLE_HOME directory:

 cp -r OPatch /u01/app/oracle/product/fmw/Oracle_BI1/

Check the version of the opatch binary:

cd /u01/app/oracle/product/fmw/Oracle_BI1/OPatch
./opatch version
OPatch Version: 11.2.0.3.10

OPatch succeeded.


Visit our advertisers

Quick Poll

How many Proxmox servers do you work with?

Visit our advertisers