Category Archives: How-to

Proxmox OpenVZ Container and KVM Startup and Shutdown Order

Get Social!

proxmox logo gradFrom time to time you will need to shutdown and startup your Proxmox hardware node. There are many reasons for this such as adding new hardware or to apply new kernel updates.

Before you shutdown the hardware node you must cleanly shutdown all OpenVZ containers and all KVMs. To avoid having to do this manually, Proxmox will issue all running containers and VMs the shutdown command as part of the hardware nodes shutdown procedure. Proxmox also gives us the option to specify which containers and VMs should be started when the hardware node is turned on. This means that the final part of the hardware nodes startup sequence will be to start your containers and VMs. Depending on your environment, this may need to be done in a specific order. For example you may wish your database VM or container to be started before your web application.

Enable automatic startup of containers and VMs

To enable the automatic startup of an OpenVZ container or VM you must specify the Start at boot attribute in the Proxmox web interface. Simply click on the Options tab of the container or VM and double click the Start at boot attribute.

proxmox-start-at-boot

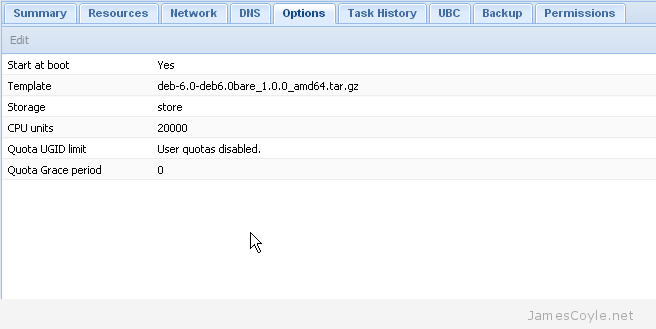
Make sure the checkbox is ticked in the new dialogue box which pops up and click OK.

Your container or VM will now automatically be started when your hardware node next starts.

Startup Order for VMs

It is sometimes necessary to specify which containers and VMs startup first and how long the hardware node should wait until issuing the next startup command. This is easy for KVMs as this can be done through the Proxmox web interface.

Simply click on the Options tab of the container or VM and double click the Start/Shutdown order attribute.

proxmox-start-shutdown-order

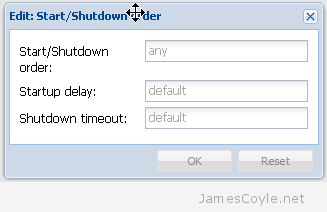
You can specify the following attributes for the KVM:

  • Start/Shutdown order – this is the order the VMs will be started in. For example, setting this to 1 will mean that this VM will be instructed to start first. You can specify the same number for multiple VMs which means that all VMs of the same number will be instructed to start at the same time. The reverse order is used when the machines are automatically shutdown.
  • Startup delay – this is the time in seconds which Proxmox will wait until moving on to the next priority. If you set a VM with a Start/Shutdown order of 1 with a Startup delay of 30, Proxmox will wait 30 seconds until instructing the VM with a Start/Shutdown order of 2 to start.
  • Shutdown timeout – when a VM is asked to shutdown, an ACPI shutdown request is sent to the VM which should initiate the guests shutdown procedure. If ACPI requests are not supported by the guest, or an exception occurs during shutdown the process may not complete. In this case the Proxmox will wait for the Shutdown timeout threshold to pass before forcefully terminate the VM. If no value is specified then the defaults are used which are 60 seconds for Containers and 180 seconds for VMs.

Any VMs which have the Start at boot attribute enabled but no Start/Shutdown order attribute will be started after all VMs with a Start/Shutdown order attribute set have been processed.

Startup Order for OpenVZ Containers

Unfortunately Proxmox has not provided this functionality in the web based GUI for OpenVZ containers. To specify the order for a container we need to use the command line on the Proxmox hardware node.

Login to your Proxmox hardware node as the root user and issue the below command to set the machine startup order. You will need to change [PRIORITY] to the priority value to use and [VMID] to the ID of the container.

vzctl set [VMID] –bootorder [PRIORITY] -save

You can use vzlist if you do not know the [VMID] of the container.

vzlist

CTID      NPROC STATUS    IP_ADDR         HOSTNAME
100       32    running   -               test.jamescoyle.net

You must have already enabled Start at boot for the container to start up. Any containers which have the Start at boot attribute enabled but no Start/Shutdown order attribute will be started after all containers with a Start/Shutdown order attribute set have been processed.


Benchmark MySQL server Performance with Sysbench

Get Social!

mysql-logoYou can spend hours tweaking the settings of a MySQL server instance to get the best possible performance for your hardware and environment. The hardest part is to ensure that the changes made are reflected with increased performance.

To ensure each change results in better performance of the MySQL server we need to measure the performance of the MySQL server before and after the change.

There are a verity of tools to automate MySQL benchmarking, one of which is Sysbench. I will be demonstrating the tests on a Debian 7 system however Sysbench will work on most common Linux distributions. Sysbench can be used to test both InnoDB or MyISAM database types in either a single server environment or a clustered environment with a single instance.

Installing Sysbench will differ on each Linux distribution; it can be downloaded and built from source from Sourceforge or installed with apt-get on Ubuntu or Debian.

apt-get install sysbench

Login to MySQL using the CLI or your favorite GUI tool and create a new database which will be used for the test. If you already have a database you can use for the test then you can skip this step. This example will use a database called dbtest for the tests.

create database dbtest;

The next step is to use the prepare statement with sysbench to generate a table in the specified database which will be used when performing tests.

From the command line, run the below command changing [USER] and [PASSWORD] to your MySQL access credentials.

sysbench --test=oltp --oltp-table-size=1000000 --mysql-db=dbtest --mysql-user=[USER] --mysql-password=[PASSWORD] prepare

sysbench 0.4.12:  multi-threaded system evaluation benchmark

No DB drivers specified, using mysql
Creating table 'sbtest'...
Creating 1000000 records in table 'sbtest'...

This has created a table called sbtest with 1000000 rows of data which will be used for testing. The below commands show the the created table and do not need to be executed.

mysql> use dbtest;
Reading table information for completion of table and column names
You can turn off this feature to get a quicker startup with -A

Database changed
mysql> show tables;
+------------------+
| Tables_in_dbtest |
+------------------+
| sbtest           |
+------------------+
1 row in set (0.00 sec)

mysql> SELECT COUNT(*) FROM sbtest;
+----------+
| COUNT(*) |
+----------+
|  1000000 |
+----------+
1 row in set (0.12 sec)

The next step is to being the performance tests. There are multiple parameters which can be changed to alter the test performed but we will do a simple read write test. Again you will need to change [USER] and [PASSWORD] to your MySQL access credentials.

sysbench --test=oltp --oltp-table-size=1000000 --oltp-test-mode=complex --oltp-read-only=off --num-threads=6 --max-time=60 --max-requests=0 --mysql-db=dbtest --mysql-user=[USER] --mysql-password=[PASSWORD] run

To perform a read only test, change the above parameter oltp-read-only=off to oltp-read-only=on.

The results will look similar to the below output. The main statistic to look for is transactions which shows the number of transactions the test managed to complete, and how many per second.

sysbench 0.4.12:  multi-threaded system evaluation benchmark

No DB drivers specified, using mysql
Running the test with following options:
Number of threads: 6

Doing OLTP test.
Running mixed OLTP test
Using Special distribution (12 iterations,  1 pct of values are returned in 75 pct cases)
Using "BEGIN" for starting transactions
Using auto_inc on the id column
Threads started!
Time limit exceeded, exiting...
(last message repeated 5 times)
Done.

OLTP test statistics:
    queries performed:
        read:                            456680
        write:                           163100
        other:                           65240
        total:                           685020
    transactions:                        32620  (543.63 per sec.)
    deadlocks:                           0      (0.00 per sec.)
    read/write requests:                 619780 (10329.05 per sec.)
    other operations:                    65240  (1087.27 per sec.)

Test execution summary:
    total time:                          60.0036s
    total number of events:              32620
    total time taken by event execution: 359.8823
    per-request statistics:
         min:                                  1.66ms
         avg:                                 11.03ms
         max:                                981.94ms
         approx.  95 percentile:              15.13ms

Threads fairness:
    events (avg/stddev):           5436.6667/31.44
    execution time (avg/stddev):   59.9804/0.00

Finally, you need to clean up your test area. If you can drop the entire database which was used for testing then login to MySQL and run the below command.

drop database dbtest;

If you are unable to drop the whole database then Sysbench comes with a cleanup command. Again you will need to change [USER] and [PASSWORD] to your MySQL access credentials.

sysbench --test=oltp --mysql-db=dbtest --mysql-user=[USER] --mysql-password=[PASSWORD] cleanup


Speed up Multiple apt-get install Requests by Caching the Repository

Get Social!

Linux penguinapt-get is the tool used in Debian and Ubuntu to manage packages installed on the system. Each time an update is available, or you install a new package the files will be downloaded from one of the central repository servers out on the internet and installed on your system.

There are two main problems with this:

  • Your servers may not be on able to access the internet directly for security reasons
  • Installing the same package on multiple servers will result in downloading the package the same amount of times. This could be slow or expensive in terms of bandwidth.

To solve the problem you can mirror the source repository on your own local server and add that as a source for your servers to update from. The main issue with this is that each distribution has a huge catalog of package which would take up vast amounts of space. Multiply this by the different releases of operating system in your environment and you could be talking terabytes of space.

Various utilities have been created to work round this problem such as apt-proxy, apt-cacher and debproxy. These utilities work by only caching some of the most used packages and fetching the rest from the source.

The below example will use apt-cacher-ng which is a middle man who sits in between the server being updated and the source repository out on the internet. It chooses to cache some regularly or recently used files locally and will recall them when they are requested which greatly speeds up the process for the requesting machine. The cache is frequently cleared to make sure that disk space is only being used for the most necessary packages. This drastically reduces resource required to run the service, whilst speeding up package downloading and guaranteeing that all packages are available.

Setting up apt-cacher-ng server

The apt-cacher-ng utility sits on a server which must be able to access both the public network and any internal network which your other servers may sit on.

Run apt-get install to install the proxy utility.

apt-get install apt-cacher-ng

The default installation of apt-cacher-ng holds details of both Ubuntu and Debian source repositories and is ready to use.

If you need to change the settings of the application such as the port it listens on, edit the below file:

vi /etc/apt-cacher-ng/acng.conf

You can now access the web interface using using the local machine’s IP or host name and the port. The default port is 3142.

apt-cache-nr-homescreen

This page shows that apt-cacher-ng is working correctly and is ready to cache the first source requests.

The next step is to add the server location to your clients. Create the below file and add details of your caching server.

/etc/apt/apt.conf.d/02proxy

Add the below line and edit [SERVER_IP] and [SERVER_PORT] to match your apt-cacher-ng configuration.

Acquire::http { proxy "http://[SERVER_IP]:[SERVER_PORT]"; };

Eg.

Acquire::http { proxy "http://10.10.10.1:3142"; };

Finally, run the update command on your clients to cause the proxy to cache the package lists. Packages will also be cached soon as you start to install or updates packages on your client.

To make sure that apt-cacher-ng is doing it’s job, tail the log to make sure entries are appearing.

tail -f /var/log/apt-cacher-ng/apt-cacher.log

In addition, you can also view the webpage for statistics on cache hits and misses:

http://[SERVER_IP]:[SERVER_PORT]/acng-report.html?doCount=Count+Data#top


doskey in Windows is just like alias in Linux

Category : How-to

Get Social!

doskey on Windows is very similar to alias on Linux, it allows you to set a term which will call a command and allow you to specify default arguments. You can specify that the command showdirs could call the command dir to list the content of a folder.

You may have guessed, the above use of doskey is unlikely and has no real benefit. A better use of the command would be to turn some of the windows commands into their Linux counterparts – such as ls into dir.

Run the below command in a command prompt to alias ls to run the command dir. The $* on the end are required so that any additional arguments are also passed to the dir command.

doskey ls=dir $*

The problem with this is that all of your alias commands will be lost when you close the cmd session. To make them persist we need to create a batch file and add the entry to the windows registry.

Create a new folder in the windows directory called bin and create a new batch file inside it.

C:\>mkdir c:\windows\bin
C:\>notepad.exe c:\windows\bin\doskey.bat

Add your entries to the batch file in the below format.

@echo off
doskey ls=dir $*
doskey mv=move $*
doskey cp=copy $*
doskey cat=type $*

Next, open up regedit.exe and add an entry to the batch file to make the doskey commands permanent for each cmd session.

HKEY_CURRENT_USER\Software\Microsoft\Command Processor

Add a new String Value called AutoRun and set the absolute path in the value of c:\windows\bin\doskey.bat.

The doskey.bat file will now be executed before opening a new cmd session which will set all of your alias ready for you to use.


Ignoring Files and Directories in Git with .gitignore

Tags :

Category : How-to

Get Social!

octocat-githubWith Git you are able to define file exceptions to exclude certain files and folders from git repository commits. You can create files which contain a list of patterns which git will check against on each git add and ignore any matching files.

You can create ignore pattern lists to ignore files on either a global scale which will affect all repositories on the system or limit it to a specific repository.

Both types of ignore use a .gitignore file which contains literal paths of files inside the repository or patterns which will be used to exclude matching files and directories.

You can skip to the bottom of the post for a few common examples.

.gitignore patterns

Patterns inside the .gitignore file are matched from the root directory of the git repository. Patterns are comprised of a wildcard character *, to match any character, and literal characters to match the exact phrase.

A typical example of using a .gitignore file would be to exclude all files ending in .log. The below pattern would be added to the .gitignore file

*.log

Or, as with something like log4j, your log files may include numbers at the end. This pattern will exclude any file names that contain .log.

*.log*

Another use is to exclude all files in a specific path, such as the application build directory. This will ignore the Build directory and everything within it.

/Build/*

A double asterisk (**) has its own special meaning and represents matching in all directories. For example, a/*/c would only match a single folder between a and b – a/this/b would match but /a/this/and/this/b would not match. Using a double asterisk would match in both scenarios. 

/src/**/tmp # exclude any /tmp files or folders at any level in the /src/ folder.

Single repository .gitignore

Add your patterns to the below file to add exclusions to affect only a singe git repository. You must make sure you have changed to the root directory of your repository, or include it in the file path.

vi /path/to/repository/.git/info/exclude

Global .gitignore

You must run a git config command to enable .gitignore to work across all local repositories. You can edit the ~/.gitignore path if required.

git config --global core.excludesfile ~/.gitignore

Once enabled, edit the ~/.gitignore file and add patterns which will affect the next git add command.

vi ~/.gitignore

For example, you may add a global gitignore entry for .bak files. Add the following line to you global gitignore file:

*.bak

You can use just one of the above methods or a combination of both gitignore methods on your git client.

Common .gitignore examples


Copy MySQL Database to Another Server

Category : How-to

Get Social!

mysql-logoThe easiest way to do a one off move of a MySQL database from one server to another is to use the mysqldump utility. This utility will dump the entire database and it’s content to a file and which can then be imported it into the target database.

Before running the export, you should make sure you have enough free space to hold the database. The bigger the database, the more free space you will need for the SQL dump.

Run the below command to export your database from the source server. Replace [EXPORT_DATABASE] with the name of the database to export.

mysqldump -uroot -p [EXPORT_DATABASE] -r /location/to/export/to.sql

If required, move the SQL dump file to the target server. On the target server, run the below command to connect, create the database and import the data. Change [USERNAME] to the user you would like to connect as and [DATABASE_NAME] to the name of the databse where the dump file will be imported. The [DATABASE_NAME] will most likely be the same as on the source database however you are able to change it if required.

mysql -p -u [USERNAME] [DATABASE_NAME] < /location/to/export/to.sql

Visit our advertisers

Quick Poll

Do you use ZFS on Linux?

Visit our advertisers