Category Archives: How-to

Samba: The process cannot access the file because another process has locked a portion of the file

Tags :

Category : How-to

Get Social!

Copy file error on samba share over nfsI had a problem with a SMB share which was sharing storage from an NFS mount.

Whilst you could argue that it is not efficient to share storage this way, sometimes there is a valid need.

The error was displayed when creating a none empty file, or copying a non zero byte file to the storage. The error is displayed, in my case in Windows, in a dialogue box.

Error:

The process cannot access the file because another process has locked a portion of the file

To fix this issue we need to open the smb.conf file on the Samba server

vi /etc/samba/smb.conf

In the general section of the smb.conf (that is usually the part at the top of the file) add “strict locking = no“. An example of how your smb.conf file may look is below.

[global]
    netbios name = sambaserver
    workgroup = JAMESCOYLE
    security = user
    encrypt passwords = yes
	strict locking = no

[homes]
    comment = %u's Home Directory
    browsable = no
    read only = no

When strict locking is disabled, the NFS server will only lock the file when the client tells it to. When it is enabled, the NFS server locks the file on every read and write.


Reclaim disk space from a sparse image file (qcow2/ vmdk)

Get Social!

western-digital-diskSparse disk image formats such as qcow2 only consume the physical disk space which they need. For example, if a guest is given a qcow2 image with a size of 100GB but has only written to 10GB then only 10GB of physical disk space will be used. There is some slight overhead associated, so the above example may not be strictly true, but you get the idea.

Sparse disk image files allow you to over allocate virtual disk space – this means that you could allocate 5 virtual machines 100GB of disk space, even if you only have 300GB of physical disk space. If all the guests need 100% of their 100GB disk space then you will have a problem. If you use over allocation of disk space you will need to monitor the physical disk usage very carefully.

There is another problem with sparse disk formats, they don’t automatically shrink. Let’s say you fill 100GB of a sparse disk (we know this will roughly consume 100GB of physical disk space) and then delete some files so that you are only using 50GB. The physical disk space used should be 50GB, right? Wrong. Because the disk image doesn’t shrink, it will always be 100GB on the file system even if the guest is now using less. The below steps will detail how to get round this issue.

On Linux

We need to fill the disk of the guest with zero’s (or any other character) so that the disk image can be re-compressed.

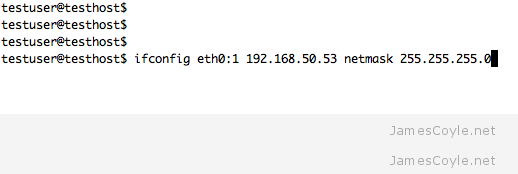
In a terminal, run the below command until you run out of disk space. Before running this, be sure to stop any applications running on the guest otherwise errors may result.

dd if=/dev/zero of=/mytempfile

Once the command errors out (this may take a while depending on your disk image size and physical disk speed) delete the file.

rm -f /mytempfile

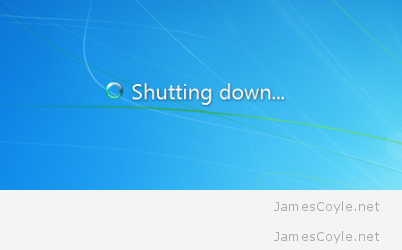
Shutdown the guest and follow the steps below under All OS’s.

On Windows

You will need to download a tool called sdelete from Microsoft which is will fill the entire disk with zeros which can be re-compressed later.

Download: http://technet.microsoft.com/en-gb/sysinternals/bb897443.aspx

Once you have downloaded and extracted sdelete, open up a command prompt and enter the following. This assumes that sdelete was extracted into c:\ and c:\ is the disk you would like to use to reclaim space

c:\sdelete.exe -z c:

Once this completes (this may take a while depending on your disk image size and physical disk speed), shutdown the guest and follow the below steps under All OS’s.

All OS’s

The rest of the process is done on the host so open up a terminal window and SSH to your Proxmox host. Move to the directory where the disk image is stored and run the below commands.

Make sure you have shut down the virtual machine which is using the qcow2 image file before running the below commands.

mv original_image.qcow2 original_image.qcow2_backup
qemu-img convert -O qcow2 original_image.qcow2_backup original_image.qcow2

The above commands move the original image file, and then re-compress it to it’s original name. This will shrink the qcow2 image to consume less physical disk space.

You can now start the guest and check that everything is in working order. If it is, you can remove the original_image.qcow2_backup file.


How to change a linux login password

Category : How-to

Get Social!

It’s easy to change your password in linux – don’t bother with the GUI’s which ship with distros such as Ubuntu, just hit the command line!

To change a linux users password, just type passwd and enter your new password:

# passwd
Enter new UNIX password:
Retype new UNIX password:
passwd: password updated successfully

If you are not logged in as that user, you can run the command with sudo and the users name:

# sudo passwd james
Enter new UNIX password:
Retype new UNIX password:
passwd: password updated successfully


Create a Virtual IP Address in Linux

Category : How-to

Get Social!

terminal ifconfigThis post will detail how to set ip a virtual IP address and assign an interface to handle the traffic in the Linux OS. This may not work for all Linux distros but it should be accurate for most.

Run the ifconfig command to see what interfaces are available.

ifconfig

Run the ifconfig command again, however this time create a VIP using the following syntax.

ifconfig [INTERFACE] [IP_ADDRESS] netmask [NETMASK]

Example:

ifconfig eth0:1 192.168.50.53 netmask 255.255.255.0

Substitute INTERFACE = the interface which this VIP will be based on, IP_ADDRESS = the new VIP IP address (note: this must exist) and NETMASK = the netmask of the new VIP.

Update the routing table using arping.

arping -q -U -c 3 -I [INTERFACE] [VIP_IP_ADDRESS]

Example:

arping -q -U -c 3 -I eth0 192.168.50.51

Substitute INTERFACE with the interface to bind this VIP to and VIP_IP_ADDRESS to the VIP IP address which was assigned in the above ifconfig statement.

Note: changes made will be lost when the machine is rebooted.

See this blog post to see how to make a permanent virtual IP address.


Restart Windows from the command line

Category : How-to

Get Social!

Windows 7 ShutdownSometimes you may want to restart windows without clicking the Start menu. In some cases, such as in a remote desktop session, the option to restart Windows is missing completely from the Start menu.

You can restart Windows XP/ Windows Server 2003 or newer, using the Windows command line or a shortcut.

shutdown -r -t 10

-r: is the argument to request a restart, rather than a complete shutdown.
-t n: is used to specify a delay, before the restart command will take effect. The default is 60 seconds. ‘n’ represents the time in seconds.

To name a few just a few, you can run this command from the Run dialogue, from a CMD, or from a shorcut.


How to make a new OpenVZ template from an existing template for Proxmox

Get Social!

openvz-logo-150px_new_3The kind folks over at OpenVZ.org have created a rift of templates which we can use as a starting point for our template. It is possible however, to create your own template from scratch based on your favorite Linux distribution – that will be coming in a later blog post.

The starting point for this blog post is to have downloaded a template and started it up in a container. If you don’t have any templates you can download one from OpenVZ. If you use Proxmox as your hypervisor you can download one via the web gui by clicking on your storage, clicking and finally Templates.

So, as I say, you need to have a container up and running and for this post we are going to assume it is running under the VMID of 100. Make any required changes to the template such as:

  • apt-get update && apt-get upgrade (for Debian based containers).
  • yum update (for anything RedHat).

When you are ready to create the template, turn of the container by using the GUI’s Shutdown button or issuing the command halt in the containers terminal.

The next thing to do is to remove the network interface. It doesn’t matter if you use veth or venet – just use the web gui and remove the network device. Proxmox container network remove

Once this is complete, login via SSH to the Proxmox server and cd to the root directory of the container. If you have the default setup, this will be /var/lib/vz/private/100.

ssh root@proxmoxserver
cd /var/lib/vz/private/100

Issue the tar command to create the template archive (remember to keep the . on the end, it’s important!). You can change the container template name to anything you like, but I have found it best to conform to the following formula:

operatingsystem-version-archtype-description.tar.gz

tar -cvzpf /var/lib/vz/template/cache/oracle-6-x86_64-intitial.tar.gz .

That’s it! You can now select the container when creating a template from either the GUI or using CLI commands.

I have made a patch for the Proxmox web GUI to add this functionality to the the interface. See my GUI changes blog post for more information.


Visit our advertisers

Quick Poll

Do you use ZFS on Linux?

Visit our advertisers