Category Archives: How-to

Proxmox 3.1 package/ updates manager

Get Social!

proxmox logo gradProxmox version 3.1 made a huge change to the way updates are managed. Prior to version 3.1, updates for the PVE software were managed from two main repositories – test and production – both of which were free and available. Generally the production repositories were used to ensure a stable and secure Proxmox host. These two repositories have now changed to the following:

Please note, this also works for version 4.x.

None subscription repository

This repository remains free, and all the code is still under AGPL v3. I believe this repository is similar to what the test repository used to be – containing test and potentially buggy packages. There is also the standard Debian repository for all other, non-Proxmox, updates. As these packages are potentially unstable, it is not recommended to use this repository for a production server.

Proxmox Version 3.x

Proxmox version 3.x is based on Debian Wheezy.

deb http://ftp.uk.debian.org/debian wheezy main contrib
deb http://download.proxmox.com/debian wheezy pve-no-subscription
Proxmox Version 4.x

If you run version 4.x of Proxmox, based on Debian Jessie then you’ll need to adjust the URL slightly as below:

deb http://ftp.uk.debian.org/debian jessie main contrib
deb http://download.proxmox.com/debian jessie pve-no-subscription

Enterprise repository

This repository requires a subscription license key to be added to Proxmox before you can access it. These packages are stable and are recommended for any production Proxmox server after version 3.1.

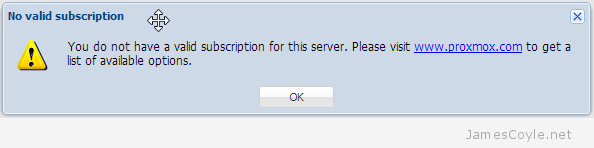
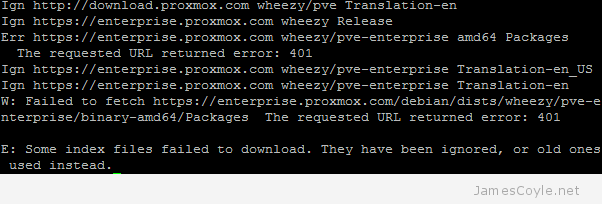
If you do not have a valid subscription, you will need to remove this repository otherwise apt-get will never complete it’s update. Without a valid subscription, you will see errors such as “You do not have a valid subscription for this server. Please visit www.proxmox.com to get a list of available options.

Proxmox valid subscription error

Proxmox valid subscription error teminal

To remove the repository, open the source list file in the apt-get sources folder

vi /etc/apt/sources.list.d/pve-enterprise.list

And comment out the line with a # as below.

#deb https://enterprise.proxmox.com/debian wheezy pve-enterprise

All updates will now come from the none subscription repository which are publicly available. Unfortunately, each time you click the Refresh button on the Updates tab you will receive the above message. You will also receive this message when you login to the web GUI.

What about the old updates repository?

The original updates repository should be removed once you have upgraded to Proxmox 3.1. No future updates will be available in this repository.

Edit the sources list and comment out the old repository:

vi /etc/apt/sources.list

If you used the test repository, you will need to comment that out too.

# PVE packages provided by proxmox.com
#deb http://download.proxmox.com/debian wheezy pve

How to remove the “No Valid Subscription” message

Each time you log into Proxmox 3.1 a dialogue box pops up reminding you that you have not purchased a valid subscription. One way to remove the message is to purchase a subscription from the Proxmox team. Another method is to make a slight change to the code to remove the dialogue box from appearing.

See my post on how to change the code to remove the dialogue box.


Create a permanent virtual IP address in Linux

Category : How-to

Get Social!

In a previous post, we saw how to create a virtual IP address, based on an existing network interface. The trouble with this method is that the virtual IP address will vanish when you reboot your machine.

On option is to attach the script to the network up and down scripts however there is a much easier way!

In Debian/ Ubuntu you simply create a new, virtual interface in the interfaces file.

vi /etc/network/interfaces

And add a network interface, based on an existing interface. The below example is a virtual IP based on eth0 – note if this is your second virtual IP you would use eth0:2, and so on.

auto eth0:1
iface eth0:1 inet static
address 192.168.100.9
netmask 255.255.255.0
network 192.168.100.0
broadcast 192.168.100.255

You will need to change the IP addresses to match your network. Notice there is no gateway – usually you can only have one gateway per machine.

Restart networking for the changes to take effect.


Apache – redirect traffic to a different url

Get Social!

Some web applications I work with are only available on a URL similar to http://hostname/application. This causes problems when giving the URL to users as they sometimes forget the /application part and receive an unhelpful page they are not looking for or worse, an error.

Using mod_rewrite in Apache2 we can force any traffic matching a specific URL to another URL of our choosing. For this example, we want to direct users landing on / to /application. Notice these URL strings only need to include the path.

Make sure mod_rewrite is enabled in you Apache2 configuration. On Debian flavour distributions you can use

a2enmod rewrite

For Red Hat type distributions, you need to uncomment the line containing mod_rewrite.so in /etc/httpd/conf/httpd.conf.

A basic redirect matching rule has two components. What URL to look for when redirecting, and where to send the traffic.

Edit the vhost file which you would like to include the redirect. For example:

/etc/apache2/sites-available/default

And add the following inside the <VirtualHost> tags.

RewriteEngine  on
RewriteRule ^[FROM]$ [TO] [R=301,L]

You will need to replace [FROM] with the url you would like to direct and [TO] should be the URL of where to send the user. For example, the below rule redirects users going to / to /myapplication

RewriteEngine  on
RewriteRule ^/$ /myapplication [R=301,L]


iptables in a Ubuntu OpenVZ container

Get Social!

proxmox logo gradIf you need a software firewall to shield containers on a Proxmox stack, you should always use a firewall on the host to decide what traffic is allowed for each container. This brings some obvious benefits such as it’s centrally managed – one configuration location for all containers on the node, and security as a compromised container cannot change firewall settings.

However, in Proxmox 3.0+ you can use iptables in a container which also has it’s own benefits under certain circumstances. For example, you can test firewall rules for a new development container without risking other containers on the same host, and you don’t need to give people access to the host to modify the rules.

I have tried iptables using a Ubuntu 12.04 container template. It works as expected but requires some setup on both the guest container and the Proxmox host.

Setup

Proxmox – steps to perform on the Proxmox host

You will need to enable containers access to the required kernel modules. To do this, edit the vz config file:

vi /etc/vz/vz.conf

And edit the IPTABLES= line as below.

IPTABLES="ipt_REJECT ipt_tos ipt_limit ipt_multiport iptable_filter iptable_mangle ipt_TCPMSS ipt_tcpmss ipt_ttl ipt_length ipt_state"

Make sure the required modules are loaded by running the following in a console window as root:

modprobe xt_state
modprobe xt_tcpudp
modprobe ip_conntrack

 Container – steps to perform in the Ubuntu container

First, you need a console window in the host. Either use the GUI console window or use vzctl enter [VMID] to login to the container.

Install iptables using apt-get.

apt-get install iptables

Any changes you make to iptables, such as adding new rules, will be lost each time the service is restarted. This is obviously not ideal as all the rules will be lost every time the container reboots. To get round this we need to add a script to save the rules each time the network interface goes down, and one to load the rules when the interface starts up.

Create an iptables script to run when the network is started:

vi /etc/network/if-pre-up.d/iptables

And add the below script to load the rules into iptables:

#!/bin/sh
iptables-restore < /etc/iptables.rules
exit 0

And when the network goes down:

vi /etc/network/if-post-down.d/iptables

To save the rules:

#!/bin/sh
iptables-save -c > /etc/iptables.rules
exit 0

After your network is restarted, the current rules will be saved to /etc/iptables.rules. To add new rules, you can edit this file directly and load the settings or you can use the iptables commands to create the rules you require. More about that in my iptables cheat sheet.


Enable Proxmox installation debugger

Get Social!

Although installations of Proxmox usually go smoothly, sometimes you may have problems detecting storage arrays or other hardware. By default the installer doesn’t give much away about any problems, so in the event of a problem you need to enable debugging.

To enable debugging, you will need to type debug at the installation boot menu.

Proxmox boot install screen debug

You can mix this with other arguments to over ride the defaults. See Advanced install settings for more information.

You will then be taken to a console where you can run any pre diagnostic commands. Press CTRL + D to continue the installation once you have finished with the terminal. If the installer errors, click Abort to return to a console.

Proxmox boot install screen debug console


Proxmox advanced install settings

Get Social!

proxmox logo gradInstalling Proxmox is quick and easy – the installer GUI takes care of everything, such as installing the correct packages and partitioning the root hard disk.

You can download Proxmox from the Proxmox download page as an ISO which you will need to boot your server from.

See my  Install guide blog post for the basics on installing Proxmox.

On more advanced installs, there may be a need to override some of these options. For example, you may want to specify how much swap space is created, or the size of the root partition. On one of my installs using a 120GB disk as the install device, 28GB is used for my root (/) partition on a default install. As I only run the basic, required packages on the host this size is far too large. With larger disks the problem gets worse.

When installing proxmox, the first screen of the installer is the Boot menu. At this prompt, we can specify arguments to override the defaults.

Proxmox boot install screen

The above example linux ext4 maxroot=10 swapsize=20 sets the partition format to ext4 (ext3 is the default), creates a root partition of 10GB providing the disk is large enough and swapsize of 20GB.

The options available at the boot menu are:

  • linux ext4 – sets the partition format to ext4. The default is ext3.
  • hdsize=nGB – this sets the total amount of hard disk to use for the Proxmox installation. This should be smaller than your disk size.
  • maxroot=nGB – sets the maximum size to use for the root partition. This is the max size so if the disk is too small, the partition may be smaller than this.
  • swapsize=nGB – sets the swap partition size in gigabytes.
  • maxvz-nGB – sets the maximum size in gigabytes that the data partition will be. Again, this is similar to maxroot and the final partition size may be smaller.
  • minfree=nGB – sets the amount of free space to remain on the disk after the Proxmox instillation.

Visit our advertisers

Quick Poll

Are you using Docker.io?

Visit our advertisers