Setup Glusterfs with a replicated volume over 2 nodes

Setup Glusterfs with a replicated volume over 2 nodes

Category : How-to

Get Social!

gluster-orange-antThis post will show you how to install GlusterFS in Ubuntu/ Debian however the steps will be similar with Red Hat based linux operating systems with minor changes to the commands.

Gluster File System is a distributed files system allowing you to create a single volume of storage which spans multiple disks, multiple machines and even multiple data centres.

Before we get started, install the required packages using apt-get. With Red Hat/ Cent based operating systems you will need to use yum, or download the package directly from http://download.gluster.org/pub/gluster/glusterfs/3.4/LATEST/

apt-get install glusterfs-server

Perform this on both of your servers. If you have more than two servers, perform this command on all of the servers required for the volume.

You will now need each of these servers to know about the others. Run gluster peer probe and the ip address of all the other servers in your GlusterFS cluster.

gluster peer probe gfs2.jamescoyle.net

Each of the commands should return with Probe successful which means the node is now known to this machine. You will only need to do this on one node of your cluster.

Run gluster peer status to check each node in your cluster is aware of the other nodes:

gluster peer status

The result should look like:

Number of Peers: 1

Hostname: gfs2.jamescoyle.net
Uuid: a0977ca2-6e47-4c1a-822b-99df896080ee State: Peer in Cluster (Connected)

Now we need to create the volume where the data will reside. the volume will be called datastore. First of all, we need to identify where on the host this storage is. For this example, it is /mnt/gfs_block on both nodes, but this could be any mount point of storage that you have. If the folder does not exist, it will be silently created so be sure to get the correct path on all nodes.

gluster volume create datastore replica 2 transport tcp gfs1.jamescoyle.net:/mnt/gfs_block gfs2.jamescoyle.net:/mnt/gfs_block

If this has been sucessful, you should see:

Creation of volume testvol has been successful. Please start the volume to access data.

As the message indicates, we now need to start the volume:

gluster volume start datastore

And wait for the message that is has started.

Starting volume testvol has been successful

Running either of the below commands should indicate that GlusterFS is up and running. The ps command should show the command running with both servers in the argument. netstat should show a connection between both nodes.

ps aux | grep gluster
netstat -tap | grep glusterfsd

As a final test, to make sure the volume is available, run gluster volume info. An example output is below:

gluster volume info

Volume Name: datastore
Type: Replicate
Status: Started
Number of Bricks: 2
Transport-type: tcp
Bricks:
Brick1: gfs1.jamescoyle.net:/mnt/datastore
Brick2: gfs2.jamescoyle.net:/mnt/datastore

That’s it! You now have a GlusterFS volume which will maintain replication across two nodes. To see how to use your volume, see our guide to mounting a volume.


Mount a GlusterFS volume

Get Social!

gluster-orange-antGlusterFS is an open source distributed file system which provides easy replication over multiple storage nodes. These nodes are then combined into storage volumes which you can easily mount using fstab in Ubuntu/ Debian and Red Hat/ CentOS. To see how to set up a GlusterFS volume, see this blog post.

Before we can mount the volume, we need to install the GlusterFS client. In Ubuntu we can simply apt-get the required package, or yum in Red Hat/ CentOS. For Ubuntu/ Debian:

apt-get install glusterfs-client

For Red Hat, OEL and CentOS:

yum install glusterfs-client

Once the install is complete, open the fstab and add a new line pointing to your server. The server used here is the server which contains the information on where to get the volume, and not necessarily where the data is. The client will connect to the server holding the data. The following steps are the same on both Debian and Red Hat based Linux distributions.

Easy way to mount

vi /etc/fstab

Replace [HOST] with your GlusterFS server, [VOLNAME] with the Gluster FS volume to mount and [MOUNT] with the location to mount the storage to.

[HOST]:/[VOLUME] /[MOUNT] glusterfs defaults,_netdev 0 0

Example:

gfs1.jamescoyle.net:/datastore /mnt/datastore glusterfs defaults,_netdev 0 0

Finally, reboot your machine to make the volume appear in df.

df -h
gfs1.jamescoyle.net:/testvol   30G  1.2G   27G   5% /mnt/volume

More redundant mount

The trouble with the above method is that there is a single point of failure. The client only has one GlusterFS server to connect to. To set up a more advanced mount, we have two options; create a volume config file, or use backupvolfile-server in the fstab mount. Remember this is not to specify where all the distributed volumes are, it’s to specify a server to query all the volume bricks.

fstab method

We can use the parameter backupvolfile-server to point to our secondary server. The below example indicates how this could be used.

gfs1.jamescoyle.net:/datastore /mnt/datastore glusterfs defaults,_netdev,backupvolfile-server=gfs2.jamescoyle.net 0 0

Using a volume config file

Create a volume config file for your GlusterFS client.

vi /etc/glusterfs/datastore.vol

Create the above file and replace [HOST1] with your GlusterFS server 1, [HOST2] with your GlusterFS server 2 and [VOLNAME] with the Gluster FS volume to mount.

volume remote1
  type protocol/client
  option transport-type tcp
  option remote-host [HOST1]
  option remote-subvolume [VOLNAME]
end-volume

volume remote2
  type protocol/client
  option transport-type tcp
  option remote-host [HOST2]
  option remote-subvolume [VOLNAME]
end-volume

volume replicate
  type cluster/replicate
  subvolumes remote1 remote2
end-volume

volume writebehind
  type performance/write-behind
  option window-size 1MB
  subvolumes replicate
end-volume

volume cache
  type performance/io-cache
  option cache-size 512MB
  subvolumes writebehind
end-volume

Example:

volume remote1
  type protocol/client
  option transport-type tcp
  option remote-host gfs1.jamescoyle.net
  option remote-subvolume /mnt/datastore
end-volume

volume remote2
  type protocol/client
  option transport-type tcp
  option remote-host gfs2.jamescoyle.net
  option remote-subvolume /mnt/datastore
end-volume

volume replicate
  type cluster/replicate
  subvolumes remote1 remote2
end-volume

volume writebehind
  type performance/write-behind
  option window-size 1MB
  subvolumes replicate
end-volume

volume cache
  type performance/io-cache
  option cache-size 512MB
  subvolumes writebehind
end-volume

Finally, edit fstab to add this config file and it’s mount point. Replace [MOUNT] with the location to mount the storage to.

/etc/glusterfs/datastore.vol [MOUNT] glusterfs rw,allow_other,default_permissions,max_read=131072 0 0

Proxmox 3.1 package/ updates manager

Get Social!

proxmox logo gradProxmox version 3.1 made a huge change to the way updates are managed. Prior to version 3.1, updates for the PVE software were managed from two main repositories – test and production – both of which were free and available. Generally the production repositories were used to ensure a stable and secure Proxmox host. These two repositories have now changed to the following:

Please note, this also works for version 4.x.

None subscription repository

This repository remains free, and all the code is still under AGPL v3. I believe this repository is similar to what the test repository used to be – containing test and potentially buggy packages. There is also the standard Debian repository for all other, non-Proxmox, updates. As these packages are potentially unstable, it is not recommended to use this repository for a production server.

Proxmox Version 3.x

Proxmox version 3.x is based on Debian Wheezy.

deb http://ftp.uk.debian.org/debian wheezy main contrib
deb http://download.proxmox.com/debian wheezy pve-no-subscription
Proxmox Version 4.x

If you run version 4.x of Proxmox, based on Debian Jessie then you’ll need to adjust the URL slightly as below:

deb http://ftp.uk.debian.org/debian jessie main contrib
deb http://download.proxmox.com/debian jessie pve-no-subscription

Enterprise repository

This repository requires a subscription license key to be added to Proxmox before you can access it. These packages are stable and are recommended for any production Proxmox server after version 3.1.

If you do not have a valid subscription, you will need to remove this repository otherwise apt-get will never complete it’s update. Without a valid subscription, you will see errors such as “You do not have a valid subscription for this server. Please visit www.proxmox.com to get a list of available options.

Proxmox valid subscription error

Proxmox valid subscription error teminal

To remove the repository, open the source list file in the apt-get sources folder

vi /etc/apt/sources.list.d/pve-enterprise.list

And comment out the line with a # as below.

#deb https://enterprise.proxmox.com/debian wheezy pve-enterprise

All updates will now come from the none subscription repository which are publicly available. Unfortunately, each time you click the Refresh button on the Updates tab you will receive the above message. You will also receive this message when you login to the web GUI.

What about the old updates repository?

The original updates repository should be removed once you have upgraded to Proxmox 3.1. No future updates will be available in this repository.

Edit the sources list and comment out the old repository:

vi /etc/apt/sources.list

If you used the test repository, you will need to comment that out too.

# PVE packages provided by proxmox.com
#deb http://download.proxmox.com/debian wheezy pve

How to remove the “No Valid Subscription” message

Each time you log into Proxmox 3.1 a dialogue box pops up reminding you that you have not purchased a valid subscription. One way to remove the message is to purchase a subscription from the Proxmox team. Another method is to make a slight change to the code to remove the dialogue box from appearing.

See my post on how to change the code to remove the dialogue box.


Proxmox 3.1 is now available!

Get Social!

proxmox logo gradA new release of Proxmox is now available, release 3.1.

The highlights of this new release are:

  • A new storage plugin for GlusterFS.

Proxmox storage types
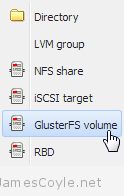
This is a new storage plugin which can be used to add usable storage to your Proxmox host. GlusterFS is an open source, distributed file system with potential to house a huge capacity of data.

GlusterFS is key to open source, scalable and highly available storage spanning many servers, and even data centres.

See their About page for more information: http://www.gluster.org/about/

  • The SPICE protocol has been implemented as a technology preview. Whilts it is not recommended for production systems, you can see what’s in store in the Proxmox roadmap.
  • One of the most dramatic changes of Proxmox 3.1 is that the package repositories have been split into subscription and none-subscription. The subscription repository is the only repository recommended for a production server, however it requires a paid subscription with Proxmox to access it. See this thread for more information on the new Updates GUI page.

Proxmox updates manager

You can update any 3.0 install of Proxmox to the latest 3.1. Before updating, make sure all your VM’s have been stopped. Run the below commands on each server in your cluster.

apt-get update
apt-get dist-upgrade

Restart all Proxmox servers to complete the update.


iptables in a Ubuntu OpenVZ container

Get Social!

proxmox logo gradIf you need a software firewall to shield containers on a Proxmox stack, you should always use a firewall on the host to decide what traffic is allowed for each container. This brings some obvious benefits such as it’s centrally managed – one configuration location for all containers on the node, and security as a compromised container cannot change firewall settings.

However, in Proxmox 3.0+ you can use iptables in a container which also has it’s own benefits under certain circumstances. For example, you can test firewall rules for a new development container without risking other containers on the same host, and you don’t need to give people access to the host to modify the rules.

I have tried iptables using a Ubuntu 12.04 container template. It works as expected but requires some setup on both the guest container and the Proxmox host.

Setup

Proxmox – steps to perform on the Proxmox host

You will need to enable containers access to the required kernel modules. To do this, edit the vz config file:

vi /etc/vz/vz.conf

And edit the IPTABLES= line as below.

IPTABLES="ipt_REJECT ipt_tos ipt_limit ipt_multiport iptable_filter iptable_mangle ipt_TCPMSS ipt_tcpmss ipt_ttl ipt_length ipt_state"

Make sure the required modules are loaded by running the following in a console window as root:

modprobe xt_state
modprobe xt_tcpudp
modprobe ip_conntrack

 Container – steps to perform in the Ubuntu container

First, you need a console window in the host. Either use the GUI console window or use vzctl enter [VMID] to login to the container.

Install iptables using apt-get.

apt-get install iptables

Any changes you make to iptables, such as adding new rules, will be lost each time the service is restarted. This is obviously not ideal as all the rules will be lost every time the container reboots. To get round this we need to add a script to save the rules each time the network interface goes down, and one to load the rules when the interface starts up.

Create an iptables script to run when the network is started:

vi /etc/network/if-pre-up.d/iptables

And add the below script to load the rules into iptables:

#!/bin/sh
iptables-restore < /etc/iptables.rules
exit 0

And when the network goes down:

vi /etc/network/if-post-down.d/iptables

To save the rules:

#!/bin/sh
iptables-save -c > /etc/iptables.rules
exit 0

After your network is restarted, the current rules will be saved to /etc/iptables.rules. To add new rules, you can edit this file directly and load the settings or you can use the iptables commands to create the rules you require. More about that in my iptables cheat sheet.


Proxmox 3.0 is now available – with updates!

Category : Tech News

Get Social!

proxmox logo gradThe guys building Proxmox have not been messing about; in the past couple of weeks we have seen a major release of Proxmox V3.0 and a few updates. We now have qemu templates which we can clone as many times as required, as a whole new guest or a thinly provisioned guest linked to the clone. With the latest updates we now have storage migration which enables us to move a qemu guests storage to a new storage type.

You can download the ISO from http://www.proxmox.com/downloads/proxmox-ve/17-iso-images

Highlights of the 3.0 release:

  • Based on Debian 7.0 (Wheezy)
  • new VM clone feature
  • new event driven API server (pveproxy)
    • completely replace apache2
    • efficient support for HTTP keep-alive
  • support bootlogd (boot log can be viewed on the GUI)
  • update qemu-kvm to 1.4.1

And the recent update:

  • Storage migration 

There is an upgrade script to upgrade from version 2.3 to 3 however as the new version is now based on Debian 7.0 instead of Debian 6. To make sure there are no left over packages or files floating around, I would recommend a fresh install of Proxmox version 3.0.

Don’t forget to update once you have installed Proxmox 3.0 with apt-get by using the below commands in a terminal. Before updating, make sure all your VM’s have been stopped. Run the below commands on each server in your cluster.

apt-get update
apt-get dist-upgrade

Restart all Proxmox servers to complete the installation.

If you would like to try the in-place upgrade path, see the Proxmox Wiki for more information.


Visit our advertisers

Quick Poll

What type of VPN protocol do you use?

Visit our advertisers