Upload OVA to Proxmox/ KVM

Upload OVA to Proxmox/ KVM

Get Social!

Proxmox does not have native support for an OVA template which is surprising considering it’s the open format for creating packaged virtual machines, or virtual appliances as they are often referred.

We can still get an OVA template running in Proxmox but it will take a little bit of work to transform it into a functional VM.

ovf-upload

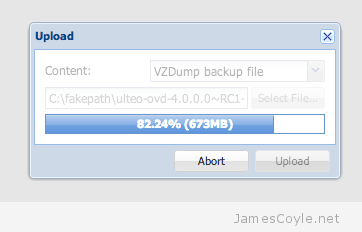
First off, lets get the OVA file uploaded to the Proxmox server; you can do this using SCP or the Proxmox web GUI. If you use the Proxmox web GUI you will need to rename the OVA to end in a iso extension and upload it as a ISO image content. Depending on the size of the OVA file and the bandwidth you have available, it may take a while to upload the file. The file will then be available in the dump folder in the selected storage.

SSH onto your Proxmox server and locate the OVA file. An OVA file is simply a tar file containing an image file and some configuration for things like CPU, RAM, etc. Run the tar command to extract the components of the OVA file onto your file system.

tar - my.ovf

The output will be two or more files – one will be an OVF file which contains the settings and configuration of the virtual machine and one or more files will be VMDKs which are the disk images of the virtual machine.

Although you can run a VMDK file in Proxmox, it’s recommended to use qcow2 which is the default file format for Proxmox virtual machines. Run the VMDK file through the converter – note this can take a while with large files.

qemu-img convert -f vmdk myvm-disk1.vmdk -O qcow2 myvm-disk1.qcow2

We now need to get the image into a VM with some hardware so that we can begin to use it. This is where things get tricky – the OVF file is not compatible with Proxmox and needs to be manually understood. The principle here is we are going to use the Proxmox web GUI to create a VM and replace the empty disk image which is created with our recently converted qcow2 image.

You can use vi to open the OVF file and understand some of the basic settings which are required for the VM. Open the OVF file and look for the following XML tags:

  • OperatingSystemSection
  • VirtualHardwareSection
  • Network
  • StorageControllers

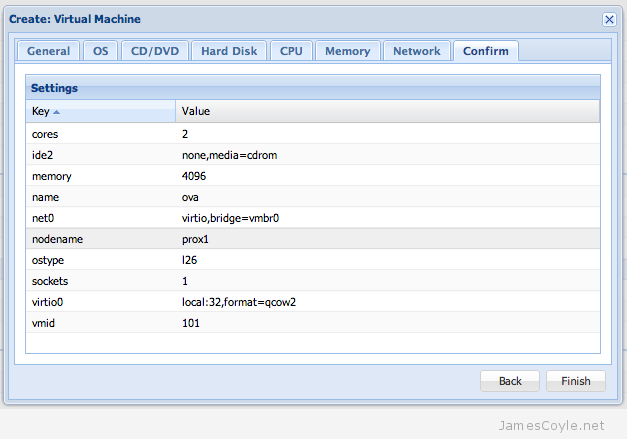
You should be able to get a rough idea of the requirements for the KVM. In the Proxmox web GUI, click on Create VM and create a VM which meets the requirements of the image you converted. Make sure that you select qcow2 for the disk format. After clicking Finish an empty VM will be created – in this example I used local storage and VMID 101 so the disk images are stored in /var/lib/vz/images/101.

proxmox-complete-create-vm

Copy the previously converted qcow2 image over the existing image – be sure to overwrite the existing image otherwise your image will not be used and KVM will try to start with a blank, empty image.

mv /tmp/myvm-disk1.qcow2 /var/lib/vz/image/101/vm-101-disk-1.qcow2

Thats it – you can now start up the image from the Proxmox web GUI.


Proxmox OpenVZ Container and KVM Startup and Shutdown Order

Get Social!

proxmox logo gradFrom time to time you will need to shutdown and startup your Proxmox hardware node. There are many reasons for this such as adding new hardware or to apply new kernel updates.

Before you shutdown the hardware node you must cleanly shutdown all OpenVZ containers and all KVMs. To avoid having to do this manually, Proxmox will issue all running containers and VMs the shutdown command as part of the hardware nodes shutdown procedure. Proxmox also gives us the option to specify which containers and VMs should be started when the hardware node is turned on. This means that the final part of the hardware nodes startup sequence will be to start your containers and VMs. Depending on your environment, this may need to be done in a specific order. For example you may wish your database VM or container to be started before your web application.

Enable automatic startup of containers and VMs

To enable the automatic startup of an OpenVZ container or VM you must specify the Start at boot attribute in the Proxmox web interface. Simply click on the Options tab of the container or VM and double click the Start at boot attribute.

proxmox-start-at-boot

Make sure the checkbox is ticked in the new dialogue box which pops up and click OK.

Your container or VM will now automatically be started when your hardware node next starts.

Startup Order for VMs

It is sometimes necessary to specify which containers and VMs startup first and how long the hardware node should wait until issuing the next startup command. This is easy for KVMs as this can be done through the Proxmox web interface.

Simply click on the Options tab of the container or VM and double click the Start/Shutdown order attribute.

proxmox-start-shutdown-order

You can specify the following attributes for the KVM:

  • Start/Shutdown order – this is the order the VMs will be started in. For example, setting this to 1 will mean that this VM will be instructed to start first. You can specify the same number for multiple VMs which means that all VMs of the same number will be instructed to start at the same time. The reverse order is used when the machines are automatically shutdown.
  • Startup delay – this is the time in seconds which Proxmox will wait until moving on to the next priority. If you set a VM with a Start/Shutdown order of 1 with a Startup delay of 30, Proxmox will wait 30 seconds until instructing the VM with a Start/Shutdown order of 2 to start.
  • Shutdown timeout – when a VM is asked to shutdown, an ACPI shutdown request is sent to the VM which should initiate the guests shutdown procedure. If ACPI requests are not supported by the guest, or an exception occurs during shutdown the process may not complete. In this case the Proxmox will wait for the Shutdown timeout threshold to pass before forcefully terminate the VM. If no value is specified then the defaults are used which are 60 seconds for Containers and 180 seconds for VMs.

Any VMs which have the Start at boot attribute enabled but no Start/Shutdown order attribute will be started after all VMs with a Start/Shutdown order attribute set have been processed.

Startup Order for OpenVZ Containers

Unfortunately Proxmox has not provided this functionality in the web based GUI for OpenVZ containers. To specify the order for a container we need to use the command line on the Proxmox hardware node.

Login to your Proxmox hardware node as the root user and issue the below command to set the machine startup order. You will need to change [PRIORITY] to the priority value to use and [VMID] to the ID of the container.

vzctl set [VMID] –bootorder [PRIORITY] -save

You can use vzlist if you do not know the [VMID] of the container.

vzlist

CTID      NPROC STATUS    IP_ADDR         HOSTNAME
100       32    running   -               test.jamescoyle.net

You must have already enabled Start at boot for the container to start up. Any containers which have the Start at boot attribute enabled but no Start/Shutdown order attribute will be started after all containers with a Start/Shutdown order attribute set have been processed.


New Proxmox BETA – now with Ceph

Category : Tech News

Get Social!

ceph-tab-proxmoxProxmox has just released a new feature to the Proxmox VE software – Ceph integration. It is currently in BETA and available to test from the pvetest repository.

Ceph is a distributed storage engine which is designed to work over many nodes to provide resilient, highly available storage.

You will need to add the pvetest repository to your Proxmox installation by adding the below line to your apt sources file.

vi /etc/apt/sources.list

You may only need to add pvetest if you already have an entry similar to below. If not, add the full line to the bottom of the file.

http://download.proxmox.com/ debian wheezy pvetest

The set up and installation of Ceph is detailed on my Ceph storage on Proxmox blog post.


Proxmox Firewall Rules

Category : Knowledge

Get Social!

proxmox logo gradProxmox uses various ports for communication between either a user and the server or between multiple servers in a cluster. You may need to proxy or port forward some of these ports for external access to Proxmox or, in more strict environments, add rules to allow inter machine communication.

For external access to Proxmox you will use either SSH, the web console or SPICE. The following ports are used for each of these services:

  • Web console: 8006 TCP – this is the console you open in your web browser to administer Proxmox. Note: VNC terminals will not work on this port alone.
  • VNC console: 5900 – 5999 TCP – this range of ports is used for the VNC console/ terminal. The reason there is a range is because each open session requires it’s own port meaning that you can have a total of 100 open VNC sessions at once.
  • SPICE: 3128 TCP – this is used if you use SPICE instead of the VNC console. SPICE requires a client to connect.
  • SSH: 22 TCP – this is required for accessing your Proxmox server using SSH.

An additional set of ports are required if you are using Proxmox in a cluster.

  • CMAN: 5404 and 5405 UDP – this is the cluster manager for the Proxmox cluster.

Reverse Proxy Proxmox with Apache

Get Social!

proxmox logo gradThe Proxmox web GUI is accessible on port 8006 by default using SSL encryption. The web GUI is served by the built in Proxmox lightweight HTTP server however changing the config could cause issues when upgrading to future Proxmox releases. The easiest way to expose the Proxmox web GUI externally is to use Apache to reverse proxy the site. You can then add additional security or specify SSL certificates at the proxy level without interfering with the Proxmox installation.

See my blog post on the basics of using Apache to reverse proxy websites.

To setup the reverse proxy for Proxmox, create a new sites-available entry called proxmox.

vi /etc/apache2/sites-available/proxmox

Add the following to the file and substitute a few settings for your own environment:

  • proxmox.cer – change to your SSL certificate for Proxmox
  • proxmox.key – change to the SSL certificate key for Proxmox.
  • proxmox.host – appears in the Location tags and must be the IP address or resolvable hostname of your internal Proxmox server. The ServerAdmin attribute is an email address which will be displayed on error pages such as 404.
  • proxmox.jamescoyle.net – change this to the external URL which will be used to access the reverse proxy server. The server will only proxy requests which contain this URL.
  SSLEngine On
  SSLCertificateFile /etc/apache2/ssl/proxmox.cer
  SSLCertificateKeyFile /etc/apache2/ssl/proxmox.key
  SSLProxyEngine on
  SSLProxyVerify none

  ServerAdmin [email protected]
  DocumentRoot /var/www
  ServerName proxmox.jamescoyle.net

  # Possible values include: debug, info, notice, warn, error, crit,alert, emerg.
  LogLevel warn
  CustomLog ${APACHE_LOG_DIR}/proxmox-access.log combined
  ErrorLog ${APACHE_LOG_DIR}/proxmox-error.log

  ProxyRequests off
  ProxyPreserveHost on
  RequestHeader unset Accept-Encoding

  
     ProxyPass https://proxmox.host:8006/
     ProxyPassReverse https://proxmox.host:8006/
     Order allow,deny
     Allow from all
  

Enable the new site in Apache. In Ubuntu the command a2ensite will create the symlink, or you can create it manually.

a2ensite proxmox

Reload Apache to load the new configuration.

service apache2 reload

How to Cluster Proxmox

Category : How-to

Get Social!

proxmox logo grad

Clustering is a technique to group together multiple machines or devices providing common parameters, such as storage, over all machines in the cluster. Proxmox can be clustered to provide a common interface to control all machines in the cluster.

Automatic failover of machines can also be achieved with a Proxmox cluster however this requires significant setup and it not available out of the box. I will discuss VM failover in a future blog post.

Create a new Cluster

To join one or more nodes to a Proxmox cluster we must first create a cluster on one of the machines. Run the below command on your first Proxmox node and replace [CLUSTER_NAME] with a name for your cluster.

pvecm create [CLUSTER_NAME]

Check the status of a Cluster

Once a cluster is created, you can check the status using the status command.

pvecm status

You can use the nodes command to view all nodes in the cluster.

pvecm nodes

Add a new Node to the Cluster

Adding a new node to a Proxmox cluster is easy and only requires the hostname or IP address of the primary cluster node. It is highly recommended to use a hostname or DNS entry over an IP address to shield any IP address changes.

On a non-clustered node, log in and run the pvecm add command and specify the IP address or hostname. You can use the IP address or hostname of any already clustered Proxmox node.

pvecm add [HOSTNAME_OF_CLUSTER]

You must not have any virtual machines/ OpenVZ containers running on the node which you are adding to the cluster. All nodes should also be running the same component versions of Proxmox to ensure compatibility.


Visit our advertisers

Quick Poll

How many Proxmox servers do you work with?

Visit our advertisers