Author Archives: James Coyle

Basic OpenVZ Container Management

Category : How-to

Get Social!

OpenVZ containers, or CT for short, work on the premise of using a template as the starting point for each virtual instance. The Template usually holds the basic applications, such as an SSH server, to create a functioning running instance.

See my blog post on Setting up an OpenVZ server for information on creating an OpenVZ server.

Download an OpenVZ Template

OpenVZ hosts a suite of OpenVZ templates for all common Linux distributions. Before you can create a CT you will need to choose a template from the below site and download it to your OpenVZ server. The template must be saved in your servers template directory, by default this is /vz/template/cache.

Download your templates from: http://wiki.openvz.org/Download/template/precreated

I will use the Debian 7 template for this example.

wget -P /vz/template/cache http://download.openvz.org/template/precreated/debian-7.0-x86_64.tar.gz

Create your first OpenVZ container

Most of the administration tasks for a container, such as creating and destroying a container, use the vzctl command.

Before we create our first container we need to understand the components of the create command. This is an example of a basic create command:

vzctl create 200 --ostemplate debian-7.0-x86_64 --config basic
  • 200 is the container ID. This is a unique ID which represents the CT being created. We will use this ID later when we start and stop the machine.  You can use virtually any number, but we usually use a three digit number.
  • –ostemplate is the template file name which we downloaded in the previous section. This file, with a tar.gz extention, must exist in the template directory of your OpenVZ server. By default, the templates directory is /vz/template/cache.
  • –config is what decides how much RAM, disk and other properties the CT will assume. OpenVZ have created some example configurations for us, basic being one of them.

Example:

# vzctl create 200 --ostemplate debian-7.0-x86_64 --config basic 
Creating container private area (debian-7.0-x86_64)
Performing postcreate actions
CT configuration saved to /etc/vz/conf/200.conf
Container private area was created

List available OpenVZ containers

Now that we have created a container, we can list the details with vzlist. Running this command will list all turned on containers so we’ll need the -a switch to list the turned off ones as well.

# vzlist -a
      CTID      NPROC STATUS    IP_ADDR         HOSTNAME
       200          - stopped   -               -

Start/ Stop/ Restart an OpenVZ container

Starting, stopping and restarting a container are done via the vzctl command with either start, stop or restart and the container ID.

vzctl start 200
vzctl stop 200
vzctl restart 200

Configure an OpenVZ container

There are many configuration options for an OpenVZ container which specify disk space, SWAP, networking, CPU and plenty of others. I’ll cover a few basic options here.

Networking is a common option, and something we will need in our OpenVZ container. First lets set the hostname to example.jamescoyle.net.

vzctl set 200 --hostname example.jamescoyle.net --save

Next, let’s add an IP address on the same range as our host. Make sure you check that this IP is free and not already in use by another machine on your network.

vzctl set 200 --ipadd 10.10.10.100 --save

The last part of our basic network configuration is to add some nameservers so that DNS entries can be resolved. I’ll use the Google nameservers for this example but you may also wish to include your own local servers.

vzctl set 200 --nameserver 8.8.8.8 --nameserver 8.8.4.4 --save

Execute commands in an OpenVZ container

Using this current example, we can’t connect to our container because we haven’t set a root password. We need to issue the passwd command inside the container and type a password.

There are two ways to do this. We can enter the container directly from the host which will give us a shell running on the container itself.

vzctl enter 200

You can then issue any further commands you require.

The other option is to run a single command from the host using vzctl exec followed by the command to execute.

# vzctl exec 200 passwd
Enter new UNIX password: mypassword
Retype new UNIX password: mypassword
passwd: password updated successfully

Remove an OpenVZ container

Before you remove an OpenVZ container, you must make sure it is stopped. Once the container is stopped, you can use the vzctl destroy command to delete the container permanently.

vzctl destroy 200

Be careful, there is no confirmation for the destroy command!


Change the Password for an OpenVZ Container

Category : How-to

Get Social!

openvz-logo-150px_new_3If you have forgotten the password for an OpenVZ container – relax! Help is at hand.

Luckily OpenVZ makes it very easy to set or reset the password for any user of a container. You’ll need access to the terminal on the hardware node which is running the container to run a simple vzctl command.

vzctl is the CLI command which is used to configure and control an OpenVZ container. Using the –userpassword switch we can reset a users password. We can also use this command to create a new user if the specified user does not already exist.

vzctl set [VMID] --userpasswd [USER]:[PASSWORD]

Run the above command and substitute the following values for your own:

  • [VMID] is the ID of the container to set the new password on.
  • [USER] is the name of the user that you’d like to change the password for. If this user doesn’t exist then a new user will be created.
  • [PASSWORD] is the password to set for the [USER].

Note: The container needs to be running for this command to work as the user information is saved within the container and not in the containers configuration file like many of the other vzctl commands. If the container is not already running, this command will start it.


Proxmox 3.2 is now available with SPICE, Ceph and updated QEMU

Category : Tech News

Get Social!

proxmox logo gradProxmox has today released a new version of Proxmox VE, Proxmox 3.2 which is available as either a downloadable ISO or from the Proxmox repository.

Hilights of this release include’;

  • Ceph has now been integrated to the Proxmox web GUI as well as a new CLI command created for creating Ceph clusters. See my post on Ceph storage in Proxmox for more information.
  • SPICE is now fully integrated as the console viewer however the original Java console is still the default. SPICE supports multiple monitors and all recent guest operating systems.
  • QEMU has been updated with better backups and a few new supported guest hardware devices, mostly for compatibility with VMWare.

You can download the ISO from Proxmox directly at the following link:
http://www.proxmox.com/downloads/item/proxmox-ve-3-2-iso-installer

If you already have Proxmox installed, you can use the below commands to automatically update your Proxmox servers to the latest 3.2 version from the terminal. Before updating, make sure all your VM’s have been stopped. Run the below commands on each server in your cluster.

Upgrade
apt-get update
apt-get dist-upgrade

Restart all Proxmox servers to complete the installation.


Linux User Management Cheat Sheet

Get Social!

This is my cheat sheet on Linux user administration covering functions such as adding, and removing users and assigning them to groups.

Add a new Linux user

Use the useradd command to add a new user.

useradd [USERNAME]

Change a users password

The user account is locked until you set a password with the passwd command.

passwd [USERNAME]

Add user to group – new user

If you are adding a new user, you can add it to a group in the same command. This command will create a user of [USERNAME] in group [GROUPNAME].

useradd -G [GROUPNAME] [USERNAME]

Add user to group – existing user

If the user already exists, you can add it to an existing group with the usermod command.

usermod -a -G [GROUPNAME] [USERNAME]

Delete a user

Run the userdel command to remove an existing Linux user.

userdel [USERNAME]

View existing users and groups

Run the below cat command to view existing Linux users. You sill see the user names and user IDs of all users on your server.

cat /etc/passwd | sort

Use this cat command to view the existing Linux groups.

cat /etc/group | sort

Change a users home directory location

You can change the users home directory with the usermod command.

usermod -d -m [NEW_DIRECTORY] [USERNAME]

Change a users UID

Use the usermod -u command to change the user ID of a user.

usermod -u [UID] [USER_NAME]


Remove a Windows Service

Get Social!

windows-logoYou can easily remove a Windows service from the Windows registry using a simple command prompt command called SC.
SC is the command line utility which interacts with the Windows Service Controller and can be used to manage services on either a remote or local Windows machine.

You will need to find the name of the service you would like to remove before you can issue the SC command to remove it. You can either use the Windows Service console or the sc query command to find the name of a service.

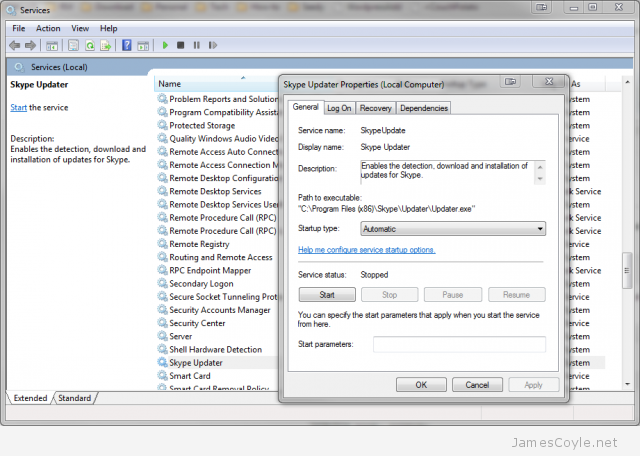
Click the Start menu and type in Services and click the Windows Services console in the list. Find your service by name and double click it to see the Properties window. The service name can be seen at the top of the form. The below example shows the Skype Updater service.

services-skype-properties

To use the sc query command to find your service name, open up a command prompt and type the below command.

sc query

Find the SERVICE_NAME attribute of your required service.

Once you have the service name, you will need to stop the service before you can delete it. Issue the sc stop command followed by the service name. The below example show how to stop the SkypeUpdate service.

sc stop SkypeUpdate

Finally, you can issue the sc delete command to remove the service.

sc remove SkypeUpdate

Add Create OpenVZ Template to the Proxmox Web GUI

Get Social!

proxmox logo gradCreating a template from an OpenVZ container is a very manual process. My biggest problem is that you have to have root access to the Proxmox hardware node in order to create a tar from the root of the CT. See How to make a new OpenVZ template for more information on manually creating a template.

proxmox-create-template-context-menu

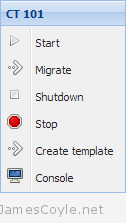
I created a small code patch for the Proxmox API and web GUI to add a ‘create template’ feature for CTs. The code adds a context menu entry when you right click on a CT in the Proxmox web GUI.

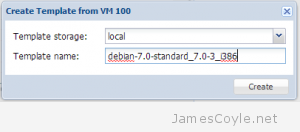
Before using the feature, the CT must be shut down and any network interfaces removed. The feature presents the user with a dialogue box requesting which storage device the template should be saved to, and what it should be called.

Once the storage has been selected and the template has been given a name, a new ‘create template’ task is created which archives the root directory of the selected container and adds it to the cache folder of the selected storage.

proxmox-create-template-dialogue-box

The changes were declined by the Proxmox team on the grounds that creating a template is a technical process and may not result in creating a working, cloned instance. In addition, it is very easy to leave sensitive information in the CT which is the source of the template – all data on the CTs file system will be archived into the template making it available the next time a CT is created. If SSH keys are left on the CT, for example, then they will be available in the new CT also.

Because the feature was not accepted into the main distribution of Proxmox, I will maintain it myself and manually apply the patches to my Proxmox servers after every update. I have created a public repository on my Gitlab server that holds the git patch file which is available for everyone. 

If you accepts the risks mentioned above, and are happy to hack away at your Proxmox binaries, then you are welcome to try the patch for yourself.

You can download the patch and get more information on my public Proxmox Github page.

I should mention that this patch may not always be up to date. In addition, this is changing the actual Proxmox distribution files and as such may have unintended side effects. Please use these patches with caution and only in your development environments.

gitlabDownload


Visit our advertisers

Quick Poll

Are you using Docker.io?

Visit our advertisers