Category Archives: How-to

How to Kill a Process Based on Part of the Process Name

Category : How-to

Get Social!

This is a small, handy snippet to kill a Linux process based on matching a string from the ps command output.

For example, we may want to kill the mongodb process based on matching just the string mongo.

We would use the below command, consisting of ps and grep to get the process we would like to kill.

ps aux | grep mongo
mongodb   1025  0.7  7.9 5076284 39120 ?       Sl   Jul08  10:16 /usr/bin/mongod --config /etc/mongodb.conf
root     11873  0.0  0.1  11748   916 pts/0    S+   19:07   0:00 grep --color=auto mongo

We need to change the grep slightly, to stop the actual grep command process that we just ran from returning. We can add [] around part of the matching string to stop the process from being matched exactly as it will be parsed as a pattern, and not a literal string.

ps aux | grep mong[o]
mongodb   1025  0.7  7.9 5076284 39120 ?       Sl   Jul08  10:16 /usr/bin/mongod --config /etc/mongodb.conf

It doesn’t matter where on the string you add the brackets, as long as they are there somewhere.

Using awk we can now filter the results line to only print out the pid of the mongodb process.

ps aux | grep mong[o] | awk {'print$2'}
1025

Finally, we need to wrap all of this with the kill statement to remove the process. Be careful here as this will immediately kill the process with no warning or confirmation. This is just an example, it’s never a good idea to forcefully kill the mongodb process!

kill -9 `ps aux | grep mong[o] | awk {'print$2'}`

And that’s it, the mongodb process is dead!


Installing MariaDB on Ubuntu

Category : How-to

Get Social!

mariadb-logoMariaDB is termed a drop in replacement for MySQL – that means that you can deploy MariaDB without changing all of your client applications as MariaDB is compatible with most MySQL features and commands.

MariaDB was forked from MySQL when Oracle took over Sun Microsystems in 2010 and was born of the fear that Oracle would not adhere to the development ethos that was used by Sun. I discuss this in more detail in my blog post on MySQL alternative. There are a few gotchas with the new versioning system used by MariaDB and I’d recommend reading the blog post to familiarise yourself.

MariaDB has not yet made it into Ubuntu’s main repositories but is available as an add-in repository from MariaDB directly.

Installing MariaDB on Ubuntu couldn’t be easier – follow one of the below instructions for your version of Ubuntu.

Install MariaDB 10 on Ubuntu 14.04

Use the below commands to add the MariaDB repository to your Ubuntu 14.04 installation.

apt-get install software-properties-common
apt-key adv --recv-keys --keyserver hkp://keyserver.ubuntu.com:80 0xcbcb082a1bb943db
add-apt-repository 'deb http://mirror.stshosting.co.uk/mariadb/repo/10.0/ubuntu trusty main'

Run the following commands to install MariaDB.

apt-get update
apt-get install mariadb-server

Install MariaDB 10 on Ubuntu 12.04

Use the below commands to add the MariaDB repository to your Ubuntu 14.04 installation.

apt-get install python-software-properties
apt-key adv --recv-keys --keyserver hkp://keyserver.ubuntu.com:80 0xcbcb082a1bb943db
add-apt-repository 'deb http://mirror.stshosting.co.uk/mariadb/repo/10.0/ubuntu precise main'

Run the following commands to install MariaDB.

apt-get update
apt-get install mariadb-server

Install a different version of MariaDB or a use a different target operating system

MariaDB supports all common Linux distributions and they maintain a repository for each. You can see the full list of distro repositories on their repository configuration tool.


MySQL Circular Replication

Category : How-to

Get Social!

mysql-logoI spoke about master – slave replication in my previous blog post and how to set up one way replication. The problem with one way replication is that any changes that are made to the slave would not be replicated to the master and would likely end up causing inconsistencies in future queries. This means that you can only apply updates on your master server.

If only two servers are involved then we can set up each server as both a master and a slave. This allows for two way replication – if changes are made on server 1 they are replicated on server 2, and vice versa. If more than two servers are needed for replication then it can get a little more complicated. Using the circular replication method we set up each server as a master, and as a slave to another master until all the masters have slaves. This results in a circular flow of information as each change is replicated to the next server in the chain. The below diagram indicates how replication changes would travel.

mysql-circular-replication

In the above illustration there are 8 MySQL Server nodes that all replicate changes they are sent directly and changes from the MySQL Server node before it are processed and sent to the next MySQL Server node along. A change made on any one of the MySQL Server nodes would be replicated to the next server along until every server in the chain has processed the update.

There are some drawbacks to to this type of configuration:

  • When many nodes are added it can take a long time for a change to one server to make it round the chain to update all other servers. For example, if a change is made on Server 2, it has to go to Server 3, then server 4, 5, 6 and 7 before Server 8 is notified of the change.
  • Conflicts can occur in MySQL Server circular replication. The way MySQL processes replication updates and direct SQL statements from clients is in parallel. MySQL does not guarantee consistency across all the databases in the chain. This is because a replication request may act on a column at the same time as a direct request from a client. Due to the time it takes to receive a replication update and process it, a direct request from a client could have updated the same row, even though, as far as the overall sequence of events is concerned, the initial event that triggered the replication from another server could have happened first.

Conflicts will have to be considered and affect the way a group of MySQL Servers set up in this way can be used. For example, you may choose to only update each table on one node at a time – Server 1 for the sales table, Server 2 for the payments table and so on. This will have to be built into your process for writing to these MySQL tables.

Setting up MySQL Server circular replication is straightforward – it’s essentially setting up master-slave replication multiple times for how many nodes have.

I’m not going to write out all of the commands for setting up circular replication because all the steps are written down in my blog post about master slave replication. Follow these steps to set up Server 1 as your master and then Server 2 as your slave. Then repeat the steps with Server 2 as your master and Server 3 as your slave. Continue doing this until you make your last server a master and then Server 1 as a slave to complete the circle.

And that’s all there is to it! Just remember to make sure you plan your workloads to protect your data from inconsistency issues.


MySQL Database Replication

Category : How-to

Get Social!

mysql-logoThe MySQL server can replicate a database over TCP to another instance of MySQL to provide a near real time backup for data redundancy. This process is not to be confused with MySQL working in a cluster to share workload and provide high availability. I’ll cover clustering in a later blog post.

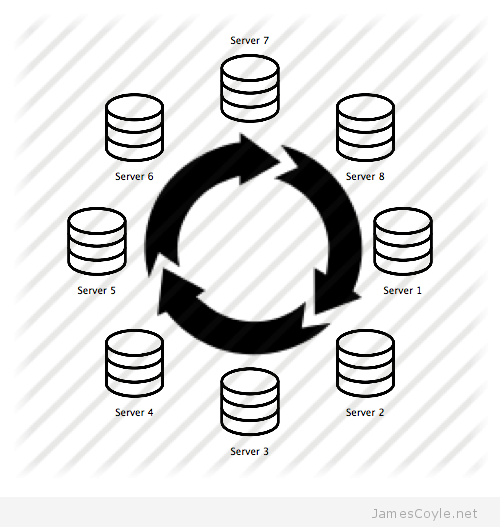
MySQL uses a master and slave scenario where the master is where the changes are detected and the slave is where the changes are sent to. This means that changes are only replicated one-way and any changes on the slave will not be replicated on the master. To get round this, you can set up each server as a slave and as a master so that changes are sent both ways. This is called circular replication.

To set up one way replication this post will assume that you have MySQL installed on two servers, one the master and one the slave. If you have not installed MySQL server you can install it on Debian/ Ubuntu with apt-get.

apt-get install mysql-server

The below instructions must be executed on the correct server, either master or slave. Be careful that you are executing the right command on the right server!

MySQL Replication Mode

Before we get into setting up our replication server we need to consider the replication mode to use. There are two types of replication mode, or a third if you include the combination of the two.

  • Statement based replication is where each statement that is sent to the master is also sent to the slave. This means that, in most scenarios, the data will be the same on each server as the same statements have been executed on each server.
  • Row based replication is where each change to a row in a table on the master server is written to a log and sent to the slave. The slave server then updates the required rows with the literal data.
  • Mixed is a combination of the two – the MySQL server chooses which mode to use based on the task being performed.

Configure MySQL Replication

Replication, in this example, is done at a database level and changes will be replicated in one direction from master to slave. This means that any changes made to the slave will not appear on the master.

Master

The below changes should be made on the master MySQL server. A slightly different set of steps will be detailed below for the slave.

Open the my.cnf MySQL configuration file and make the following changes:

vi /etc/my.cnf

Find the bind-address attribute and change it to the IP address of the master server.  You can find your IP address by using ifconfig if you are not sure what it is.

bind-address = 10.1.1.100

Find or add the server-id attribute and make  sure it’s uncommented. You need to assign your master server an ID, let’s use 1 for our master server.

server-id = 1

Find or add the log_bin attribute and make sure it’s uncommented. This is the location where your master server will write all the changes that occur on the database.

log_bin = /var/log/mysql/mysql-bin.log

Add an entry to specify which MySQL database should be included for replication.

binlog_do_db = replication_database

You can add as many databases as you like by repeating the binlog_do_db attribute. For example:

binlog_do_db = replication_database1
binlog_do_db = replication_database2

The next step is to create a user which has the appropriate permission to use the MySQL replication features. Log in to MySQL with the below command, followed by your root MySQL user password.

mysql -u root -p

Create a new user which will be used to connect to the master instance from the slave to transfer the replication data.

GRANT REPLICATION SLAVE ON *.* TO 'mysql_rep'@'%' IDENTIFIED BY '[PASSWORD]';

The above example of granting privileges and creating a user are the easiest to get working but are the least secure. You may need to change this to meet your security requirements. You’ll also need to replace [PASSWORD] with the password you would like to use for the mysql_rep user.

Now lets create the database that will be replicated to our slave server. It’s important that after creating the database that nothing is changed until replication has been completely set up. If you already have a database then you will need to export the database, with all it’s data, and import it into the slave before completing the replication setup. This is because both databases must be in the same state for replication to keep everything in sync.

create database replication_database;

Type quit to exit the MySQL client and restart the MySQL server.

service mysql restart

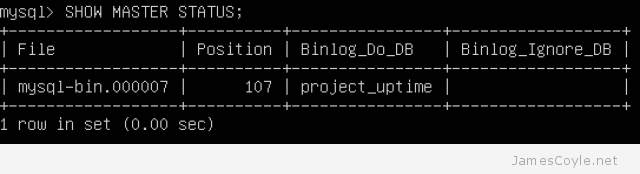
At this point, we can check that the server is set up to write changes to the log file. Log back into MySQL Server Client and issue the below SHOW command.

mysql -u root -p

SHOW MASTER STATUS;

The output should be similar to the below, and indicates that the master is configured to log the changes.

mysql-show-master-status

And that should be your master MySQL server configured! Onto the slave…

Slave

The slave configuration is very similar to the master, however there are subtle differences.

Open the my.cnf MySQL configuration file and make the following changes:

vi /etc/my.cnf

Find the bind-address attribute and change it to the IP address of the master server.  You can find your IP address by using ifconfig if you are not sure what it is.

bind-address = 10.1.1.200

Find or add the server-id attribute and make  sure it’s uncommented. You need to assign your slave server an ID, let’s use 2 for our slave server. Keep in mind that this has to be unique across your replication environment so you must change it from the default of 1 that will likely be in the file already.

server-id = 2

Find or add the log_bin attribute and make sure it’s uncommented. This is the location where your slave server will write all the changes that occur on the database. In addition to the log_bin you’ll also need a relay-log file on your slave.

log_bin = /var/log/mysql/mysql-bin.log
relay-log = /var/log/mysql/mysql-relay-bin.log

Add an entry to specify which MySQL database should be included for replication.

binlog_do_db = replication_database

Save the file and restart the MySQL server.

service mysql restart

We now need to tell the slave server where it can find the master server. Log into MySQL Server Client as the root user.

mysql -u root -p

Run the following command, and substitute your values as below.

  • MASTER_HOST is the IP address of your master server.
  • MASTER_USER is the user on the master that the slave should use to connect.
  • MASTER_PASSWORD is the password for the above user on the master server
  • MASTER_LOG_FILE is the logfile name on the master server that will be used for replication. This was displayed in the image above when running the command SHOW MASTER STATUS.
  • MASTER_LOG_POS is the location within the log file that your slave should start replicating from. The log position is also displayed with the SHOW MASTER STATUS command. Note, this will increase as changes are made to your master database.
CHANGE MASTER TO MASTER_HOST='10.1.1.100',
MASTER_USER='mysql_rep',
MASTER_PASSWORD='[PASSWORD]', 
MASTER_LOG_FILE='mysql-bin.000001', 
MASTER_LOG_POS=  107;

The final steps are to start our slave, from which point any changes made to the master will be replicated, and check the status.

Execute the below to start replication:

START SLAVE;

And finally show the status of the slave replication to make sure everything is working.

SHOW SLAVE STATUS;

If you now make some changes on your master server, they should be immediately replicated to the slave. After making some changes, run the SHOW SLAVE STATUS command again and you should notice that the Position value has incremented.

You should be aware that almost any changes are replicated – new tables, indexes and changes in data will all be replicated in the same way.


Proxy the Proxmox Web GUI with Nginx Over HTTPS with Load Balancing

Get Social!

The Proxmox web GUI is served by Proxmox’s new event driven API server called PVE Proxy. The default settings for the Proxmox web GUI is to listen on port 8006 for incoming HTTPS connections.

The following tutorial will show you how to use Nginx to reverse proxy the PVE Proxy application to do the following:

  • Redirect HTTP requests to use the HTTPS protocol.
  • Add your own certificate to use for HTTPS.
  • Listen on the standard HTTPS port (port 443).

The following steps show how to use Nginx to reverse Proxy Proxmox’s web GUI. If you would prefer to use Apache, please see my other blog post.

The first step is to make sure you have Nginx installed on the machine, or virtual instance, that you are going to use. You can install Nginx directly on the Proxmox host however, I prefer to keep the host software as standard as possible and run all additional applications in OpenVZ containers.

Create a shell session on the machine you would like to use and use apt-get to install Nginx.

apt-get install nginx

Make sure you have an SSL certificate and key pair on your server. See my OpenSSL certificate cheat sheet for more information.

We now need to specify the configuration for Nginx. Remove the existing site configuration and create a new configuration file called proxmox-gui. You can call this file whatever you wish, but you will also need to use the same name in the below steps.

rm -f /etc/nginx/sites-enabled/default
vi /etc/nginx/sites-enabled/proxmox-gui

Add the below text to your proxmox-gui file. You will need to substitute some of the settings with your own values:

  • ssl_certificate – this should point to your SSL certificate to use for signing the SSL traffic.
  • ssl_certificate_key – is this key which matches the above certificate.
  • server – this is the IP and port of your Proxmox server. If you have installed Nginx on the same host as the Proxmox web GUI then you could use https://localhost:8006 here.
upstream proxmox {
    server 10.10.10.10:8006;
}

server {
    listen 80 default_server;
    rewrite ^(.*) https://$host$1 permanent;
}

server {
    listen 443;
    server_name _;
    ssl on;
    ssl_certificate /etc/nginx/ssl/cert.pem;
    ssl_certificate_key /etc/nginx/ssl/key.pem;
    proxy_redirect off;
    location / {
        proxy_pass https://proxmox;
    }
}

If you have multiple Proxmox servers in a cluster, it would make sense to use load balancing in Nginx. We don’t really want to use this feature to spread the load, because usually the traffic will be very light – we want to use it so that if one node in the cluster is down, Nginx will automatically try a different node in the cluster.

To add load balancing, add your additional servers in the upstream proxmox code section. For example:

upstream proxmox {
    server 10.10.10.10:8006;
    server 10.10.10.11:8006;
    server 10.10.10.12:8006;

}

We need to link the newly created config file so that Nginx can load it.

ln -sf /etc/nginx/sites-available/proxmox-gui /etc/nginx/sites-enabled/

The last step is to restart Nginx web server to pick up the new settings.

service nginx restart

Your Proxmox web GUI should now be available on the IP address of your Nginx server on the HTTPS protocol.


Create Your First Docker Container

Category : How-to

Get Social!

docker-logoDocker is probably one of the easiest environments to create a virtualised instance based on a number of flavours of operating systems. Rather that having to install an operating system yourself, you can download one of the many guests templates or ‘images’ available directly from the Docker community.

See my blog post on installing Docker on Ubuntu 14.04 if you don’t currently have Docker installed.

There are a number of commands which are required to manage Docker containers and images. First off, let’s see if we have any images in our local Docker library.

$ docker images
REPOSITORY          TAG                 IMAGE ID            CREATED             VIRTUAL SIZE

The docker images command lists the available local images which you can use to create a Docker container. The above output does not show any local images so lets download one from the central Docker repository.

We must choose which image to download and use to create our first Docker container. There are literally thousands of images available on the central repository and all can be downloaded through the docker command. Let’s use the search command to find an image to download.

$ docker search ubuntu

This will display a huge list of all the images available containing the word ubuntu. As you can imagine, there will be hundreds because not only are base OS images available, but customised images containing specific applications or set ups.

Let’s download the basic ubuntu 14.04 image:

$ docker pull ubuntu:14.04
Pulling repository ubuntu
ad892dd21d60: Download complete
511136ea3c5a: Download complete
e465fff03bce: Download complete
23f361102fae: Download complete
9db365ecbcbb: Download complete

You can check this has downloaded the image to your local store with the above docker images command. We will also need to make a note of the image ID so that we can use it to create a container from it.

$ docker images
REPOSITORY          TAG                 IMAGE ID            CREATED             VIRTUAL SIZE
ubuntu              14.04               ad892dd21d60        11 days ago         275.5 MB

The next step is to create a container and make the required changes. Creating a container is Docker is done with the run command followed by, amongst other things, a command to run within the container. We are going to create a new container and use a bash session to customise the container before saving it as a new image for use in the future.

Create the Docker container with the run command and specify the bash shell to be executed on completion. This will leave us with a bash session which we can use the customise the image. Replace the ad892dd21d60 ID with the ID of the image we downloaded in the previous step.

$ docker run -i -t ad892dd21d60  /bin/bash
root@3a09b2588478:/#

You now have an active shell on the container which has been created with the id 3a09b2588478. Type exit to end the session in your guest container and the container will be stopped and kept available on your Docker system.

Run the ps Docker command to see what containers are known to your Docker system.

$ docker ps -a
CONTAINER ID        IMAGE               COMMAND             CREATED             STATUS              PORTS               NAMES
f4b0d7285fec        ubuntu:14.04        /bin/bash           8 minutes ago       Exit 0                                  hungry_thompson
8ae64c0faa34        ubuntu:14.04        /bin/bash           10 minutes ago      Exit 0                                  jovial_hawking
3a09b2588478        ubuntu:14.04        /bin/bash           14 minutes ago      Exit 130                                kickass_lovelace

The above output shows 3 containers which are available in my Docker system with the container ID on the left. We can re-enter one of these containers to make our changes, but first we need to start it. I’m going to use container ID 3a09b2588478 for the rest of this example but yours will be a different ID.

$ docker start 3a09b2588478

We can now attach to the container to create a shell where we can make our modifications.

$ docker attach 3a09b2588478

You now have a shell running on the container which you can use to make your changes to the container. Let’s keep it simple and just run an upgrade with apt-get and then exit. In the real world, you might install an application, or define your configuration such as LDAP SSH login.

$ apt-get update
$ apt-get upgrade
$ exit

The last step in our example is to save the container as a new image which can be used to create future Docker containers. You’ll need to specify the container ID as well as the name of the image to use. You can specify a new image name or overwrite the existing image name.

$ docker commit 3a09b2588478 ubuntu:14.04
b2391f1efa6db419fad0271efc591be11d0a6d7f645c17487ef3d06ec54c6489


And that’s all there is to it! You have created a new Docker container, from one of the images available from Docker, made some changes and saved it locally for future use. Of cause, there are plenty more ways to use Docker, but I hope this has been useful for getting a basic understanding of how Docker works.

Next steps: See my post on using a Dockerfile to automate Docker image creation.

Quick Poll

Are you using Docker.io?

Visit our advertisers

Quick Poll

What type of VPN protocol do you use?

Visit our advertisers