Category Archives: How-to

Create a 3 Node Ceph Storage Cluster

Category : How-to

Get Social!

ceph-logoCeph is an open source storage platform which is designed for modern storage needs. Ceph is scalable to the exabyte level and designed to have no single points of failure making it ideal for applications which require highly available flexible storage.

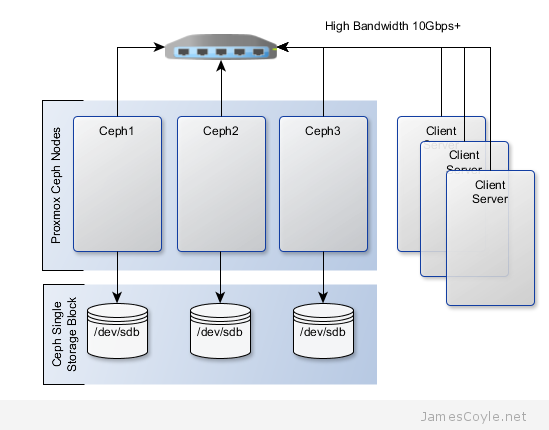
The below diagram shows the layout of an example 3 node cluster with Ceph storage. Two network interfaces can be used to increase bandwidth and redundancy. This can help to maintain sufficient bandwidth for storage requirements without affecting client applications.
ceph-infrastructure

This example will create a 3 node Ceph cluster with no single point of failure to provide highly redundant storage. I will refer to three host names which are all resolvable via my LAN DNS server; ceph1ceph2 and ceph3 which are all on the jamescoyle.net domain. Each of these nodes has two disks configured; one which runs the Linux OS and one which is going to be used for the Ceph storage. The below output shows the storage available, which is exactly the same on each host. /dev/vda is the root partition containing the OS install and /dev/vdb is an untouched partition which will be used for Ceph.

root@ceph1:~# fdisk -l | grep /dev/vd
Disk /dev/vdb doesn't contain a valid partition table
Disk /dev/mapper/pve-root doesn't contain a valid partition table
Disk /dev/mapper/pve-swap doesn't contain a valid partition table
Disk /dev/mapper/pve-data doesn't contain a valid partition table
Disk /dev/vda: 21.5 GB, 21474836480 bytes
/dev/vda1   *        2048     1048575      523264   83  Linux
/dev/vda2         1048576    41943039    20447232   8e  Linux LVM
Disk /dev/vdb: 107.4 GB, 107374182400 bytes

Before getting started with setting up the Ceph cluster, you need to do some preparation work. Make sure the following prerequisites are met before continuing the tutorial.

You will need to perform the following steps on all nodes in your Ceph cluster. First you will add the Ceph repositories and download the key to make the latest Ceph packages available. Add the following line to a new /etc/apt/sources.list.d/ file.

vi /etc/apt/sources.list.d/ceph.list

Add the below entry, save and close the file.

deb http://ceph.com/debian-dumpling/ wheezy main

Download the key from Ceph’s git page and install it.

wget -q -O- 'https://ceph.com/git/?p=ceph.git;a=blob_plain;f=keys/release.asc' | apt-key add -

Update all local repository cache.

sudo apt-get update

Note: if you see the below code when running apt-get update then the above wget command has failed – it could be because the Ceph git URL has changed.

W: GPG error: http://ceph.com wheezy Release: The following signatures couldn't be verified because the public key is not available: NO_PUBKEY 7EBFDD5D17ED316D

Run the following commands on just one of your Ceph nodes. I’ll use ceph1 for this example. Update your local package cache and install the ceph-deploy command.

apt-get install ceph-deploy -y

Create the first Ceph storage cluster and specify the first server in your cluster by either hostname or IP address for [SERVER].

ceph-deploy new [SERVER]

For example

ceph-deploy new ceph1.jamescoyle.net

Now deploy Ceph onto all nodes which will be used for the Ceph storage.  Replace the below [SERVER] tags with the host name or IP address of your Ceph cluster including the host you are running the command on. See this post if you get a key error here.

ceph-deploy install [SERVER1] [SERVER2] [SERVER3] [SERVER...]

For example

ceph-deploy install ceph1.jamescoyle.net ceph2.jamescoyle.net ceph3.jamescoyle.net

Install the Ceph monitor and accept the key warning as keys are generated. So that you don’t have a single point of failure, you will need at least 3 monitors. You must also have an uneven number of monitors – 3, 5, 7, etc. Again, you will need to replace the [SERVER] tags with your server names or IP addresses.

ceph-deploy mon create [SERVER1] [SERVER2] [SERVER3] [SERVER...]

Example

ceph-deploy mon create ceph1.jamescoyle.net ceph2.jamescoyle.net ceph3.jamescoyle.net

Now gather the keys of the deployed installation, just on your primary server.

ceph-deploy gatherkeys [SERVER1]

Example

ceph-deploy gatherkeys ceph1.jamescoyle.net

It’s now time to start adding storage to the Ceph cluster. The fdisk output at the top of this page shows that the disk I’m going to use for Ceph is /dev/vdb, which is the same for all the nodes in my cluster. Using Ceph terminology, we will create an OSD based on each disk in the cluster. We could have used a file system location instead of a whole disk but, for this example, we will use a whole disk. Use the below command, changing [SERVER] to the name of the Ceph server which houses the disk and [DISK] to the disk representation in /dev/.

ceph-deploy osd --zap-disk create [SERVER]:[DISK]

For example

ceph-deploy osd --zap-disk create ceph1.jamescoyle.net:vdb

If the command fails, it’s likely because you have partitions on your disk. Run the fdisk command on the disk and press d to delete the partitions and w to save the changes. For example:

fdisk /dev/vdb

Run the osd command for all nodes in your Ceph cluster

ceph-deploy osd --zap-disk create ceph2.jamescoyle.net:vdb
ceph-deploy osd --zap-disk create ceph3.jamescoyle.net:vdb

We now have to calculate the number of placement groups (PG) for our storage pool. A storage pool is a collection of OSDs, 3 in our case, which should each contain around 100 placement groups. Each placement group will hold your client data and map it to an OSD whilst providing redundancy to protect against disk failure.

To calculate your placement group count, multiply the amount of OSDs you have by 100 and divide it by the number of number of times each part of data is stored. The default is to store each part of data twice which means that if a disk fails, you won’t loose the data because it’s stored twice.

For our example,

3 OSDs * 100 = 300
Divided by replicas, 300 / 2 = 150

Now lets create the storage pool! Use the below command and substitute [NAME] with the name to give this storage pool and [PG] with the number we just calculated.

ceph osd pool create [NAME] [PG]

For example

ceph osd pool create datastore 150
pool 'datastore' created

You have now completed the set up for the Ceph storage pool. See my blog post on mounting Ceph storage on Proxmox.
Manually Mount a Ceph Storage Pool in Proxmox

Get Social!

ceph-logoThe latest BETA of Proxmox, and soon to be released 3.2 comes with the Ceph client automatically installed which makes mount Ceph storage pools painless.

You can mount the Ceph storage pool using the Proxmox web GUI.

You may need to copy the Ceph storage pool keyring from your Ceph server to your Proxmox server. If you use authentication on your Ceph storage pool, log in to your Ceph server via SSH. Run the below scp command to copy your Ceph keyring to your Proxmox server. You will need to replace [PROXMOX_SERVER] with the host name or IP address of your Proxmox server and [STORAGE_NAME] is the name you will use for your Proxmox storage mount which will be used in the web GUI.

scp /etc/ceph/ceph.client.admin.keyring [PROXMOX_SERVER]:/etc/pve/priv/ceph/[STORAGE_NAME].keyring

For example

scp /etc/ceph/ceph.client.admin.keyring prox3.jamescoyle.net:/etc/pve/priv/ceph/ceph_storage.keyring

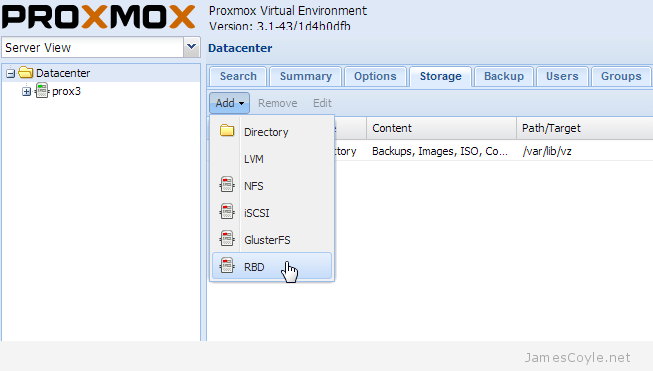
To use the Proxmox GUI to mount a Ceph storage pool, login to the web GUI and click on the Datacenter folder in the top left, then click the Storage tab, Add and finally RBD.

proxmox-add-ceph-rbd

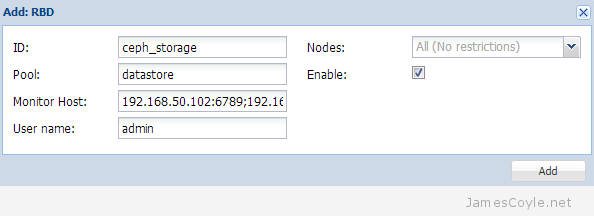
Enter the details of your Ceph storage pool in the new dialogue box which appears.

  • ID: the name which this storage mount will have in Proxmox. If you use authentication on your Ceph server, you will need to use the same name as the above  [STORAGE_NAME] field.
  • Pool: the Ceph storage pool name.
  • Monitor Host: the host or IP addresses of your Ceph monitor servers. You can enter a single host or multiple hosts separated by a semicolon [;].
  • User name: the named use to use when connecting to the Ceph storage pool. If you are not using user authentication, set this to the below value.
    admin (optional, default = admin)

proxmox-ceph-add-rbd

Don’t forget to make sure that the Proxmox host can reach the remote Ceph monitor hosts – by default a Ceph monitor runs on port 6789.

proxmox-ceph-storage-mount-rbd


Ceph Error “Warning: the ECDSA host key for ‘SERVER’ differs from the key for the IP address ‘IP'”

Category : How-to

Get Social!

ceph-logoI recently received the below error when installing Ceph on Proxmox which related the the key for the local machine. After running the ceph-deploy install command I was presented with an error and the Ceph command halted.

ceph-deploy install ceph1.jamescoyle.net ceph2.jamescoyle.net ceph3.jamescoyle.net

After agreeing to the initial prompt I received the below error.

Are you sure you want to continue connecting (yes/no)? yes
Warning: Permanently added 'ceph1.jamescoyle.net' (ECDSA) to the list of known hosts.
Warning: the ECDSA host key for 'ceph1.jamescoyle.net' differs from the key for the IP address '192.168.50.102'
Offending key for IP in /etc/ssh/ssh_known_hosts:2
Are you sure you want to continue connecting (yes/no)? yes
Write failed: Broken pipe
[ceph_deploy][ERROR ] RuntimeError: connecting to host: ceph1.jamescoyle.net resulted in errors: HostNotFound ceph1.jamescoyle.net

You need to remove the local key using ssh-keygen and then allow the machine to re-add the key when you first connect to it. The above error was complaining about the key for IP 192.168.50.102, therefore add this IP to the end of the below command.

ssh-keygen -R [IP]

Example:

ssh-keygen -R 192.168.50.102
/root/.ssh/known_hosts updated.
Original contents retained as /root/.ssh/known_hosts.old

Now rerun your Ceph command and accept the key warning and your Ceph command should complete.


Set up Fail2ban for Proxmox Web GUI

Get Social!

fail2ban_logoFail2ban is an application that scans log files in real time and bans malicious IP addresses based on a set of rules and filters you can set.
For this blog post, we’re going to look at capturing invalid login attempts to the Proxmox Web GUI and ban any IP addresses from accessing the Web GUI if they fail to authenticate 3 times from the same IP address.

Fail2ban is made up of three main component parts:

  • Filter – a Filter is a pattern or regular expression that we wish to search for in the log files. In our case, we want to search for the words ‘authentication failure’ in the log because that’s what the pvedaemon writes when a failed login attempt occurs.
  • Action – an Action is what we’ll do if the filter is found. What we need to do is ban any IP address where the filter is triggered 3 times.
  • Jail – a Jail in Fail2ban is the glue that holds it all together – this ties a Filter, together with an Action and the relevant log file.

Install Fail2ban

Installing Fail2ban on Debian/ Proxmox is as easy as it gets – just use the apt package manager.

apt-get install fail2ban

Fail2ban is mostly Python, so it’ll need to be installed on the system or apt-get  will install it as a dependency.

Note: by default Fail2ban will enable itself on SSH connections, blocking invalid IPs after 6 invalid attempts. 

Configure Fail2ban for the Proxmox Web GUI

There are several steps to setting up Fail2ban. As mentioned earlier in the post, we want to ban any users IP address from accessing the Proxmox Web GUI if they have failed to authenticate 3 times. We shouldn’t block them indefinitely because it may be a simple password issue that they can resolve with the account administrator. We’ll configure Fail2ban to ban failed attempts for an hour.

Because banning a user after 3 invalid attempts is a fairly basic thing in the world of Fail2ban, we won’t need to create an Action as listed above. We’ll need to create a Jail and a Filter.

The Jail

A Jail in Fail2ban is the core configuration that  combines a Filter, an Action (although this may be default Fail2ban behaviour) and a log file.

The default configuration for Fail2ban is found in /etc/fail2ban/jail.conf and contains many predefined entries for common processes such as FTP and Apache. We shouldn’t edit this file directly when adding new entries, instead, we should create the below file which will be used to override the default jail.conf.

vi /etc/fail2ban/jail.local

Add the following (this file may not already exist):

[proxmox-web-gui]
enabled  = true
port     = http,https,8006
filter   = proxmox-web-gui
logpath  = /var/log/daemon.log
maxretry = 3
bantime = 3600

The above entry has set a ruleset name of proxmox-web-gui, and the following:

  • enabled – this simply states that this ruleset is active.
  • port – set sthe port that any bans should act on
  • filter – this sets the file name of the filter that we’ll use to detect any login failures. More about this in the next section.
  • logpath – the name or pattern (for example /var/log/apache/*.log) of the log to monitor for the failed logins. This is the file that the above filter will work on.
  • maxretry – this is how many times should the filter detect a problem before starting the ban.
  • bantime – this is how long, in minutes, that the ban be in effect for.

The Filter

Now that we have specified the log file to look in we need to specify how to find the event we need to look for. For our example, Proxmox writes a specific string each time a failed login occurs which looks like the belew:

authentication failure; rhost=10.10.10.10 [email protected] msg=no such user ('[email protected]')

Our Filter, therefore, needs to look for this text and pull out the IP address.

Create a Filter file called proxmox-web-gui.conf in /etc/fail2ban/filter.d/.

vi /etc/fail2ban/filter.d/proxmox-web-gui.conf

Add the following:

[Definition]
failregex = pvedaemon\[[0-9]+\]: authentication failure; rhost=<HOST> user=.* msg=.*

This will match the text that Proxmox writes to the daemon.log file when a failed login is detected. It’s got a Fail2ban specific keyword <HOST> which is what’s used to indicate to Fail2ban where the offending IP address is in the log entry. Fail2ban can then block this IP address as indicated in our Jail file.

Testing Fail2ban Filters

Fail2ban provides a nice little utility to test your Filter definitions to make sure they are working as you intend. First things first – we need an entry in our log file for an invalid login attempt. Go to your Proxmox Web GUI and enter some invalid login credentials.

The command to use is fail2ban-regex which has two parameters; the log file location and the Filter location.

fail2ban-regex /var/log/daemon.log /etc/fail2ban/filter.d/proxmox-web-gui.conf

An example of the output is below. The text Success, the total number of match is 1 states that there is one match in the log for our pattern in the proxmox-web-gui.conf file.

fail2ban-regex /var/log/daemon.log /etc/fail2ban/filter.d/proxmox-web-gui.conf

Running tests
=============

Use regex file : /etc/fail2ban/filter.d/proxmox-web-gui.conf
Use log file   : /var/log/daemon.log


Results
=======

Failregex
|- Regular expressions:
|  [1] pvedaemon\[[0-9]+\]: authentication failure; rhost=<HOST> user=.* msg=.*
|
`- Number of matches:
   [1] 1 match(es)

Ignoreregex
|- Regular expressions:
|
`- Number of matches:

Summary
=======

Addresses found:
[1]
    10.27.4.98 (Fri May 29 12:31:14 2015)

Date template hits:
770 hit(s): MONTH Day Hour:Minute:Second
0 hit(s): WEEKDAY MONTH Day Hour:Minute:Second Year
0 hit(s): WEEKDAY MONTH Day Hour:Minute:Second
0 hit(s): Year/Month/Day Hour:Minute:Second
0 hit(s): Day/Month/Year Hour:Minute:Second
0 hit(s): Day/MONTH/Year:Hour:Minute:Second
0 hit(s): Month/Day/Year:Hour:Minute:Second
0 hit(s): Year-Month-Day Hour:Minute:Second
0 hit(s): Year.Month.Day Hour:Minute:Second
0 hit(s): Day-MONTH-Year Hour:Minute:Second[.Millisecond]
0 hit(s): Day-Month-Year Hour:Minute:Second
0 hit(s): TAI64N
0 hit(s): Epoch
0 hit(s): ISO 8601
0 hit(s): Hour:Minute:Second
0 hit(s): <Month/Day/Year@Hour:Minute:Second>

Success, the total number of match is 1

However, look at the above section 'Running tests' which could contain important
information.

Restart fail2ban for the new Jail to be loaded.

service fail2ban restart

To check your new Jail has been loaded, run the following command and look for the proxmox-web-gui Jail name next to Jail List.

fail2ban-client -v status
INFO   Using socket file /var/run/fail2ban/fail2ban.sock
Status
|- Number of jail:      2
`- Jail list:           ssh, proxmox-web-gui

Try to log into the Proxmox Web GUI with an incorrect user 3 and see your IP address appear in the Currently banned section.

fail2ban-client -v status proxmox-web-gui
INFO   Using socket file /var/run/fail2ban/fail2ban.sock
Status for the jail: proxmox-web-gui
|- filter
|  |- File list:        /var/log/daemon.log
|  |- Currently failed: 0
|  `- Total failed:     3
`- action
   |- Currently banned: 1
   |  `- IP list:       10.10.10.10
   `- Total banned:     1


Upload OVA to Proxmox/ KVM

Get Social!

Proxmox does not have native support for an OVA template which is surprising considering it’s the open format for creating packaged virtual machines, or virtual appliances as they are often referred.

We can still get an OVA template running in Proxmox but it will take a little bit of work to transform it into a functional VM.

ovf-upload

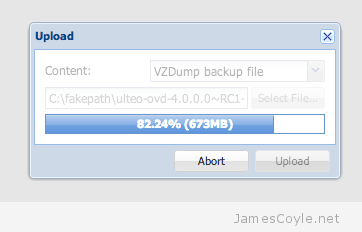
First off, lets get the OVA file uploaded to the Proxmox server; you can do this using SCP or the Proxmox web GUI. If you use the Proxmox web GUI you will need to rename the OVA to end in a iso extension and upload it as a ISO image content. Depending on the size of the OVA file and the bandwidth you have available, it may take a while to upload the file. The file will then be available in the dump folder in the selected storage.

SSH onto your Proxmox server and locate the OVA file. An OVA file is simply a tar file containing an image file and some configuration for things like CPU, RAM, etc. Run the tar command to extract the components of the OVA file onto your file system.

tar - my.ovf

The output will be two or more files – one will be an OVF file which contains the settings and configuration of the virtual machine and one or more files will be VMDKs which are the disk images of the virtual machine.

Although you can run a VMDK file in Proxmox, it’s recommended to use qcow2 which is the default file format for Proxmox virtual machines. Run the VMDK file through the converter – note this can take a while with large files.

qemu-img convert -f vmdk myvm-disk1.vmdk -O qcow2 myvm-disk1.qcow2

We now need to get the image into a VM with some hardware so that we can begin to use it. This is where things get tricky – the OVF file is not compatible with Proxmox and needs to be manually understood. The principle here is we are going to use the Proxmox web GUI to create a VM and replace the empty disk image which is created with our recently converted qcow2 image.

You can use vi to open the OVF file and understand some of the basic settings which are required for the VM. Open the OVF file and look for the following XML tags:

  • OperatingSystemSection
  • VirtualHardwareSection
  • Network
  • StorageControllers

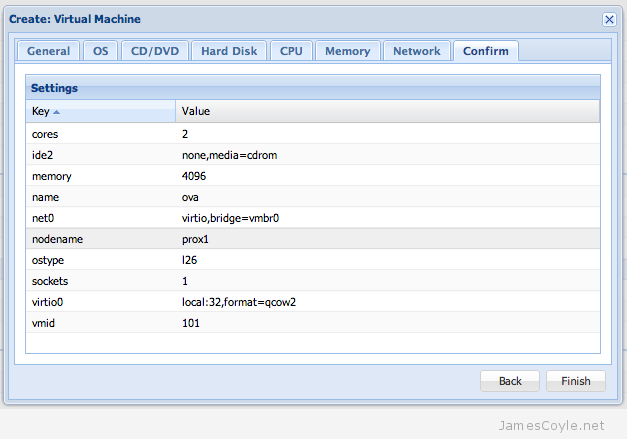
You should be able to get a rough idea of the requirements for the KVM. In the Proxmox web GUI, click on Create VM and create a VM which meets the requirements of the image you converted. Make sure that you select qcow2 for the disk format. After clicking Finish an empty VM will be created – in this example I used local storage and VMID 101 so the disk images are stored in /var/lib/vz/images/101.

proxmox-complete-create-vm

Copy the previously converted qcow2 image over the existing image – be sure to overwrite the existing image otherwise your image will not be used and KVM will try to start with a blank, empty image.

mv /tmp/myvm-disk1.qcow2 /var/lib/vz/image/101/vm-101-disk-1.qcow2

Thats it – you can now start up the image from the Proxmox web GUI.


Create SSH Key Authentication Between Nodes

Category : How-to

Get Social!

Secure key authentication is one of the more secure ways to grant users access to a Linux server. The standard password authentication which is usually used to login to a server is replaced with an SSH key which is presented when authenticating. This increases security as passwords can eventually be cracked using brute force or even guessed in some circumstances. SSH keys are impossible to guess and almost impossible to to hack using brute force due to their length and complexity.

A SSH key is actually two strings of characters – one which is private and is used to connect to the server and another which is public which sits on the server itself.

Run the below command to create the key pair on the client machine.

ssh-keygen -t rsa

Accept the default location to save the key which will be inside the current users home directory:

Enter file in which to save the key (/home/james/.ssh/id_rsa):

For additional security, you can add a passhrase to the private key. This means the key cannot be used without the passphrase which increases the security of the key itself. Simply press return if you do not wish to use a passphrase.

Note: if you are using the key for applications to gain access to other servers, it’s unlikely that a passphrase will be supported.  

Enter passphrase (empty for no passphrase):
Your identification has been saved in /home/james/.ssh/id_rsa
Your public key has been saved in /home/james/.ssh/id_rsa.pub. 
The key fingerprint is:
46:ba:02:fd:2f:9c:b9:39:ec:6c:90:50:d8:ec:7b:00 james@testpc
The key's randomart image is:
+--[ RSA 2048]----+
|   +             |
|  E +            |
|   +    .        |
|  ..o  o         |
|  ...+. S        |
|   .+..o         |
|    .=oo         |
|     oOo         |
|     o=+.        |
+-----------------+

The two keys have been created;

  • Private: /home/james/.ssh/id_rsa
  • Public: /home/james/.ssh/id_rsa.pub

The final step is to copy the public key to the machine which you are going to connect to. In Debian or Ubuntu you can use the ssh-copy-id – you will need to change [USER] for the user who you will connect to the remote machine as and [SERVER] to the hostname or IP address of the remote server you will connect to.

ssh-copy-id [USER]@[SERVER]

Not all Linux distributions will contain the required ssh-copy-id utility, many CentOS/ Red Hat distributions do not for example, so you will need to use the manual method. Again, you will need to substitute the [USER] and [SERVER] attributes to the details of your remote machine.

cat /home/james/.ssh/id_rsa.pub | ssh [USER]@[SERVER] "cat >> ~/.ssh/authorized_keys"

It is not always recommended for security reasons but you can copy this public key to multiple machines so that you can use the same private key to connect to multiple remote machines.


Visit our advertisers

Quick Poll

Which type of virtualisation do you use?
  • Add your answer

Visit our advertisers