Author Archives: James Coyle

Test Internet Speed from the Command Line

Get Social!

speedtest-netMatt Martez has kindly created and shared a Python script for interacting with speedtest.net for testing bandwidth to the internet from the command line. This is a great script which only has the dependency of Python – something which is available on most Linux distributions.

Grab the script with wget to the server you wish to test. Remember, this is to test the bandwidth to servers which are publically available on the internet – this does not test your internal server to server communication. See Iperf for details on testing LAN bandwidth.

wget -O speedtest-cli https://raw.github.com/sivel/speedtest-cli/master/speedtest_cli.py

Add the execute permission:

chmod +x speedtest-cli

And that’s all you need to start your first speed test! Run the speedtest-cli with the –simple switch to start your first basic speed test. The script will automatically choose the best server based on your location.

./speedtest-cli --simple
Ping: 10.331 ms
Download: 6.47 Mbit/s
Upload: 5.30 Mbit/s

You can use the –help switch to see all the options you have with the tool.

./speedtest-cli --help
usage: speedtest-cli [-h] [--share] [--simple] [--list] [--server SERVER]
                     [--mini MINI] [--source SOURCE] [--version]

Command line interface for testing internet bandwidth using speedtest.net.
--------------------------------------------------------------------------
https://github.com/sivel/speedtest-cli

optional arguments:
  -h, --help       show this help message and exit
  --share          Generate and provide a URL to the speedtest.net share
                   results image
  --simple         Suppress verbose output, only show basic information
  --list           Display a list of speedtest.net servers sorted by distance
  --server SERVER  Specify a server ID to test against
  --mini MINI      URL of the Speedtest Mini server
  --source SOURCE  Source IP address to bind to
  --version        Show the version number and exit

Setup Headless Dropbox Sync Client on Linux

Category : How-to

Get Social!

dropbox-logoDropbox is a cloud based file storage service which makes your files available from almost any internet connected device. You simply synchronize a folder with the service on each device and Dropbox keeps them in sync, automatically updating each folder as files are added and removed on each machine.

You can register for a free account which gives you a limited amount of storage to use – no strings attached. To register, visit Dropbox (Please note, that is my affiliate link which gives me a bonus if you sign up. If you’re not happy with this, you can simply visit dropbox.com and sign up. I’d be most grateful if you’d use the link :) ).

Dropbox offers a client to use on Windows, Mac OSX, Linux, iPhone and Android which you can download for free. These are all graphical interfaces and do not work for deployment on a headless server.

Thankfully, the Dropbox team have created an easily deployable Dropbox client which works without a desktop installed and can be managed by a Python script. To get started, download the Python script to your home directory on your headless server with wget.

cd ~
wget https://www.dropbox.com/download?dl=packages/dropbox.py -O dropbox.py

Give the script the permission to execute.

chmod +x dropbox.py

You can now use the Python script to download the Dropbox client. The client will be downloaded to your users home directory so make sure that you are logged in with the correct user.

./dropbox.py start -i

The client binaries will now be downloaded and installed. The next step is to register your account with the Dropbox client so that synchronization can begin. Start Dropbox for the first time with the Python script and you will be presented with a link. Paste the link into a web browser and login to your Dropbox account to grant access to the client. As soon as this process completes, your Dropbox client will begin synchronization.

./dropbox.py start
This client is not linked to any account... Please visit hhttps://www.dropbox.com/cli_link?host_id=10a5ce48e41d50f8135dd6fd55b70a91 to link this machine.

Once you have got all this working and the Dropbox client is synchronizing your first files, it’s time to add an init.d script so that the Dropbox client starts with your operating system. Things may differ here, depending on your Linux distribution. Add one of the below scripts to your init.d folder and substitute [USER] for the list of users who will use the client.

vi /etc/init.d/dropbox

Ubuntu/ Debian

#!/bin/sh
#dropbox service
DROPBOX_USERS="[USER]"

DAEMON=.dropbox-dist/dropboxd

start() {
   echo "Starting dropbox..."
   for dbuser in $DROPBOX_USERS; do
       HOMEDIR=`getent passwd $dbuser | cut -d: -f6`
       if [ -x $HOMEDIR/$DAEMON ]; then
           HOME="$HOMEDIR" start-stop-daemon -b -o -c $dbuser -S -u $dbuser -x $HOMEDIR/$DAEMON
       fi
   done
}

stop() {
   echo "Stopping dropbox..."
   for dbuser in $DROPBOX_USERS; do
       HOMEDIR=`getent passwd $dbuser | cut -d: -f6`
       if [ -x $HOMEDIR/$DAEMON ]; then
           start-stop-daemon -o -c $dbuser -K -u $dbuser -x $HOMEDIR/$DAEMON
       fi
   done
}

status() {
   for dbuser in $DROPBOX_USERS; do
       dbpid=`pgrep -u $dbuser dropbox`
       if [ -z $dbpid ] ; then
           echo "dropboxd for USER $dbuser: not running."
       else
           echo "dropboxd for USER $dbuser: running (pid $dbpid)"
       fi
   done
}

case "$1" in

   start)
       start
       ;;
   stop)
       stop
       ;;
   restart|reload|force-reload)
       stop
       start
       ;;
   status)
       status
       ;;
   *)
       echo "Usage: /etc/init.d/dropbox {start|stop|reload|force-reload|restart|status}"
       exit 1

esac

exit 0

Then add the execute permission and add it to the startup routine.

chmod +x /etc/init.d/dropbox 
update-rc.d dropbox defaults

RedHat/ Fedora/ CentOS

# chkconfig: 345 85 15
# description: Startup script for dropbox daemon
#
# processname: dropboxd
# pidfile: /var/run/dropbox.pid
# config: /etc/sysconfig/dropbox
#

### BEGIN INIT INFO
# Provides: dropboxd
# Required-Start: $local_fs $network $syslog
# Required-Stop: $local_fs $syslog
# Should-Start: $syslog
# Should-Stop: $network $syslog
# Default-Start: 2 3 4 5
# Default-Stop: 0 1 6
# Short-Description: Start up the Dropbox file syncing daemon
# Description: Dropbox is a filesyncing sevice provided by dropbox.com
# This service starts up the dropbox daemon.
### END INIT INFO

# Source function library.
. /etc/rc.d/init.d/functions

# To configure, add line with DROPBOX_USERS="[USERS]" to /etc/sysconfig/dropbox
# Probably should use a dropbox group in /etc/groups instead.

[ -f /etc/sysconfig/dropbox ] && . /etc/sysconfig/dropbox
prog=dropboxd
lockfile=${LOCKFILE-/var/lock/subsys/$prog}
config=${CONFIG-/etc/sysconfig/dropbox}
RETVAL=0

start() {
   echo -n $"Starting $prog"
   if [ -z $DROPBOX_USERS ] ; then
      echo -n ": unconfigured: $config"
      echo_failure
      echo
      rm -f ${lockfile} ${pidfile}
      RETURN=6
      return $RETVAL
   fi
   for dbuser in $DROPBOX_USERS; do
      daemon --user $dbuser /bin/sh -c "~$dbuser/.dropbox-dist/dropboxd&"
   done
   RETVAL=$?
   echo
   [ $RETVAL = 0 ] && touch ${lockfile}
   return $RETVAL
}

status() {
   for dbuser in $DROPBOX_USERS; do
      dbpid=`pgrep -u $dbuser dropbox | grep -v grep`
      if [ -z $dbpid ] ; then
         echo "dropboxd for USER $dbuser: not running."
      else
         echo "dropboxd for USER $dbuser: running (pid $dbpid)"
      fi
      done
}

stop() {
   echo -n $"Stopping $prog"
   for dbuser in $DROPBOX_USERS; do
      killproc ~$dbuser/.dropbox-dist/dropbox
   done
   RETVAL=$?
   echo
   [ $RETVAL = 0 ] && rm -f ${lockfile} ${pidfile}
}

# See how we were called.
case "$1" in
   start)
      start
      ;;
   status)
      status
      ;;
   stop)
      stop
      ;;
   restart)
      stop
      start
      ;;
   *)
      echo $"Usage: $prog {start|status|stop|restart}"
      RETVAL=3

esac

exit $RETVAL

Change permissions and add to the startup routine.

chmod 0755 /etc/init.d/dropbox 
chmod 0644 /etc/sysconfig/dropbox
chkconfig dropbox on

Mount a Windows/ Samba Share in Linux

Category : How-to

Get Social!

Linux penguinGiven the amount of trouble you can have getting Linux and Windows to play nicely together, you may be surprised to find out that it’s easy to mount either a Windows file share on Linux. You can also use the same method to mount a Samba share.

This article assumes you already have a Windows or Samba share set up which is protected by a username and password. The user could be part of a domain or local to the machine which presents the storage.

The first step is to create a credentials file which will contain the username and password for accessing the file share. This needs to be in a protected area so that the details cannot be viewed. For this example, I will put the file in the root home directory.

vi /root./smbcreds

Add the following details, substituting the below details

  • [DOMAIN] – this is the domain for the file share user. This may not be required in all environments.
  • [USER] – this is the user name for the file share.
  • [PASSWORD] – this is the password of the above user.
username=[DOMAIN]\[USER]
password=[PASSWORD]

For example:

username=JAMESCOYLE\james.coyle
password=mypassword

Before continuting with the configuration, we need to make sure that the required packages are installed. On Ubuntu, you can use the apt-get command. Use your distributions package manager for other Linux distributions.

apt-get install cifs-utils

The next step is to create a folder where you will mount the Windows or samba share to in Linux. I will use the mount point /mnt/winshare.

mkdir /mnt/winshare

Now open fstab and add a new row at the bottom of the file to mount the remote share to the local folder. Add the below line to your fstab and substitute the values for your environment.

  • [SHARE_LOCATION] – is the remote host name/ DNS and shared folder name.
  • [MOUNT_LOCATION] – is the local path which will be used as the mount point for the Windows or Samba share.
  • cifs – is the type of mount to use. For older Linux systems you may need to use smbfs.
  • [CREDENTIALS_FILE] – is the location of the local credentials file.
//[SHARE_LOCATION]  [MOUNT_LOCATION]  cifs  credentials=[CREDENTIALS_FILE],iocharset=utf8,uid=1001,_netdev,file_mode=0770,dir_mode=0770 0 0

For example:

//windowsbox/sharename  /mnt/winshare  cifs  credentials=/root/.smbcreds,iocharset=utf8,uid=1001,_netdev,file_mode=0770,dir_mode=0770 0 0

Finally we need to create the mount which will use the details in fstab. Change [MOUNT_POINT] to match the mount point you created.

mount [MOUNT_POINT]

For example:

mount /mnt/winshare

Proxmox OpenVZ Container and KVM Startup and Shutdown Order

Get Social!

proxmox logo gradFrom time to time you will need to shutdown and startup your Proxmox hardware node. There are many reasons for this such as adding new hardware or to apply new kernel updates.

Before you shutdown the hardware node you must cleanly shutdown all OpenVZ containers and all KVMs. To avoid having to do this manually, Proxmox will issue all running containers and VMs the shutdown command as part of the hardware nodes shutdown procedure. Proxmox also gives us the option to specify which containers and VMs should be started when the hardware node is turned on. This means that the final part of the hardware nodes startup sequence will be to start your containers and VMs. Depending on your environment, this may need to be done in a specific order. For example you may wish your database VM or container to be started before your web application.

Enable automatic startup of containers and VMs

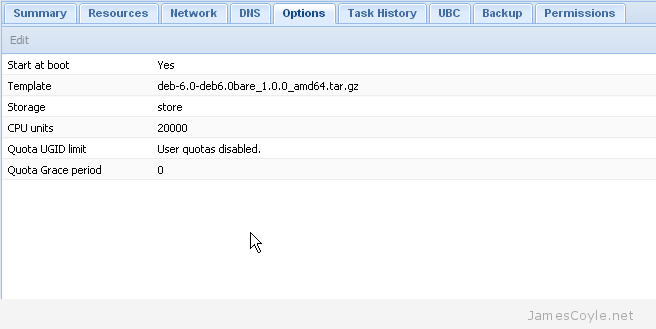
To enable the automatic startup of an OpenVZ container or VM you must specify the Start at boot attribute in the Proxmox web interface. Simply click on the Options tab of the container or VM and double click the Start at boot attribute.

proxmox-start-at-boot

Make sure the checkbox is ticked in the new dialogue box which pops up and click OK.

Your container or VM will now automatically be started when your hardware node next starts.

Startup Order for VMs

It is sometimes necessary to specify which containers and VMs startup first and how long the hardware node should wait until issuing the next startup command. This is easy for KVMs as this can be done through the Proxmox web interface.

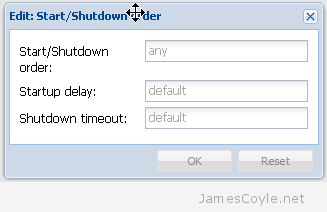
Simply click on the Options tab of the container or VM and double click the Start/Shutdown order attribute.

proxmox-start-shutdown-order

You can specify the following attributes for the KVM:

  • Start/Shutdown order – this is the order the VMs will be started in. For example, setting this to 1 will mean that this VM will be instructed to start first. You can specify the same number for multiple VMs which means that all VMs of the same number will be instructed to start at the same time. The reverse order is used when the machines are automatically shutdown.
  • Startup delay – this is the time in seconds which Proxmox will wait until moving on to the next priority. If you set a VM with a Start/Shutdown order of 1 with a Startup delay of 30, Proxmox will wait 30 seconds until instructing the VM with a Start/Shutdown order of 2 to start.
  • Shutdown timeout – when a VM is asked to shutdown, an ACPI shutdown request is sent to the VM which should initiate the guests shutdown procedure. If ACPI requests are not supported by the guest, or an exception occurs during shutdown the process may not complete. In this case the Proxmox will wait for the Shutdown timeout threshold to pass before forcefully terminate the VM. If no value is specified then the defaults are used which are 60 seconds for Containers and 180 seconds for VMs.

Any VMs which have the Start at boot attribute enabled but no Start/Shutdown order attribute will be started after all VMs with a Start/Shutdown order attribute set have been processed.

Startup Order for OpenVZ Containers

Unfortunately Proxmox has not provided this functionality in the web based GUI for OpenVZ containers. To specify the order for a container we need to use the command line on the Proxmox hardware node.

Login to your Proxmox hardware node as the root user and issue the below command to set the machine startup order. You will need to change [PRIORITY] to the priority value to use and [VMID] to the ID of the container.

vzctl set [VMID] –bootorder [PRIORITY] -save

You can use vzlist if you do not know the [VMID] of the container.

vzlist

CTID      NPROC STATUS    IP_ADDR         HOSTNAME
100       32    running   -               test.jamescoyle.net

You must have already enabled Start at boot for the container to start up. Any containers which have the Start at boot attribute enabled but no Start/Shutdown order attribute will be started after all containers with a Start/Shutdown order attribute set have been processed.


Benchmark MySQL server Performance with Sysbench

Get Social!

mysql-logoYou can spend hours tweaking the settings of a MySQL server instance to get the best possible performance for your hardware and environment. The hardest part is to ensure that the changes made are reflected with increased performance.

To ensure each change results in better performance of the MySQL server we need to measure the performance of the MySQL server before and after the change.

There are a verity of tools to automate MySQL benchmarking, one of which is Sysbench. I will be demonstrating the tests on a Debian 7 system however Sysbench will work on most common Linux distributions. Sysbench can be used to test both InnoDB or MyISAM database types in either a single server environment or a clustered environment with a single instance.

Installing Sysbench will differ on each Linux distribution; it can be downloaded and built from source from Sourceforge or installed with apt-get on Ubuntu or Debian.

apt-get install sysbench

Login to MySQL using the CLI or your favorite GUI tool and create a new database which will be used for the test. If you already have a database you can use for the test then you can skip this step. This example will use a database called dbtest for the tests.

create database dbtest;

The next step is to use the prepare statement with sysbench to generate a table in the specified database which will be used when performing tests.

From the command line, run the below command changing [USER] and [PASSWORD] to your MySQL access credentials.

sysbench --test=oltp --oltp-table-size=1000000 --mysql-db=dbtest --mysql-user=[USER] --mysql-password=[PASSWORD] prepare

sysbench 0.4.12:  multi-threaded system evaluation benchmark

No DB drivers specified, using mysql
Creating table 'sbtest'...
Creating 1000000 records in table 'sbtest'...

This has created a table called sbtest with 1000000 rows of data which will be used for testing. The below commands show the the created table and do not need to be executed.

mysql> use dbtest;
Reading table information for completion of table and column names
You can turn off this feature to get a quicker startup with -A

Database changed
mysql> show tables;
+------------------+
| Tables_in_dbtest |
+------------------+
| sbtest           |
+------------------+
1 row in set (0.00 sec)

mysql> SELECT COUNT(*) FROM sbtest;
+----------+
| COUNT(*) |
+----------+
|  1000000 |
+----------+
1 row in set (0.12 sec)

The next step is to being the performance tests. There are multiple parameters which can be changed to alter the test performed but we will do a simple read write test. Again you will need to change [USER] and [PASSWORD] to your MySQL access credentials.

sysbench --test=oltp --oltp-table-size=1000000 --oltp-test-mode=complex --oltp-read-only=off --num-threads=6 --max-time=60 --max-requests=0 --mysql-db=dbtest --mysql-user=[USER] --mysql-password=[PASSWORD] run

To perform a read only test, change the above parameter oltp-read-only=off to oltp-read-only=on.

The results will look similar to the below output. The main statistic to look for is transactions which shows the number of transactions the test managed to complete, and how many per second.

sysbench 0.4.12:  multi-threaded system evaluation benchmark

No DB drivers specified, using mysql
Running the test with following options:
Number of threads: 6

Doing OLTP test.
Running mixed OLTP test
Using Special distribution (12 iterations,  1 pct of values are returned in 75 pct cases)
Using "BEGIN" for starting transactions
Using auto_inc on the id column
Threads started!
Time limit exceeded, exiting...
(last message repeated 5 times)
Done.

OLTP test statistics:
    queries performed:
        read:                            456680
        write:                           163100
        other:                           65240
        total:                           685020
    transactions:                        32620  (543.63 per sec.)
    deadlocks:                           0      (0.00 per sec.)
    read/write requests:                 619780 (10329.05 per sec.)
    other operations:                    65240  (1087.27 per sec.)

Test execution summary:
    total time:                          60.0036s
    total number of events:              32620
    total time taken by event execution: 359.8823
    per-request statistics:
         min:                                  1.66ms
         avg:                                 11.03ms
         max:                                981.94ms
         approx.  95 percentile:              15.13ms

Threads fairness:
    events (avg/stddev):           5436.6667/31.44
    execution time (avg/stddev):   59.9804/0.00

Finally, you need to clean up your test area. If you can drop the entire database which was used for testing then login to MySQL and run the below command.

drop database dbtest;

If you are unable to drop the whole database then Sysbench comes with a cleanup command. Again you will need to change [USER] and [PASSWORD] to your MySQL access credentials.

sysbench --test=oltp --mysql-db=dbtest --mysql-user=[USER] --mysql-password=[PASSWORD] cleanup


New Proxmox BETA – now with Ceph

Category : Tech News

Get Social!

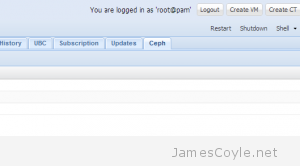
ceph-tab-proxmoxProxmox has just released a new feature to the Proxmox VE software – Ceph integration. It is currently in BETA and available to test from the pvetest repository.

Ceph is a distributed storage engine which is designed to work over many nodes to provide resilient, highly available storage.

You will need to add the pvetest repository to your Proxmox installation by adding the below line to your apt sources file.

vi /etc/apt/sources.list

You may only need to add pvetest if you already have an entry similar to below. If not, add the full line to the bottom of the file.

http://download.proxmox.com/ debian wheezy pvetest

The set up and installation of Ceph is detailed on my Ceph storage on Proxmox blog post.


Visit our advertisers

Quick Poll

What type of VPN protocol do you use?

Visit our advertisers